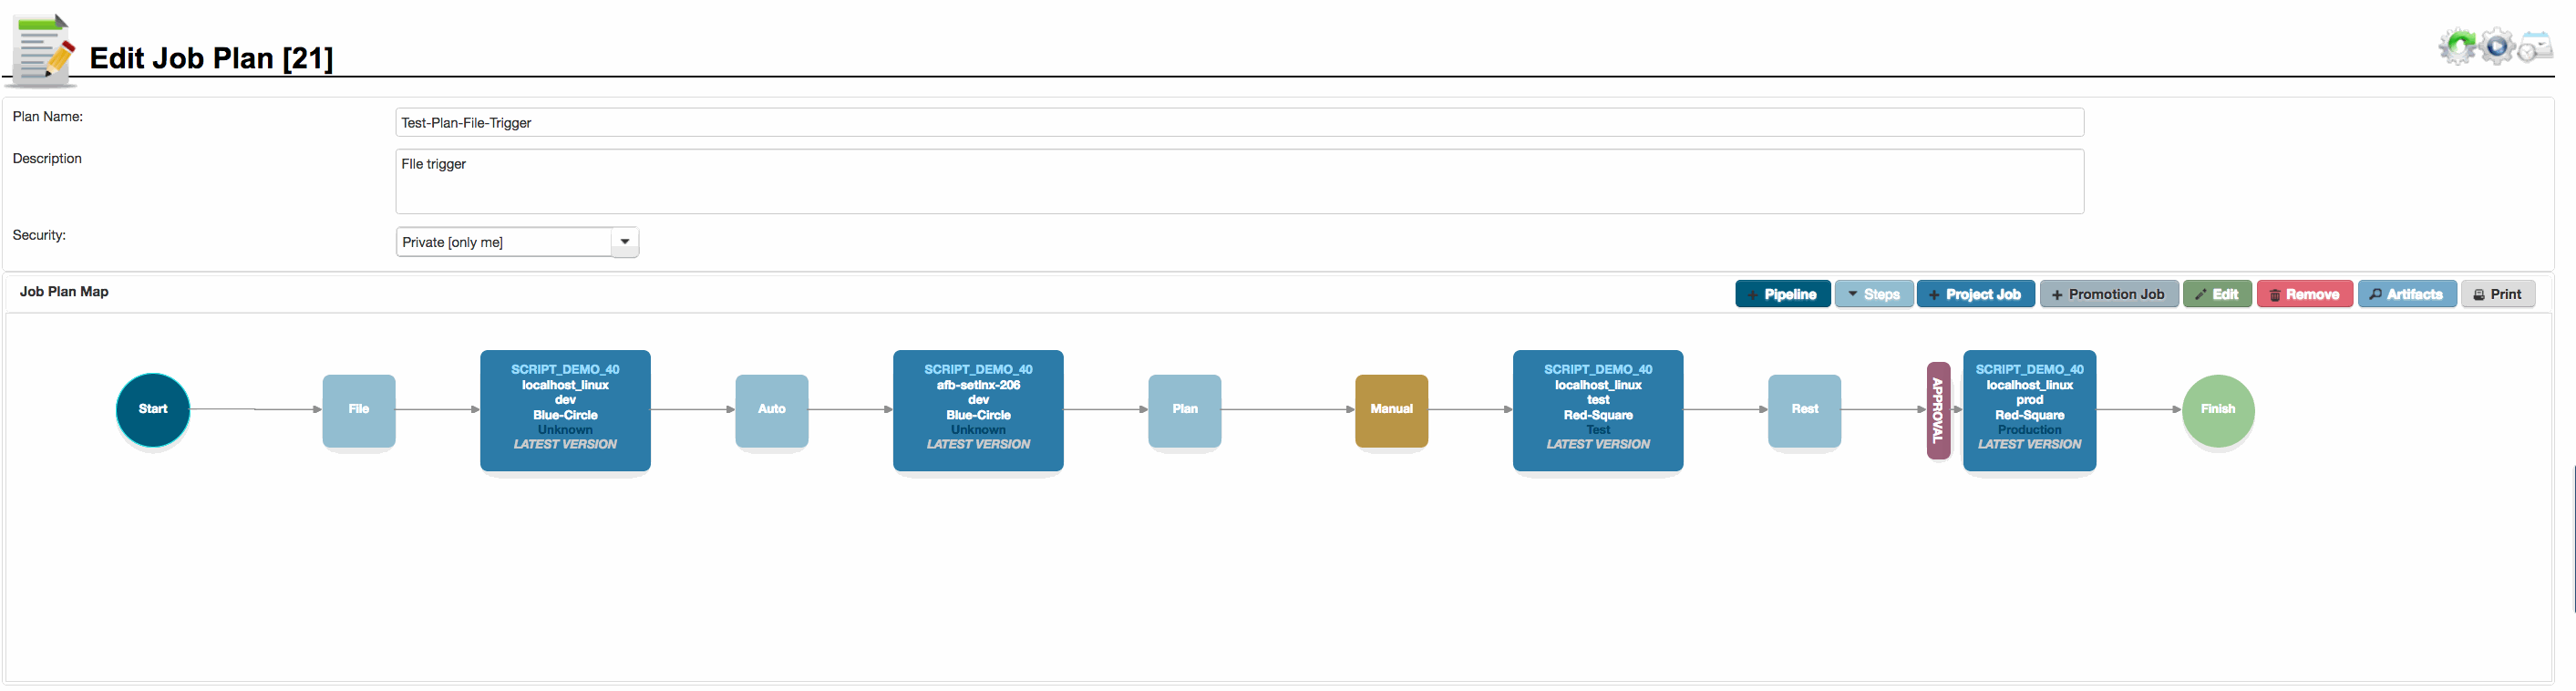
Pipeline Steps Explained

Pipeline steps in RapidDeploy

 Pipeline steps can be inserted between project jobs in the deployment pipeline. You can insert as many pipeline steps as you need between the project jobs. 
The pieline steps you see will depend on the installed plugins. Here we consider the main ‘out-of-the-box’ pipeline steps.

Job Plan Map Canvas

The Job Plan map canvas, showing File, Auto, Child-Plan, Manual and Rest step types in a single pipeline.

1. The Pipeline Automatic Step


You can configure a pipeline step by selecting ‘+ Step’ from the Pipeline task bar.

First, select the preceeding node, step or project target in the job plan, then click  ‘+ Step’ from the Pipeline task bar.

By default the step is ‘Auto‘, making this an automatic step. This is the default pipeline step type, and moves to the next set of project jobs once the previous set of project jobs have all completed.

You can chain any number of steps together between project jobs. The remaining sections detail the most important step types, but there are many others that you can choose from and add in the same way as shown below.

Click to enlarge

2. The Pipeline Manual Step


You can configure a pipeline step to be manual, by selecting ‘+ Step’ from the Pipeline task bar. By default you will get an ‘Auto‘ step. Highlight this step and click the green ‘Edit‘ button in the task bar. Alternatively double click on the step or right click and choose ‘Edit‘. 

Select the ‘Manual step‘ from the ‘Select type‘ drop down list.

You can choose from the drop list who can resume the job, which can be a member of the chosen security group.

You can allow the manual step to remain active forever (until resumed) or timeout after a certain time and either continue to the next job, or end the pipeline.

Please note that the manual step is not the same as an approval gate (see later)

Click to enlarge

3. The Pipeline to Pipeline Step


You can configure a pipeline step to call another pipeline, by selecting ‘+ Step’ from the Pipeline task bar. By default you will get an ‘Auto‘ step. Highlight this step and click the green ‘Edit‘ button in the task bar. Alternatively double click on the step or right click and choose ‘Edit‘. 

Select the ‘Job Plan Execution step‘ from the ‘Select type‘ drop down list.

The dialog is shown to the right. Select the pipeline to call from this pipeline, the execution policy and whether this pipeline will wait for the child pipeline (synchronous) or continue in parallel (asynchronous).

You can add as many child pipeline steps as you like to a parent pipeline.

Click to enlarge

4. The REST Call Step


You can configure a pipeline step to call any other service with a RESTful API, by selecting ‘+ Step’ from the Pipeline task bar. By default you will get an ‘Auto‘ step. Highlight this step and click the green ‘Edit‘ button in the task bar. Alternatively double click on the step or right click and choose ‘Edit‘. 

Select the ‘Rest call step‘ from the ‘Select type‘ drop down list.

The dialog is shown to the right. 

Configure the REST call with an expected succesful response, which will trigger the move to the next step in the pipeline.

Optionally also configure a failure response, which will trigger a failure condition.

Configure a polling interval and max number of polls, or set to zero to wait forever for the response.

The tabs allow you to configure Header, Query and Post paramters for the REST call

Click to enlarge

5. The Event Step


You can configure a pipeline step to advance on event, by selecting ‘+ Step’ from the Pipeline task bar. By default you will get an ‘Auto‘ step. Highlight this step and click the green ‘Edit‘ button in the task bar. Alternatively double click on the step or right click and choose ‘Edit‘. 

Select the ‘File Check step‘ from the ‘Select type‘ drop down list.

The dialog is shown to the right. 

Configure the step to check for an event on any target server defined in RapidDeploy. The event can be a file date, size or content change.

Configure the remote server, the remote file path and the type of verification to perform.

When the change is detected, the workflow moves to the next step.

Click to enlarge