Create a Job Plan
How to create a Job Plan in RapidDeploy
A Job Plan consists of a set of pipelines. Thes are split into ‘Deployment Pipelines‘, ‘Failure Pipelines‘ and ‘Rollback Pipelines‘. A Job Plan must contain at least one ‘Deployment Pipeline‘. It may optionally contain further deployment pipelines that can run either synchronously (from top to botton) or asynchronously with all deployment pipelines running in parallel.
Each Deployment pipeline may additionally specify one optional ‘Rollback Pipeline‘, called in the event that the pipeline is successful but needs to be rolled back at a later date.
Each Deployment pipeline may additionally specify some ‘Failure Pipelines‘, which can contain jobs to run in the event of failure. The jobs to run may be different depending on the point reached in the Pipeline.
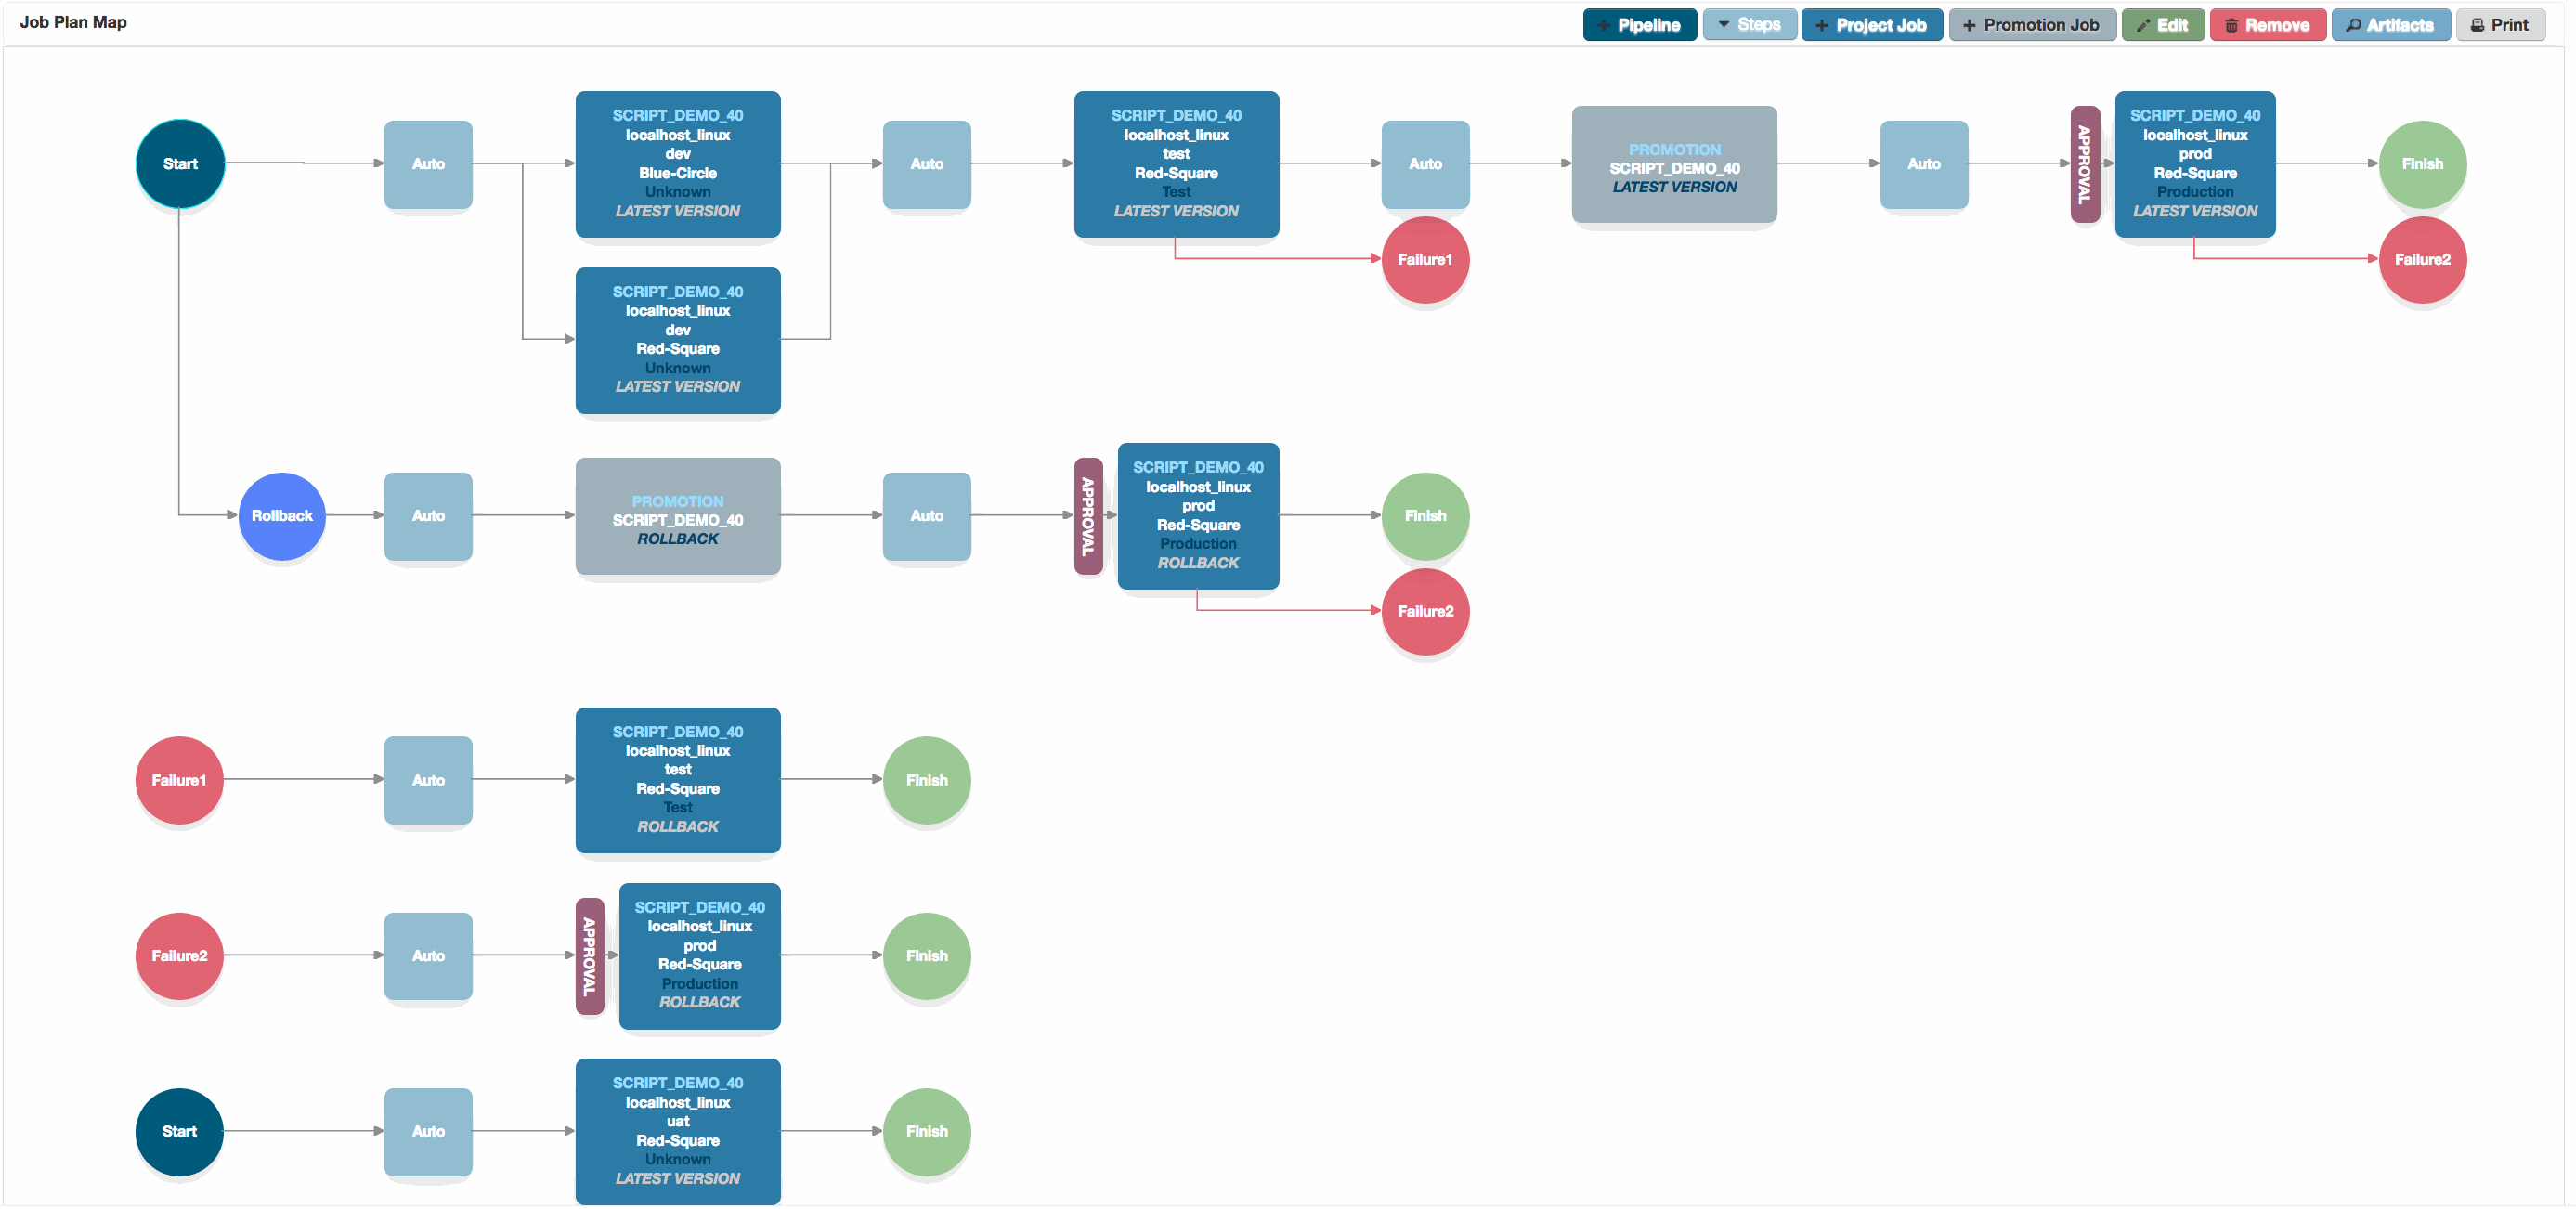
Job Plan Canvas
The Job Plan canvas, showing two standard pipelines, as well as configured failure and rollback pipelines.
1. What is a Pipeline?
All pipelines contain a ‘Start‘ and a ‘Finish‘ node. Between these two node we can place any combination of ‘Steps‘, ‘Project Jobs‘ and ‘Promotion Jobs‘. Additionaly we may have some ‘Approval Gates‘ configured.
A ‘Step‘ is an event which must occur in order to transition from one set of project jobs to another set. The simplest is the ‘Auto’ step that simply calls the next set of project jobs once the preceeding set have all completed successfully.
You can learn about different step types here.
A ‘Project Job‘ is a Project/Target combination, which can be executed as a Job on a target server or servers. The Project defines a model to run (Project Orchestration) and where to run it (Target), using the configuration defined for that Target, and any payload of external or internal resources.
Different Projects and targets can be combined into a Pipeline, and can run serially or in parallel. In the Pipeline shown in the main picture, most of the steps run a project job serially. The first step in the first Deployment Pipeline runs two jobs in parallel.
It is possible to combine multiple different projects and targets into a pipeline, as shown in the image to the right. In this Pipeline we deploy 3 components through three different environments, corresponding to Development, Test and then Production, with a promotion step between test and production.

Click to enlarge
2. Project Job
As described above, a ‘ Project Job ‘ is a Project/Target combination, which can be executed as a Job on a target server or servers. This defines a model to run (Project Orchestration) and where to run it (Target), using the configuration defined for that Target, and any payload of external or internal resources .
When the Project Job is executed, it will have its own entry in the ‘Running Jobs‘ and then ‘Previous Jobs‘ panel, where you can view execution progress and all Job Logs.
The Project Job consists of:
- Project Name, selected from a droplist of all projects
- Target, selected from a droplist of all targets for the selected Project
- Environment derived from the target installations parent Environment
- Version, selected from all available versions or one of the ‘special’ versions:
- NEW VERSION – A new version created for the project at the start of the pipeline.
- LATEST VERSION – The latest currently available version.
- ROLLBACK VERSION – The last successfully deployed version.
In The Example shown, we are deploying the LATEST VERSION of SCRIPT_DEMO_40 to a dev, test and uat targets, with associated environment. This will result in three Project Jobs being run serially when the Pipeline is executed.

Click to enlarge
3. Approval Gates
All targets belong to an Environment. RapidDeploy comes preconfigured with four environments, Unknown, Development, Test and Production.
Further environments can be created by a user with the correct permissions.
One or more user groups can be associated with an environment. For example the ‘Prod Approver’ group could be associated with the ‘Production‘ environment type.
When a group is associated with an environment, at least one user from each such group must approve a job, before it can be authorized for deployment into any target belonging to that environment.
When one or more groups are associated with an environment for a target on a pipeline, a red ‘Approval’ gate is automatically shown in the job plan, to show that approval(s) will be required to deploy into this environment.
Hovering over the approval gate will show which groups will be required to give approval for this job.
In the image to the right, you can see approval gates for the production environment types.

Click to enlarge
4. Job Plan Failure Pipelines
If a pipeline fails during a deployment of a project target, we’ve so far seen how to take corrective measures on the target server(s) themselves. However, we might under some circumstances, want to run another job on the target to revert all the changes back to a previous version, or run some specific rollback orchestration.
To achieve this, we add failure pipelines on the Job Plan Edit canvas.
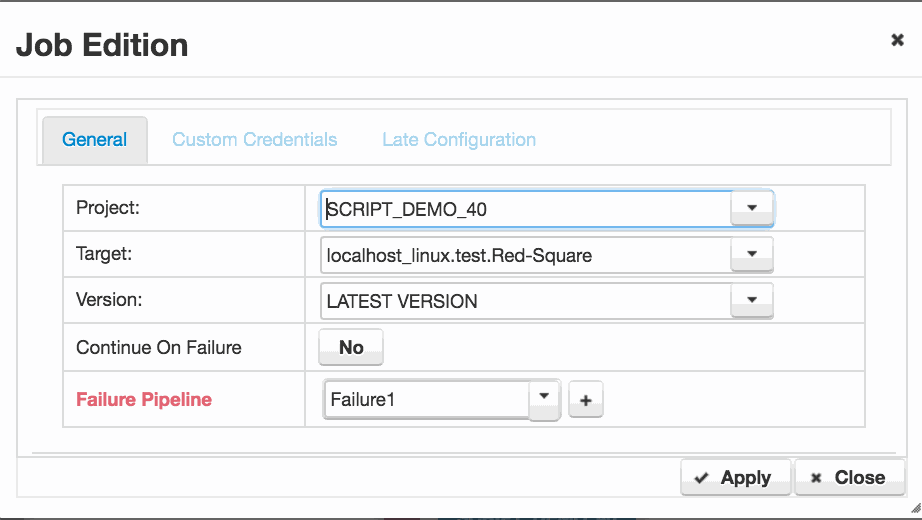
On the Job Plan Edit canvas, we can add a failure pipeline, or subscribe to an existing failure pipeline for any ‘Project Job‘.
We edit the ‘Project Job‘ and add or select a failure pipeline in the ‘Failure Pipeline‘ field.
The failure pipeline can run any project target combination in just the same way as a deployment pipeline. Typically you will run the same ‘Project Job‘ but selecting a specific version to roll back to. The special ‘ROLLBACK‘ version may also be selected, which returns the target to the previous successfully deployed version for this target.
You can see failure pipelines configured in this way in the main picture at the top of this page.
Click to enlarge
5. Rollback Pipeline
We have considered failure scenarios above. However there is also the possibility that all our deployment tasks succeed, only for us to discover that some piece of critical functionality in the deployed application is faulty. In this case we’ll need to either fix forward, or perform a rollback.
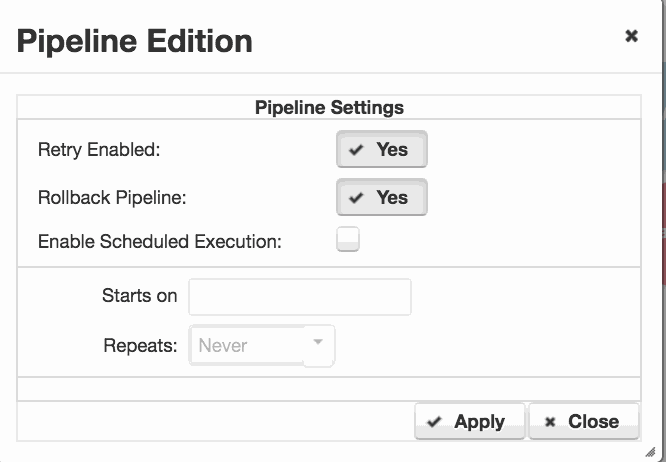
In order to be able to perform a rollback, we configure a rollback pipeline. On the ‘Start‘ point of the pipeline, we double click to open the ‘Pipeline Edition‘ dialog.
Set ‘Rollback Pipeline‘ to ‘Yes‘ and Apply the change. A rollback pipeline is automatically configured with all of the original pipeline steps, but having all versions set to ‘ROLLBACK‘ You can edit this pipeline as required to create your preferred rollback scenario.
In the example at the top of the page, we’ve removed most of the default job steps and just configured our rollback to promote and then deploy the ‘ROLLBACK‘ version to our production environment.
Click to enlarge
6. Blue – Green Deployment Pipeline
The deployment pipeline can be tailored to cater for Blue – Green deployment scenarios.
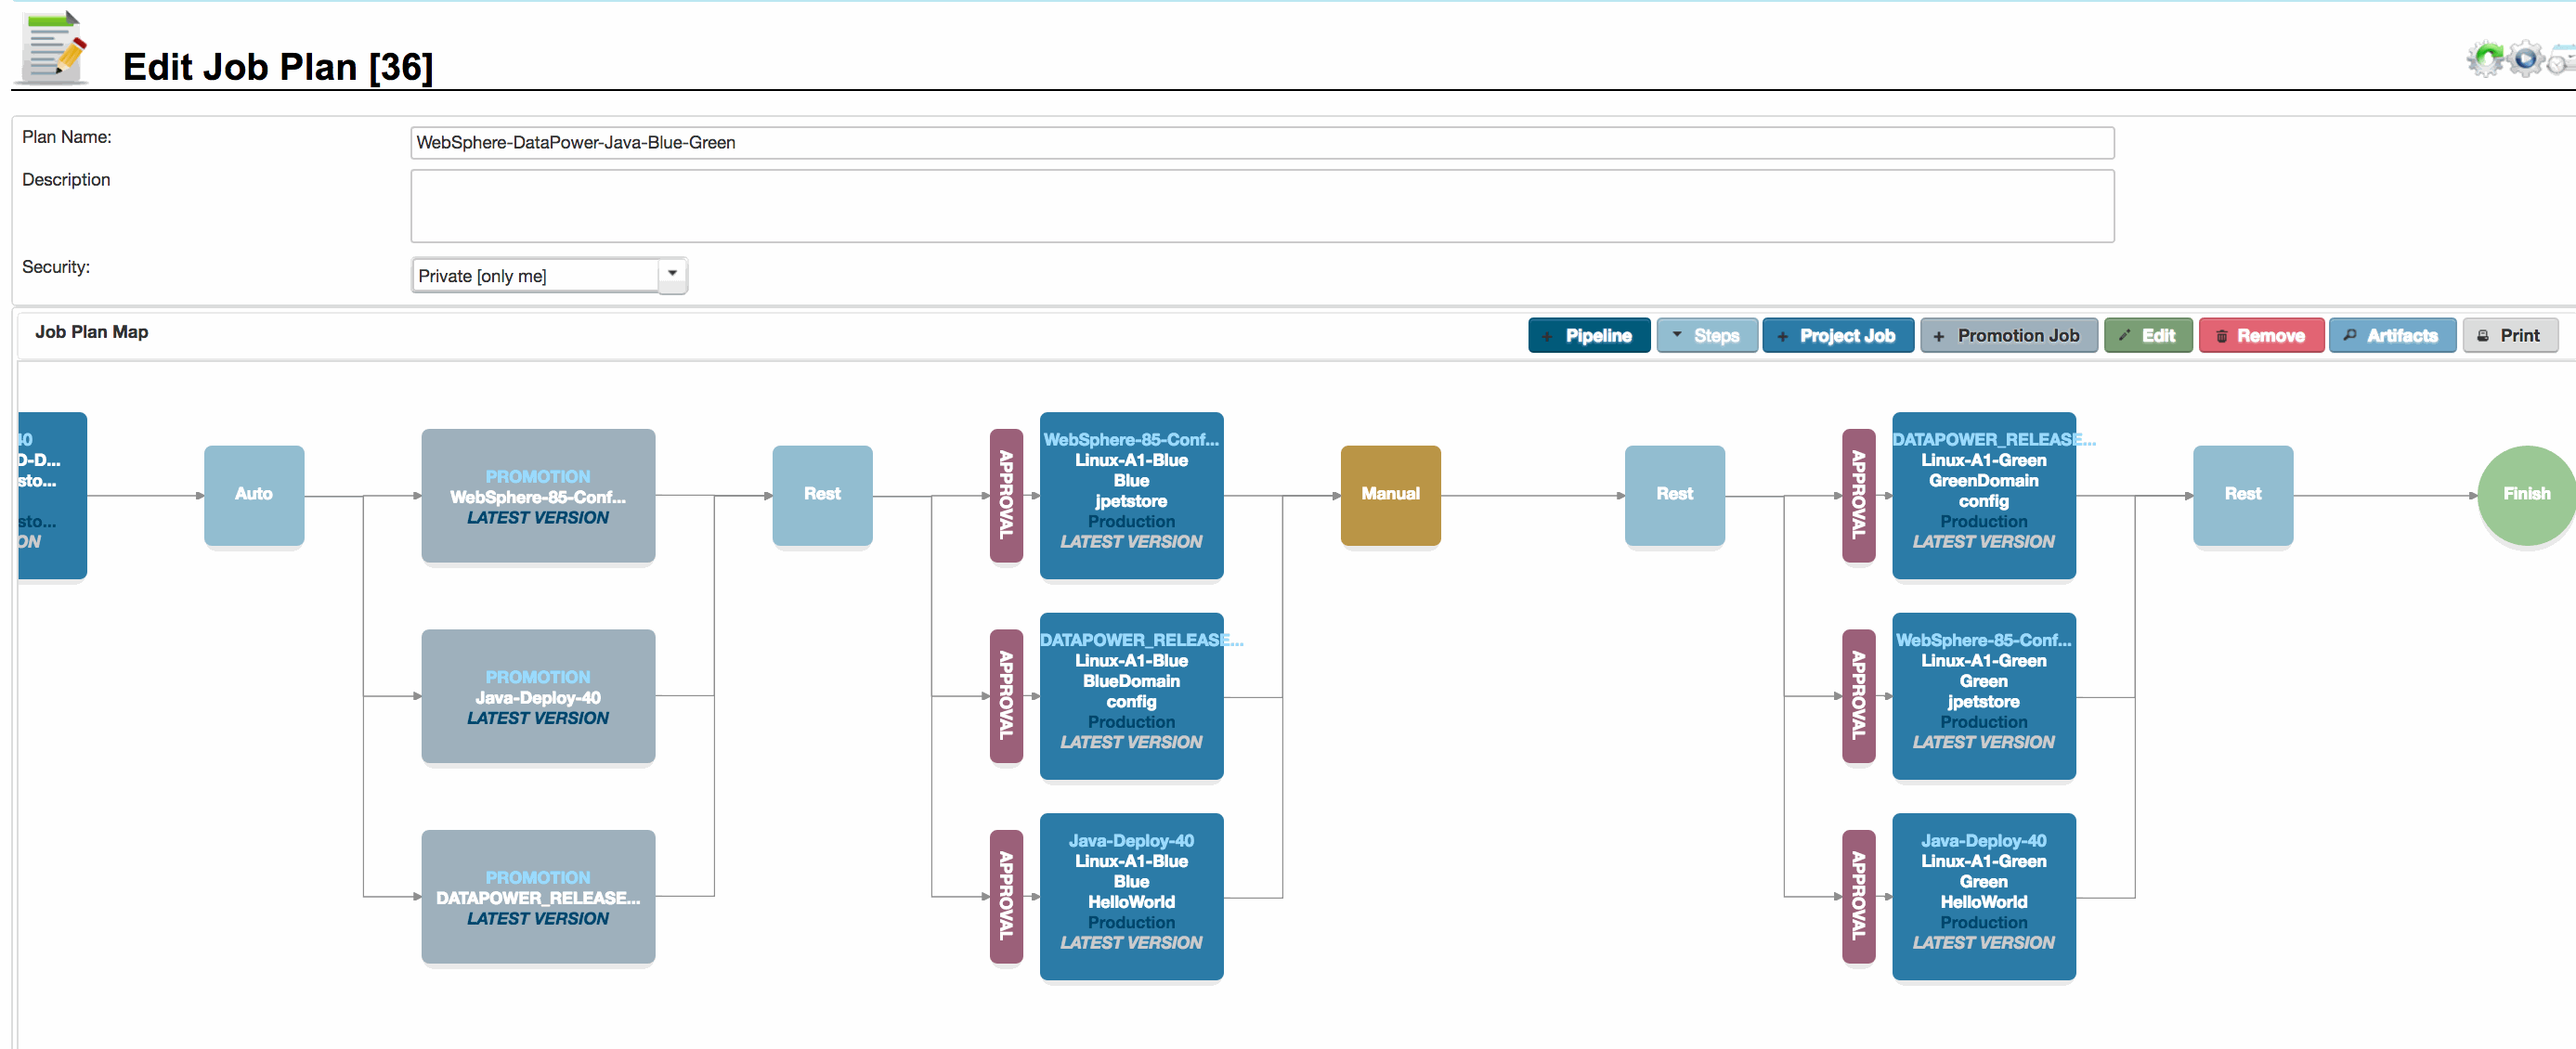
In the screenshot opposite, we are looking at the end of a pipeline that promotes and then deploys three components, first to the Blue environment, and then the green environment.
The steps are as follows:
- The versions of the three components to deploy are promoted to the production staging.
- A Rest call is made to route all traffic to the Green environment. The step will wait for confirmation. Additional Rest calls could be added here to check ticketing systems for approval etc.
- Approval gates are triggered for the three deployments.
- Once approval is granted, deployment occurs in parallel for the three components into the Blue environment.
- A manual step is triggered whilst a decision is taken to migrate traffic from Green to Blue. This step could be replaced by Rest call(s) to external ticketing or other systems.
- A Rest call is triggered to route traffic to the Blue environment. The call will wait for confirmation.
- Approval and deployment steps occur in the Green environment.
- A final Rest call is made to update a ticketing system with the success code.
A modified approach can be taken for deployment of Canary Releases.
Click to enlarge