Create a Project
How to create a Project in RapidDeploy
The main component of a Deployment Model in RapidDeploy is called the Project Orchestration. This is a series of target neutral steps that can run on any target server to deploy and/or configure a set of resources. A model can consist of multiple sub models. You access the Orchestration canvas by clicking on the ‘Projects’ icon in the icons panel at the top of any page or going to ‘Menu’ -> ‘Resources’ -> ‘Projects’ -> [Selected Project]. The orchestration Map canvas tab is the default tab when you edit a project.
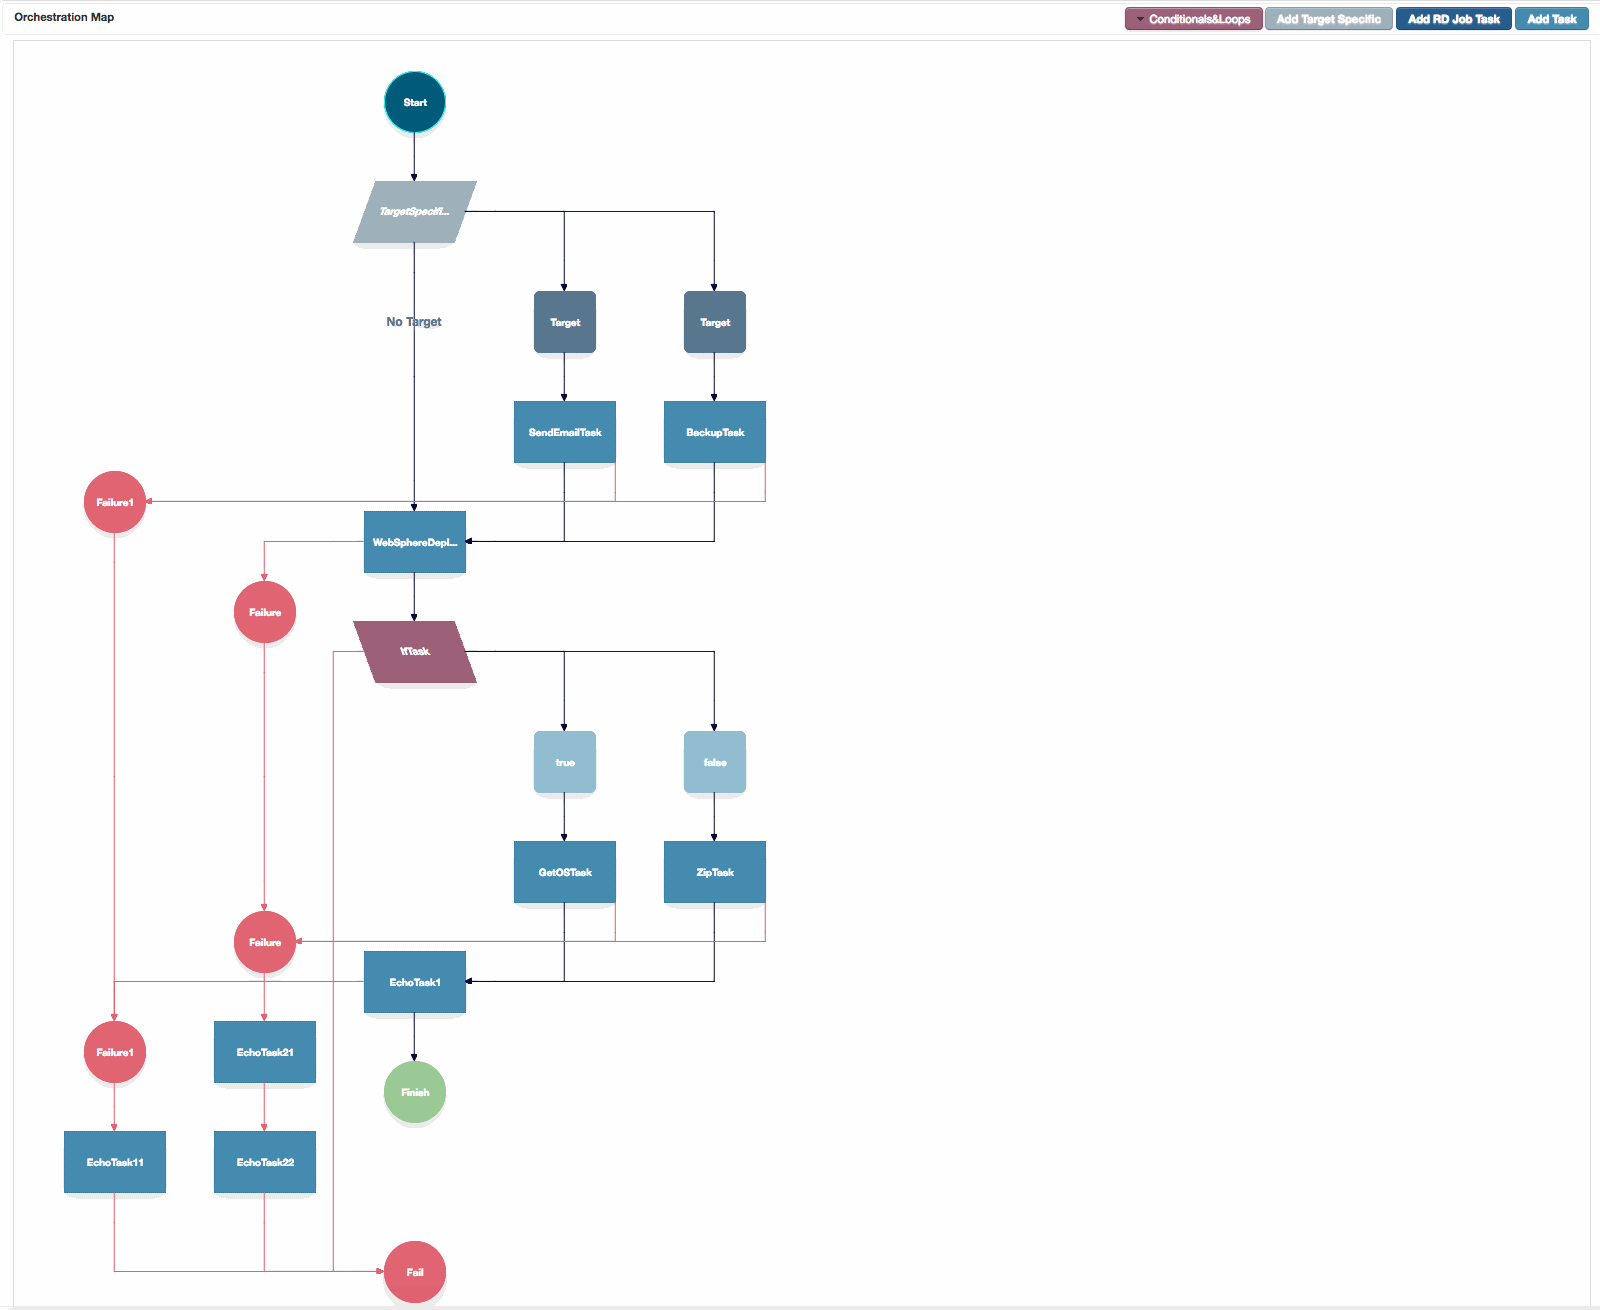
Orchestration Map Canvas
The Orchestration map canvas, showing configured failure branches, target specific tasks and a conditional.
1. The Orchestration Canvas
On the Project Orchestration tab, the Orchestration map will start with a start and finish task, and one failure branch. This is the defaut position.
Click to enlarge
2. Adding tasks to the canvas
A new task can be added by highlighting the ‘Start‘ task, and clicking ‘Add Task‘.
A dialog box will be presented, with a list of available tasks. The tasks in the list will depend on which plugins are installed. Hundreds of tasks are available out of the box.
Select the required task, and click ‘Add‘ in the top right hand corner of the dialog. You might need to scroll to see it.

Click to enlarge
3. Adding Target Specific tasks to the canvas
Ideally, the same set of task actions should run on every target where this orchestration is run. However, we have to recognise that not all targets are exactly the same and some tasks should be run on a subset of targts. For this scenario we have the ‘Target Specific‘ orchestration entry.
A new target specific orchestration entry can be added by clicking the ‘Add Target Specific‘ button.
Once the target specific task is added, you add individual targets by highlighting the ‘Target Specific‘ entry in the orchestration and on the right hand task dialog, clicking the grey ‘Add Target‘ button.
Note you can only add targets that alread exist, having been created on the ‘ Targets ‘ tab.
For each branch created, you can add any tasks that will be specific to that target.
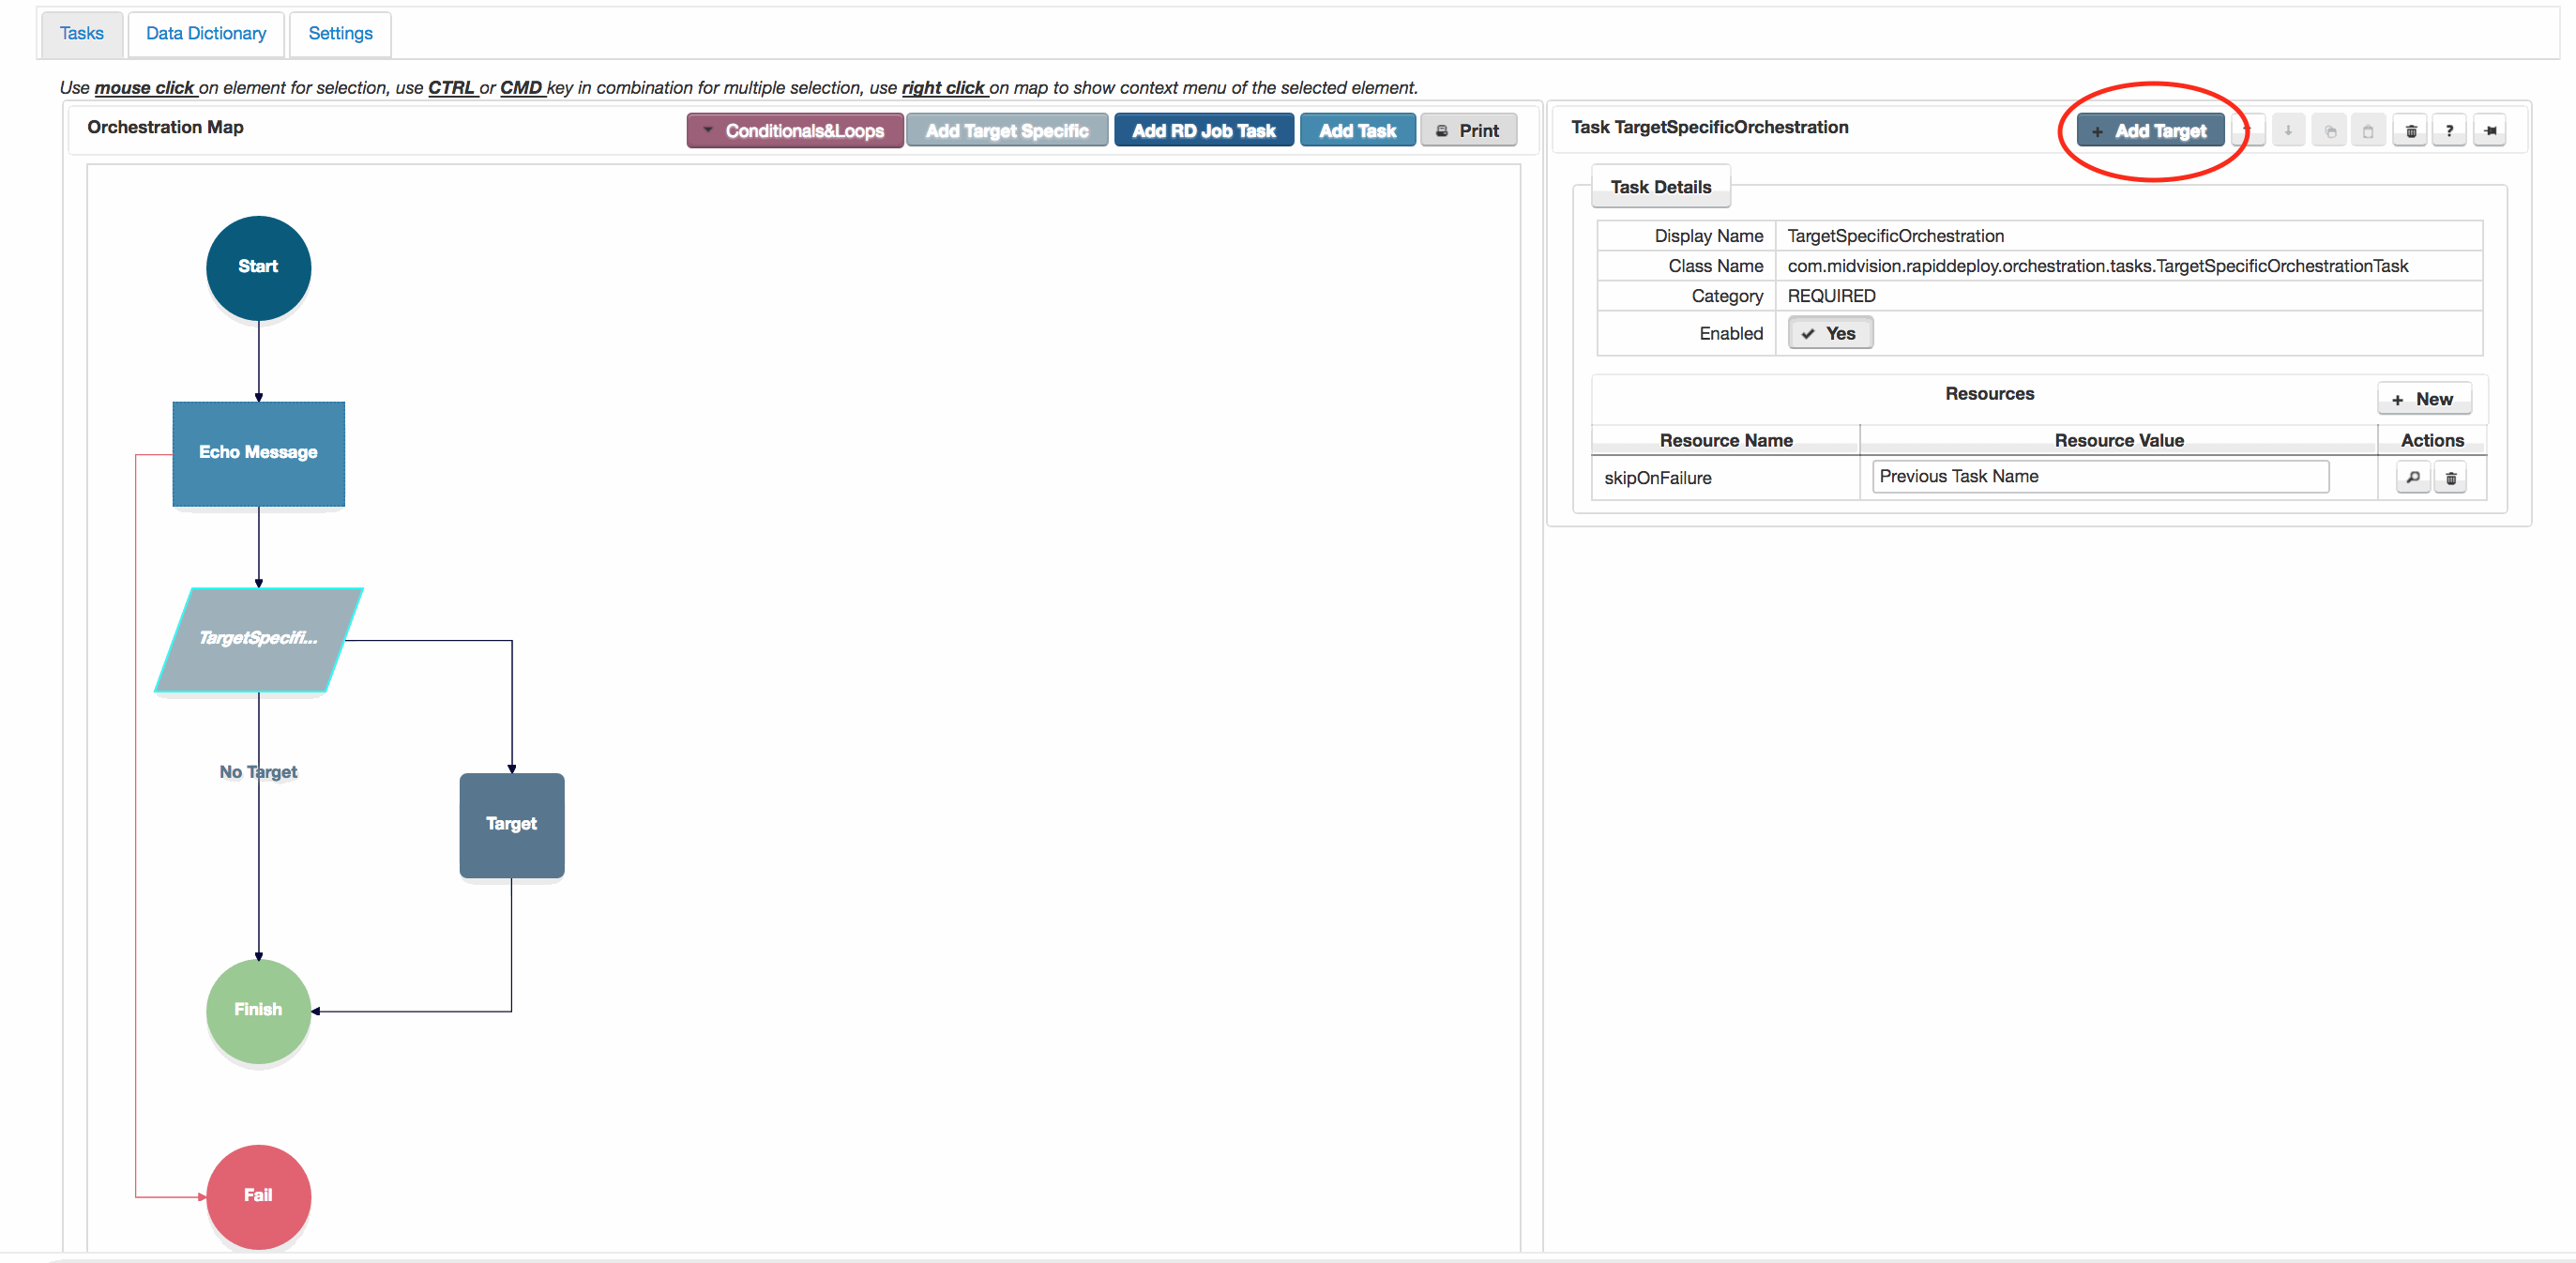
Click to enlarge
4. Adding Conditionals and loops
Conditionals and loops are meant to create simple ‘code’ constructs between tasks to allow you to orchestrate the relationship between tasks more efficiently.
If you have more complex code for specific actions, that cannot be accomplished in the set of existing tasks, then add a ‘Script Code Runner’ task and enter your bash, shell, perl, ruby or python code directly into it. The script you create can also contain any Data Dictionary values (see next sections), output parameters from previous tasks or environment variables and these will be evaluated at runtime.
A new conditional or loop task can be added by opening the red ‘Conditionals and Loops‘ button.
Highlight the point in the orchestration before the conditional or loop you want to add, and then click on the conditional or loop task you want to add in the drop-list.
Once you’ve added the conditional or loop, you can add other tasks to it. You can also nest conditionals inside loops.
Typically the conditional will act on a boolean from a previous task in the task flow. In the shown case the ‘Check File Attributes‘ task returns a check against a file to ensure it exists and is a directory. The outputParameter from this task is ${checkResult}, which we enter as the conditionParameter in the ‘If Task‘
Most tasks produce one or more output parameters, which can be defined as ${parameter-name}, and can be consumed in any field in any task later in the task flow.
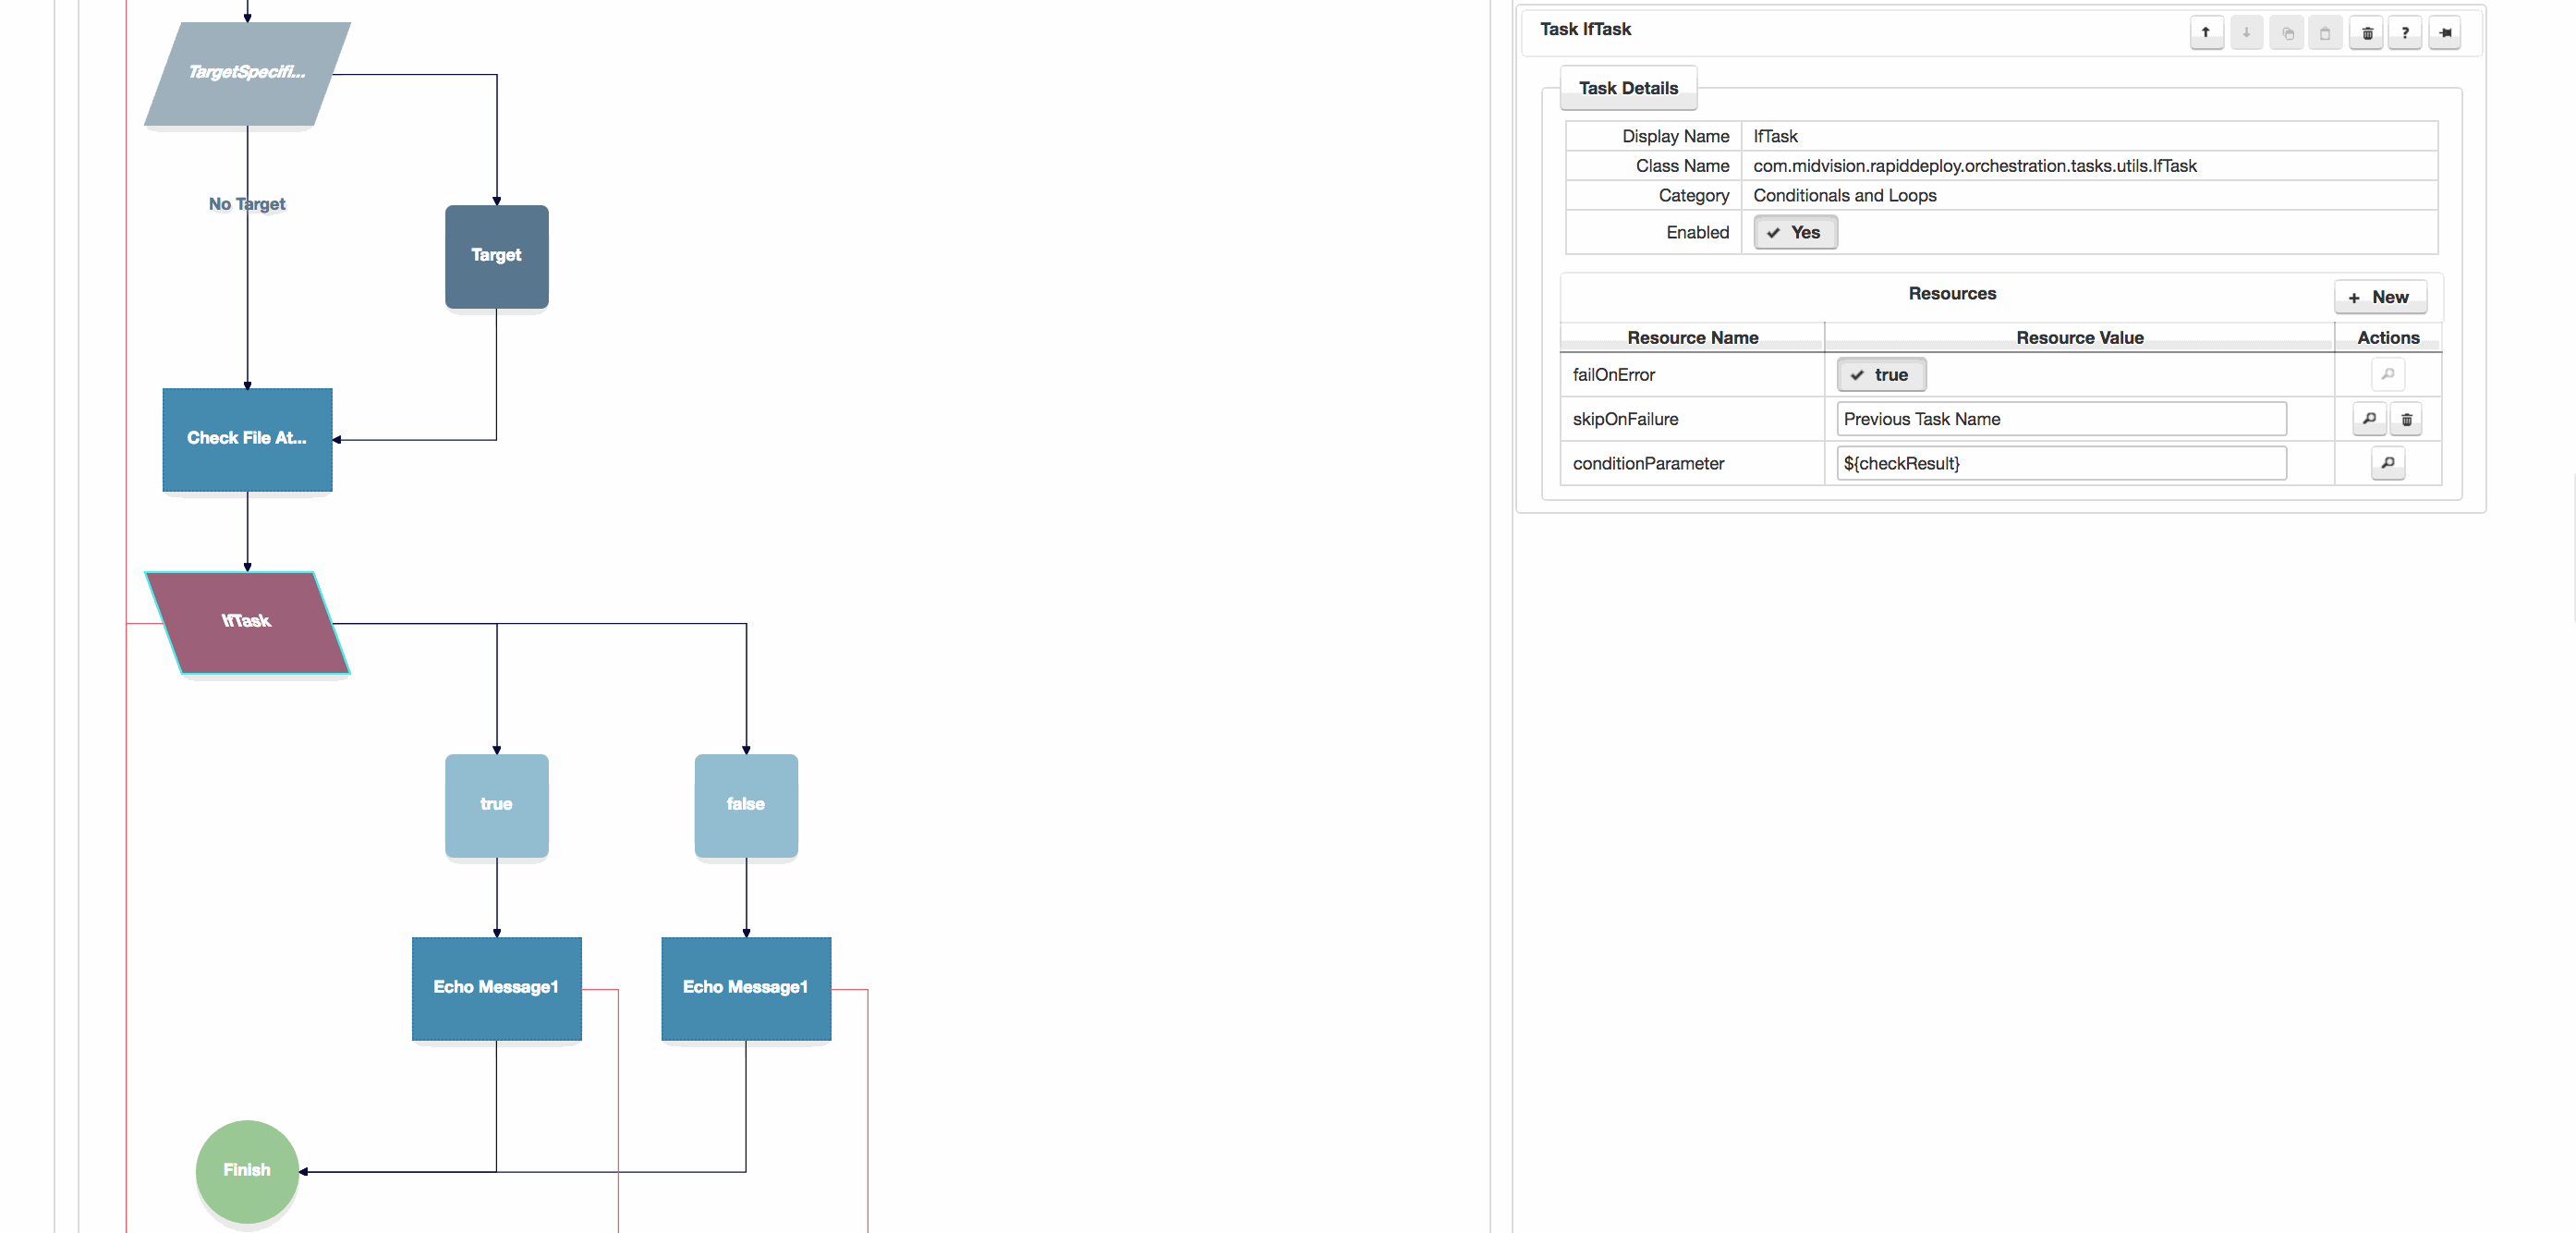
Click to enlarge
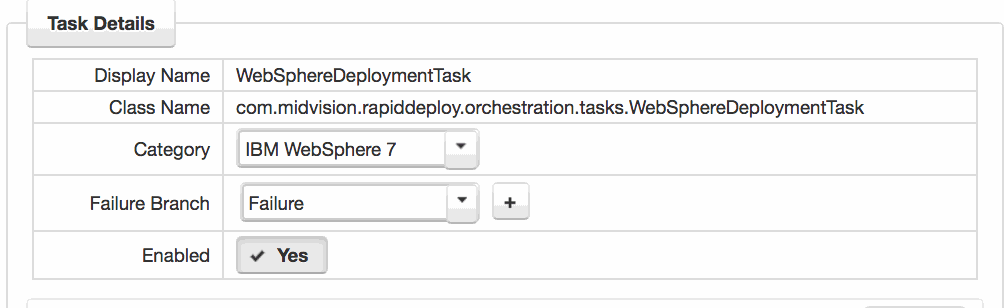
5. Adding Failure Branches
On the Project Orchestration tab, the Orchestration map will start with one failure branch. This is the defaut setting. All tasks with ‘failOnError‘ set to true will, by default, subscribe to this failure branch, which simply fails the job.
Any task can add a new failure branch, or subscribe to any other failure branch.
You can choose an existing failure branch, or add a new one by selecting the task and choosing from the drop-down in the ‘Failure branch‘ field or clicking the ‘+‘ button. You can add any tasks to the failure branch in order to accomplish the required cleanup.
See the Rollback How-To for more information.
Click to enlarge
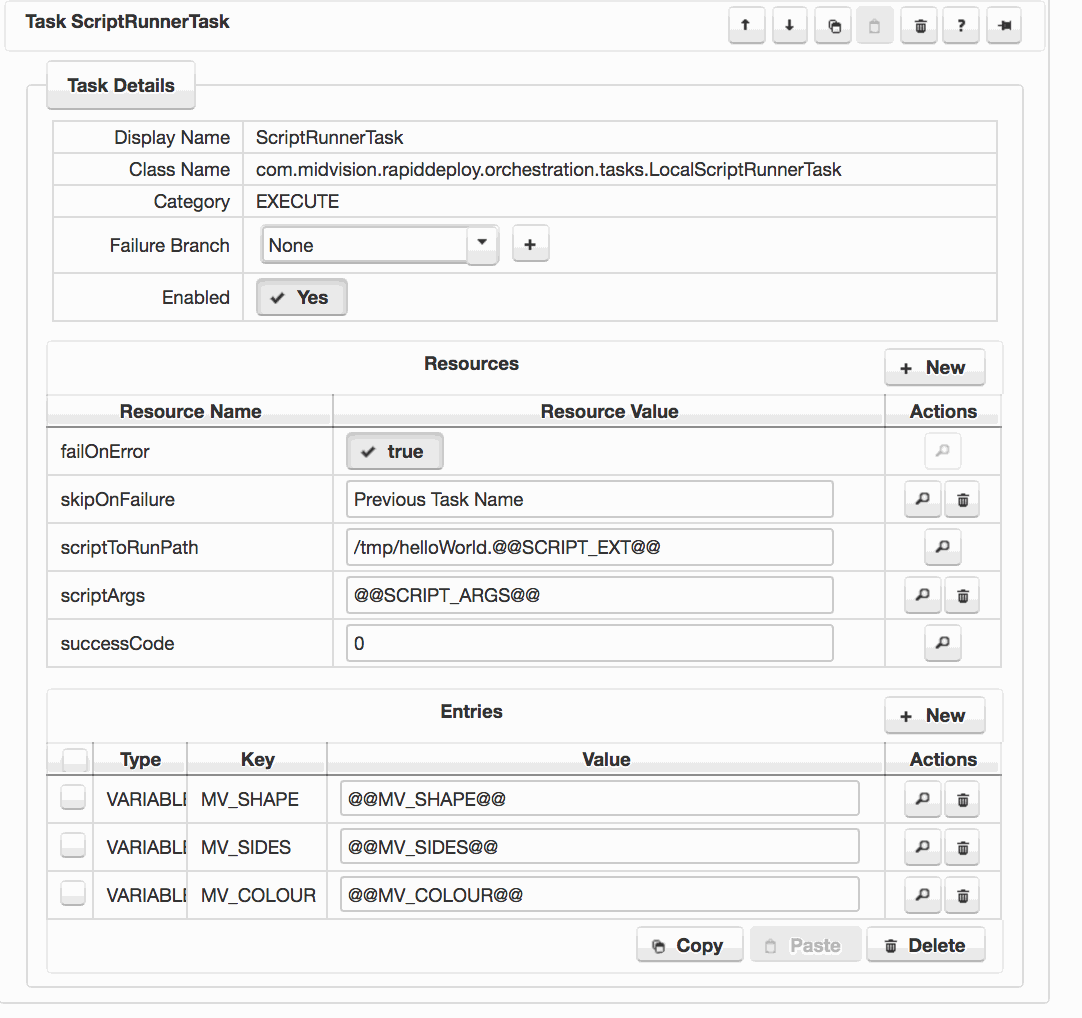
6. Data Dictionary
Target specfic values are injected into the model at deployment time using ‘Data Dictionary‘ key value pairs. These parameters are written as @@VALUE@@.
The screen shot to the right shows a task with several configured data dictionary values. These will be set to different values depending on the target that the model is being deployed to.
Data Dictionary values are scoped values that can be set at Resource, Project, Target and Job scopes.
- Resources Scope – Sets of Data Dictionary key value pairs that can be used by multiple projects. May be overridden at project, target or job scopes.
- Project Scope – Any Data Dictionary values set at project scope are used by all targets, unless overridden by the target scope. Values set at this scope will also override any with the same key name set at the resources scope.
- Target Scope – Overrides Data Dictionary values at the project or resources scope for a particular target.
- Job Scope – Overrides Data Dictionary values at the resource, project and target scopes. Can be set when a job is called via the web services interface. User is prompted to enter Job Scoped Data Dictionary values in the UI if the value is empty at the Project and Target scope. This is called ‘Late Property Injection’.
If you specify a Data Dictionary parameter and save the project, the new parameter will be discovered and added to the project scope.
Click to enlarge
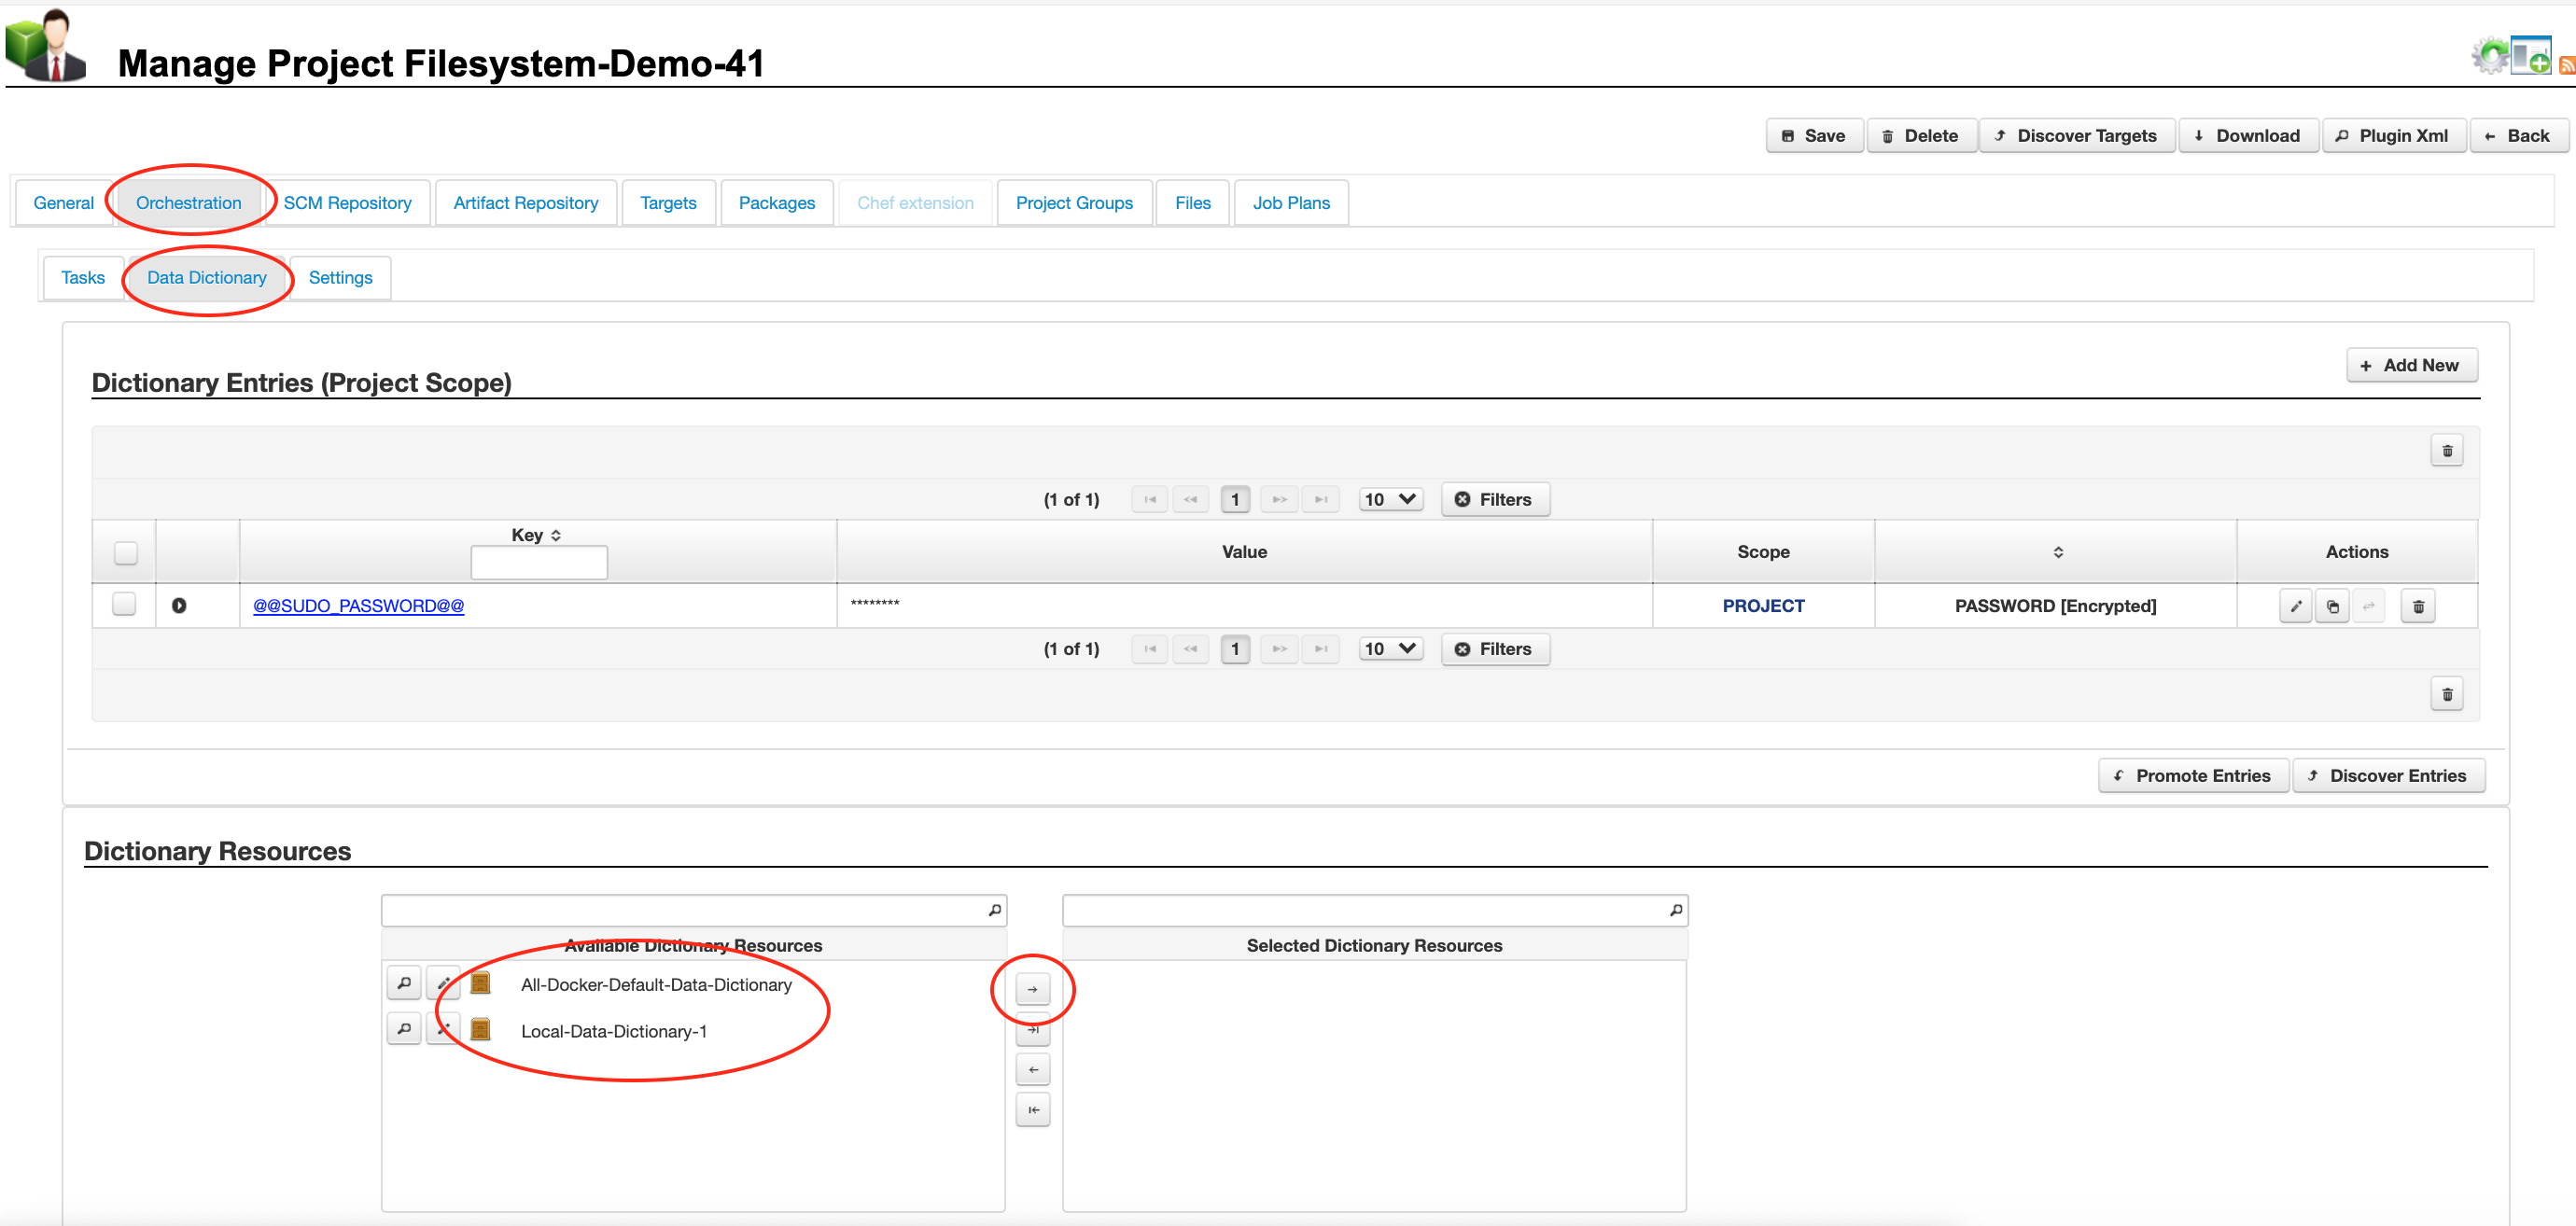
6.1 Resource Scope
You can select any Data Dictionary resources from the ‘[Project]’ -> ‘Orchestration’ tab on the ‘Data Dictionary’ sub tab from the ‘Dictionary Resources‘ list panel.
If you select data dictionary resource(s) from the resource library, these will become the default values at the project, target and job scopes, but may be overridden at the project, target or job scopes.
Click to enlarge
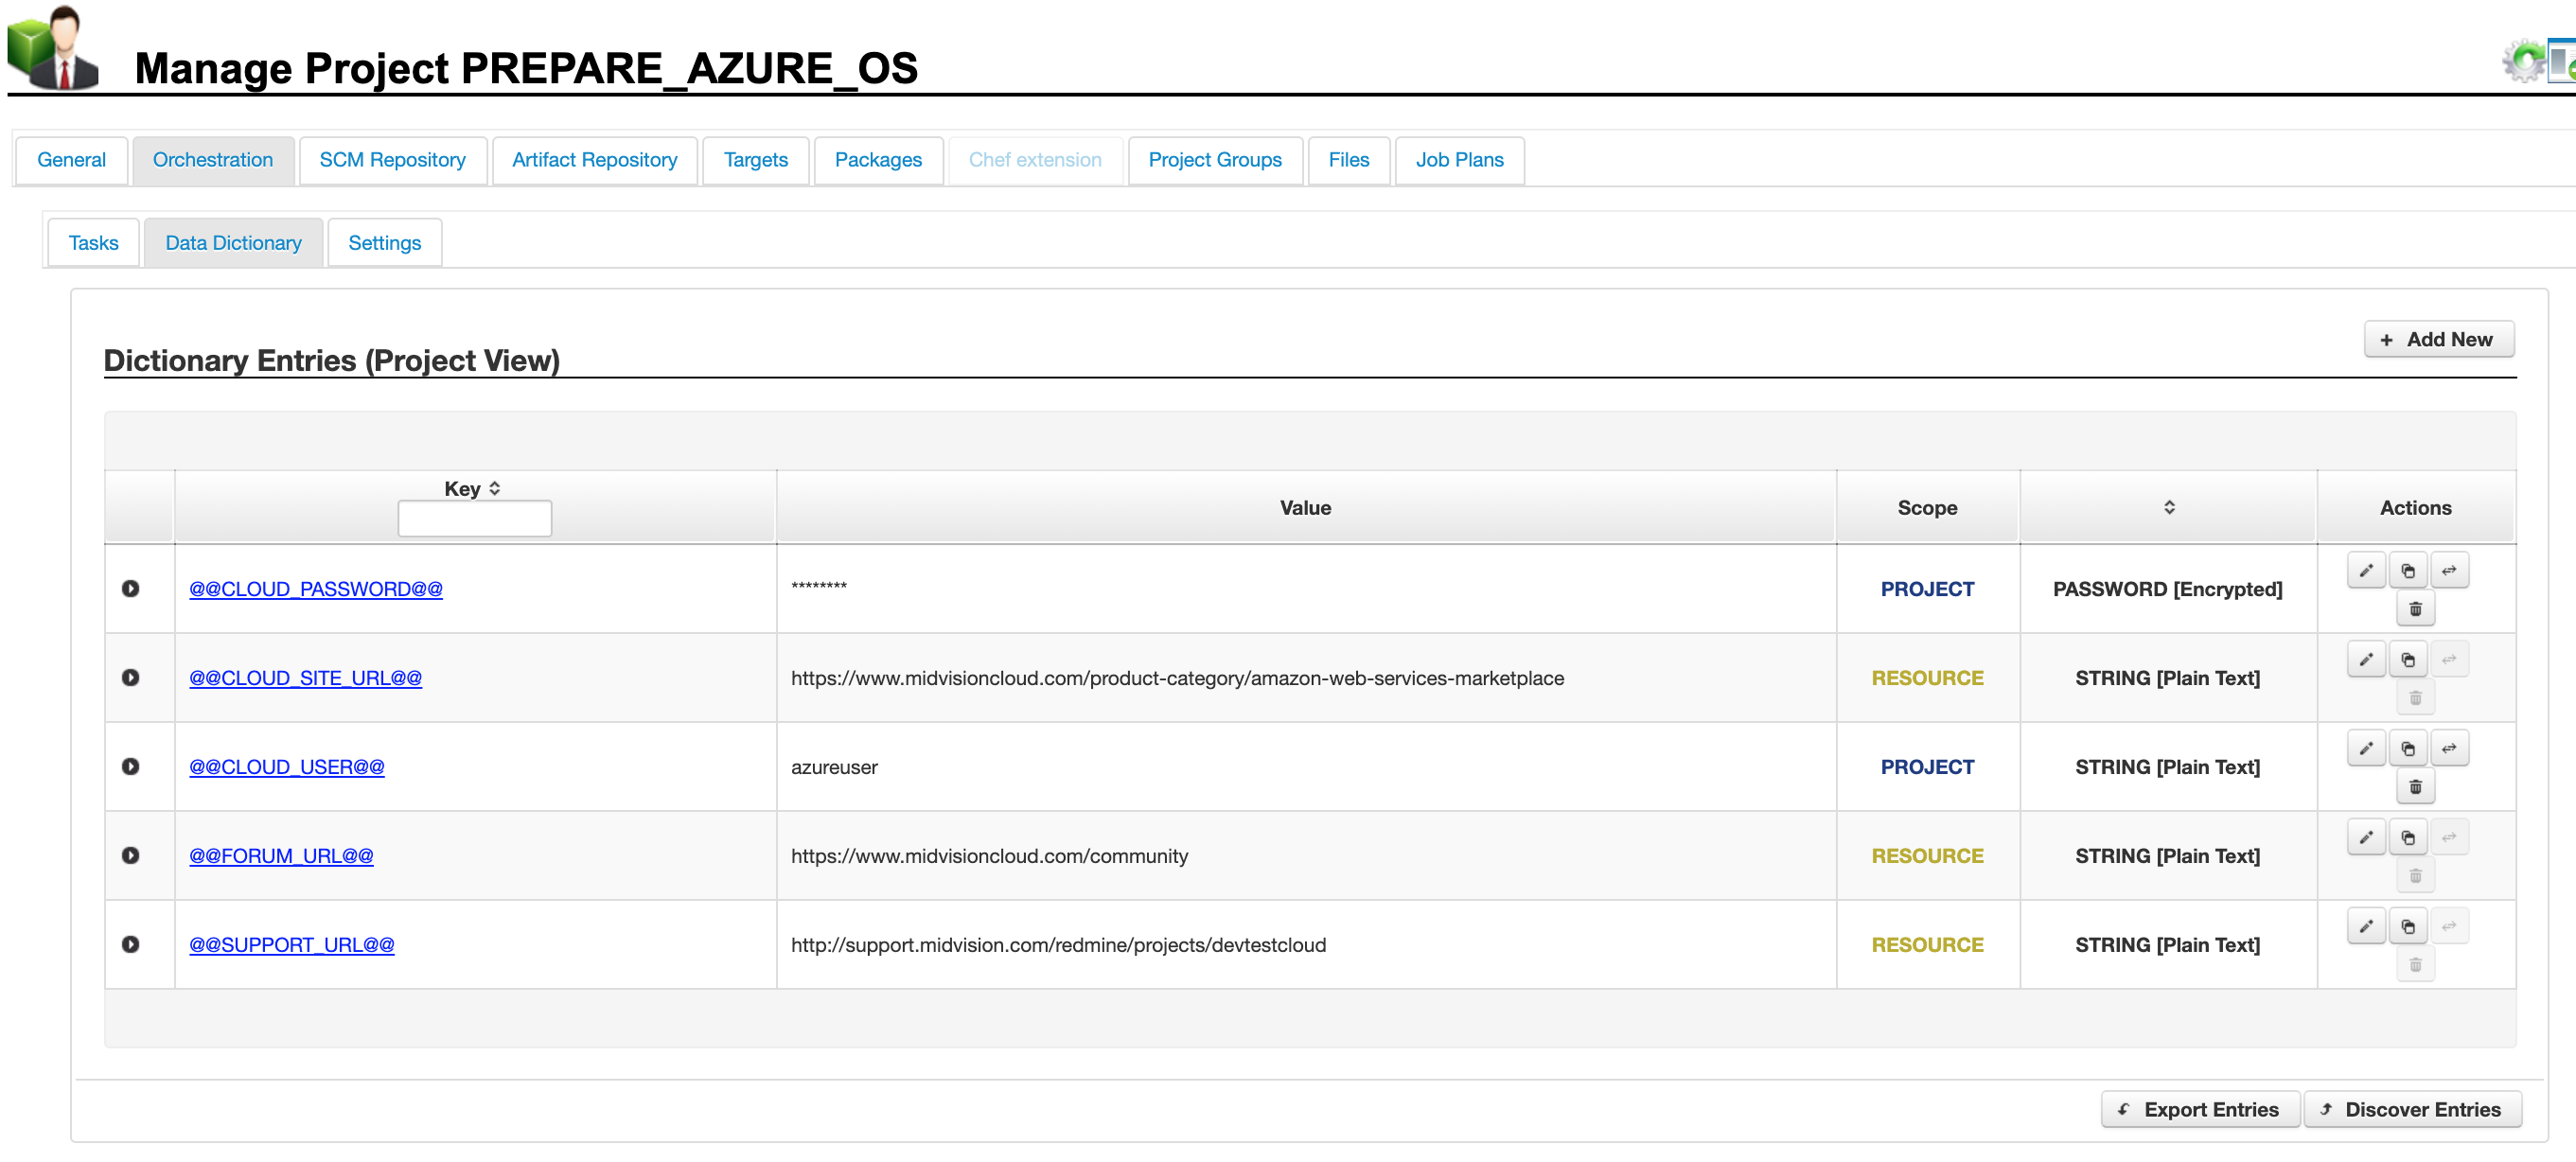
6.2 Project Scope
You can set data dictionary values at project scope, which can be overridden at target and job scope. If you have selected one or more data dictionary resources on the general tab, these will be shown here in amber as coming from the resource scope. They may be overridden.
This figure shows the resource and project scoped data dictionary values in amber and blue respectively. These values will be used unless overridden at the target or job scopes.
Click to enlarge
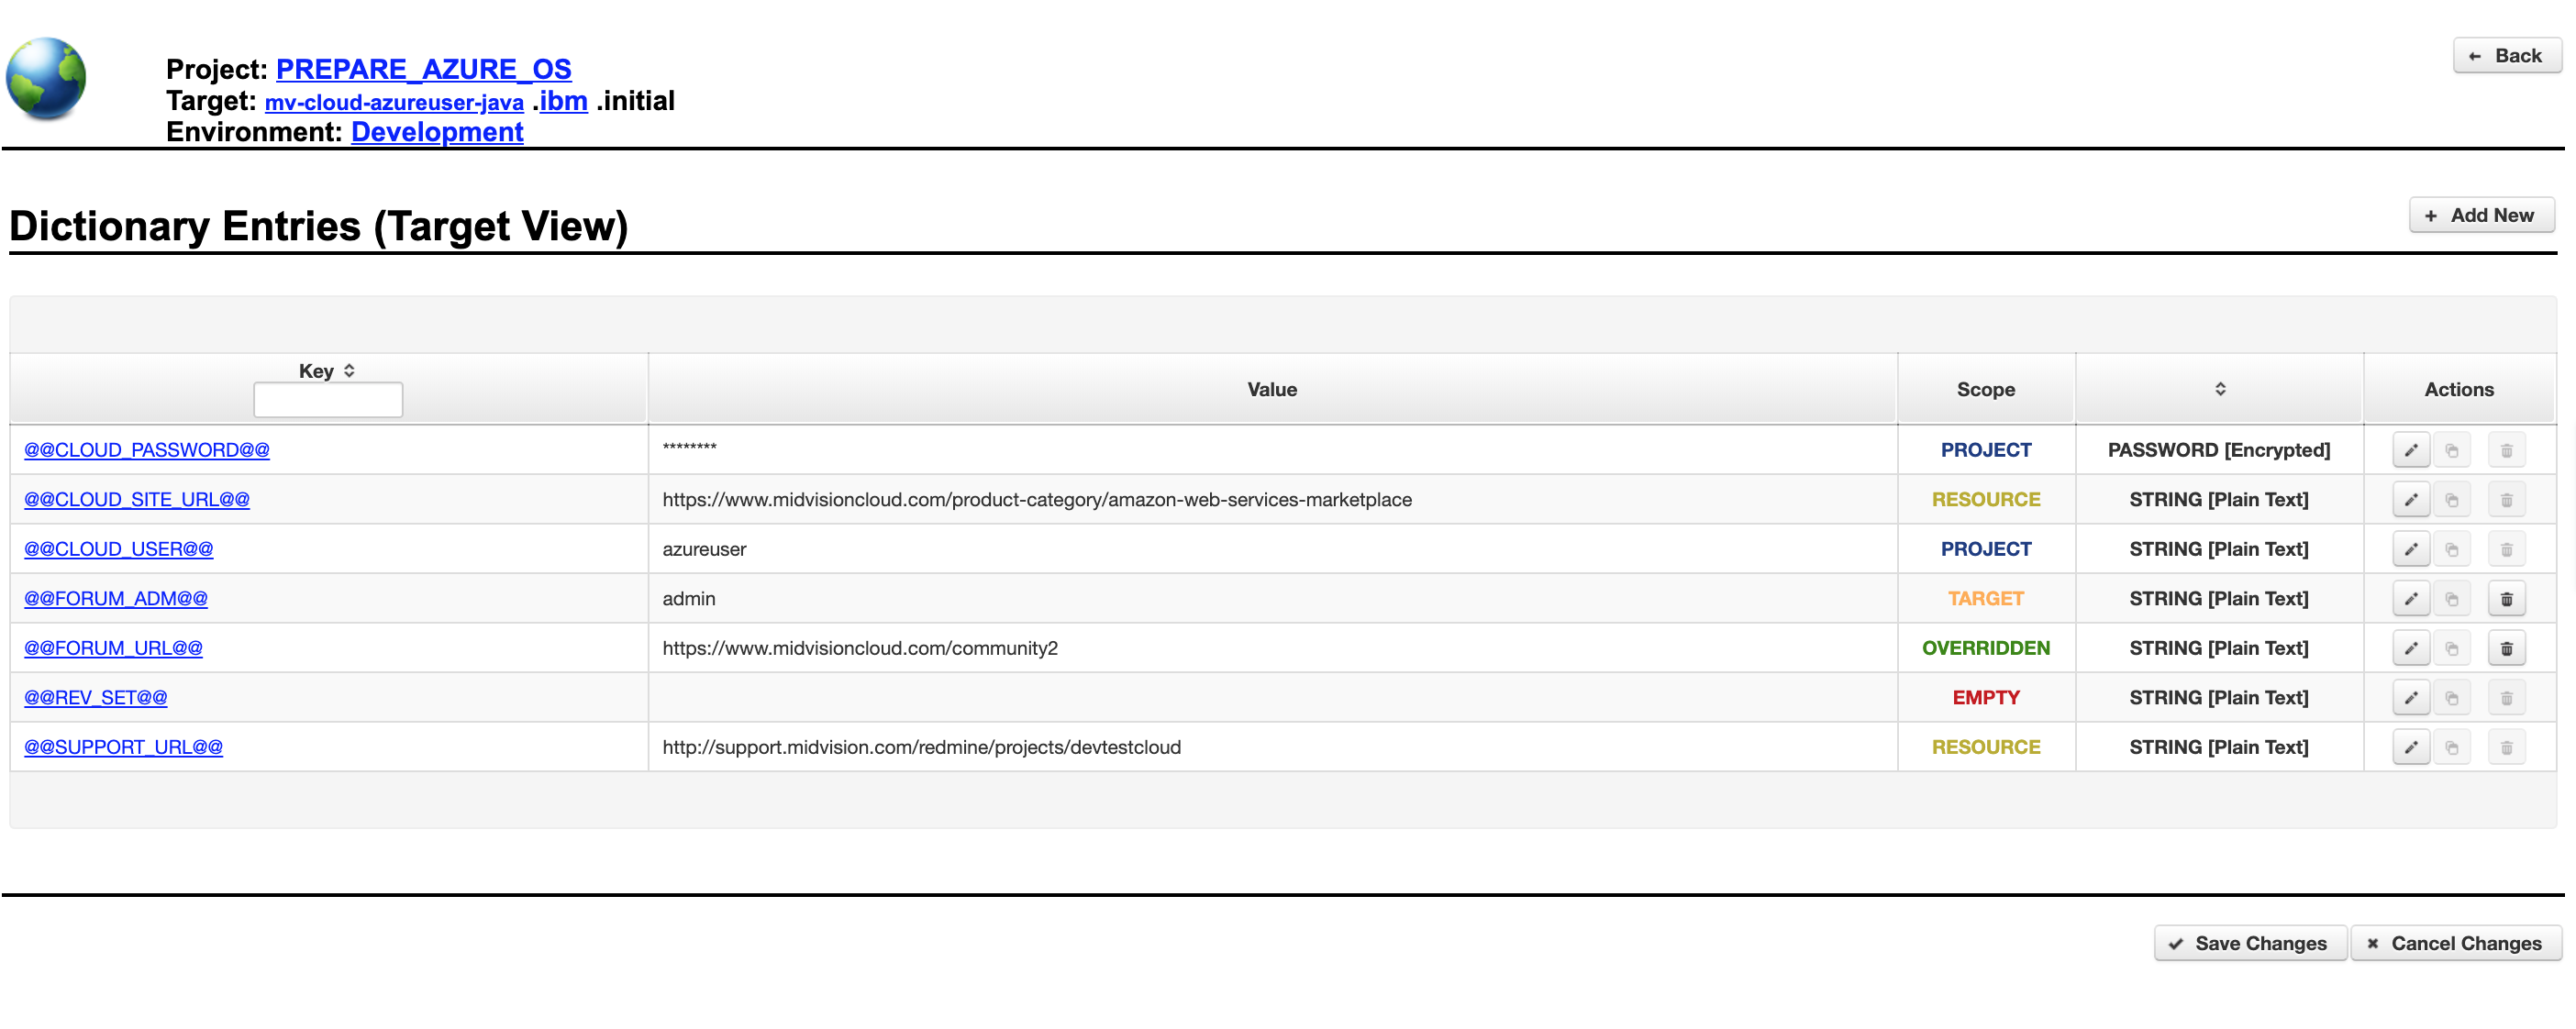
6.3 Target Scope
This panel shows the Target scoped data dictinary values. The colour coding makes it is easy to see which values are overridden, and which are inherited.
The red ‘Empty’ indicates the value is empty at both scopes. We call this ‘Late Property Injection‘. The user is prompted to enter these values at deployment time, although they can elect to leave them blank.
Click to enlarge
7. Project deployable artefacts
A Project can source both internal and external artefacts to deploy.
An ‘Internal artefact‘ is stored somewhere under the Project Root Directory. (shown opposite)
An ‘External artefact‘ is stored outside the project, possibly on a local or remote filesystem, or in an SCM or Artifact Repository such as Maven, Git, Subversion etc.
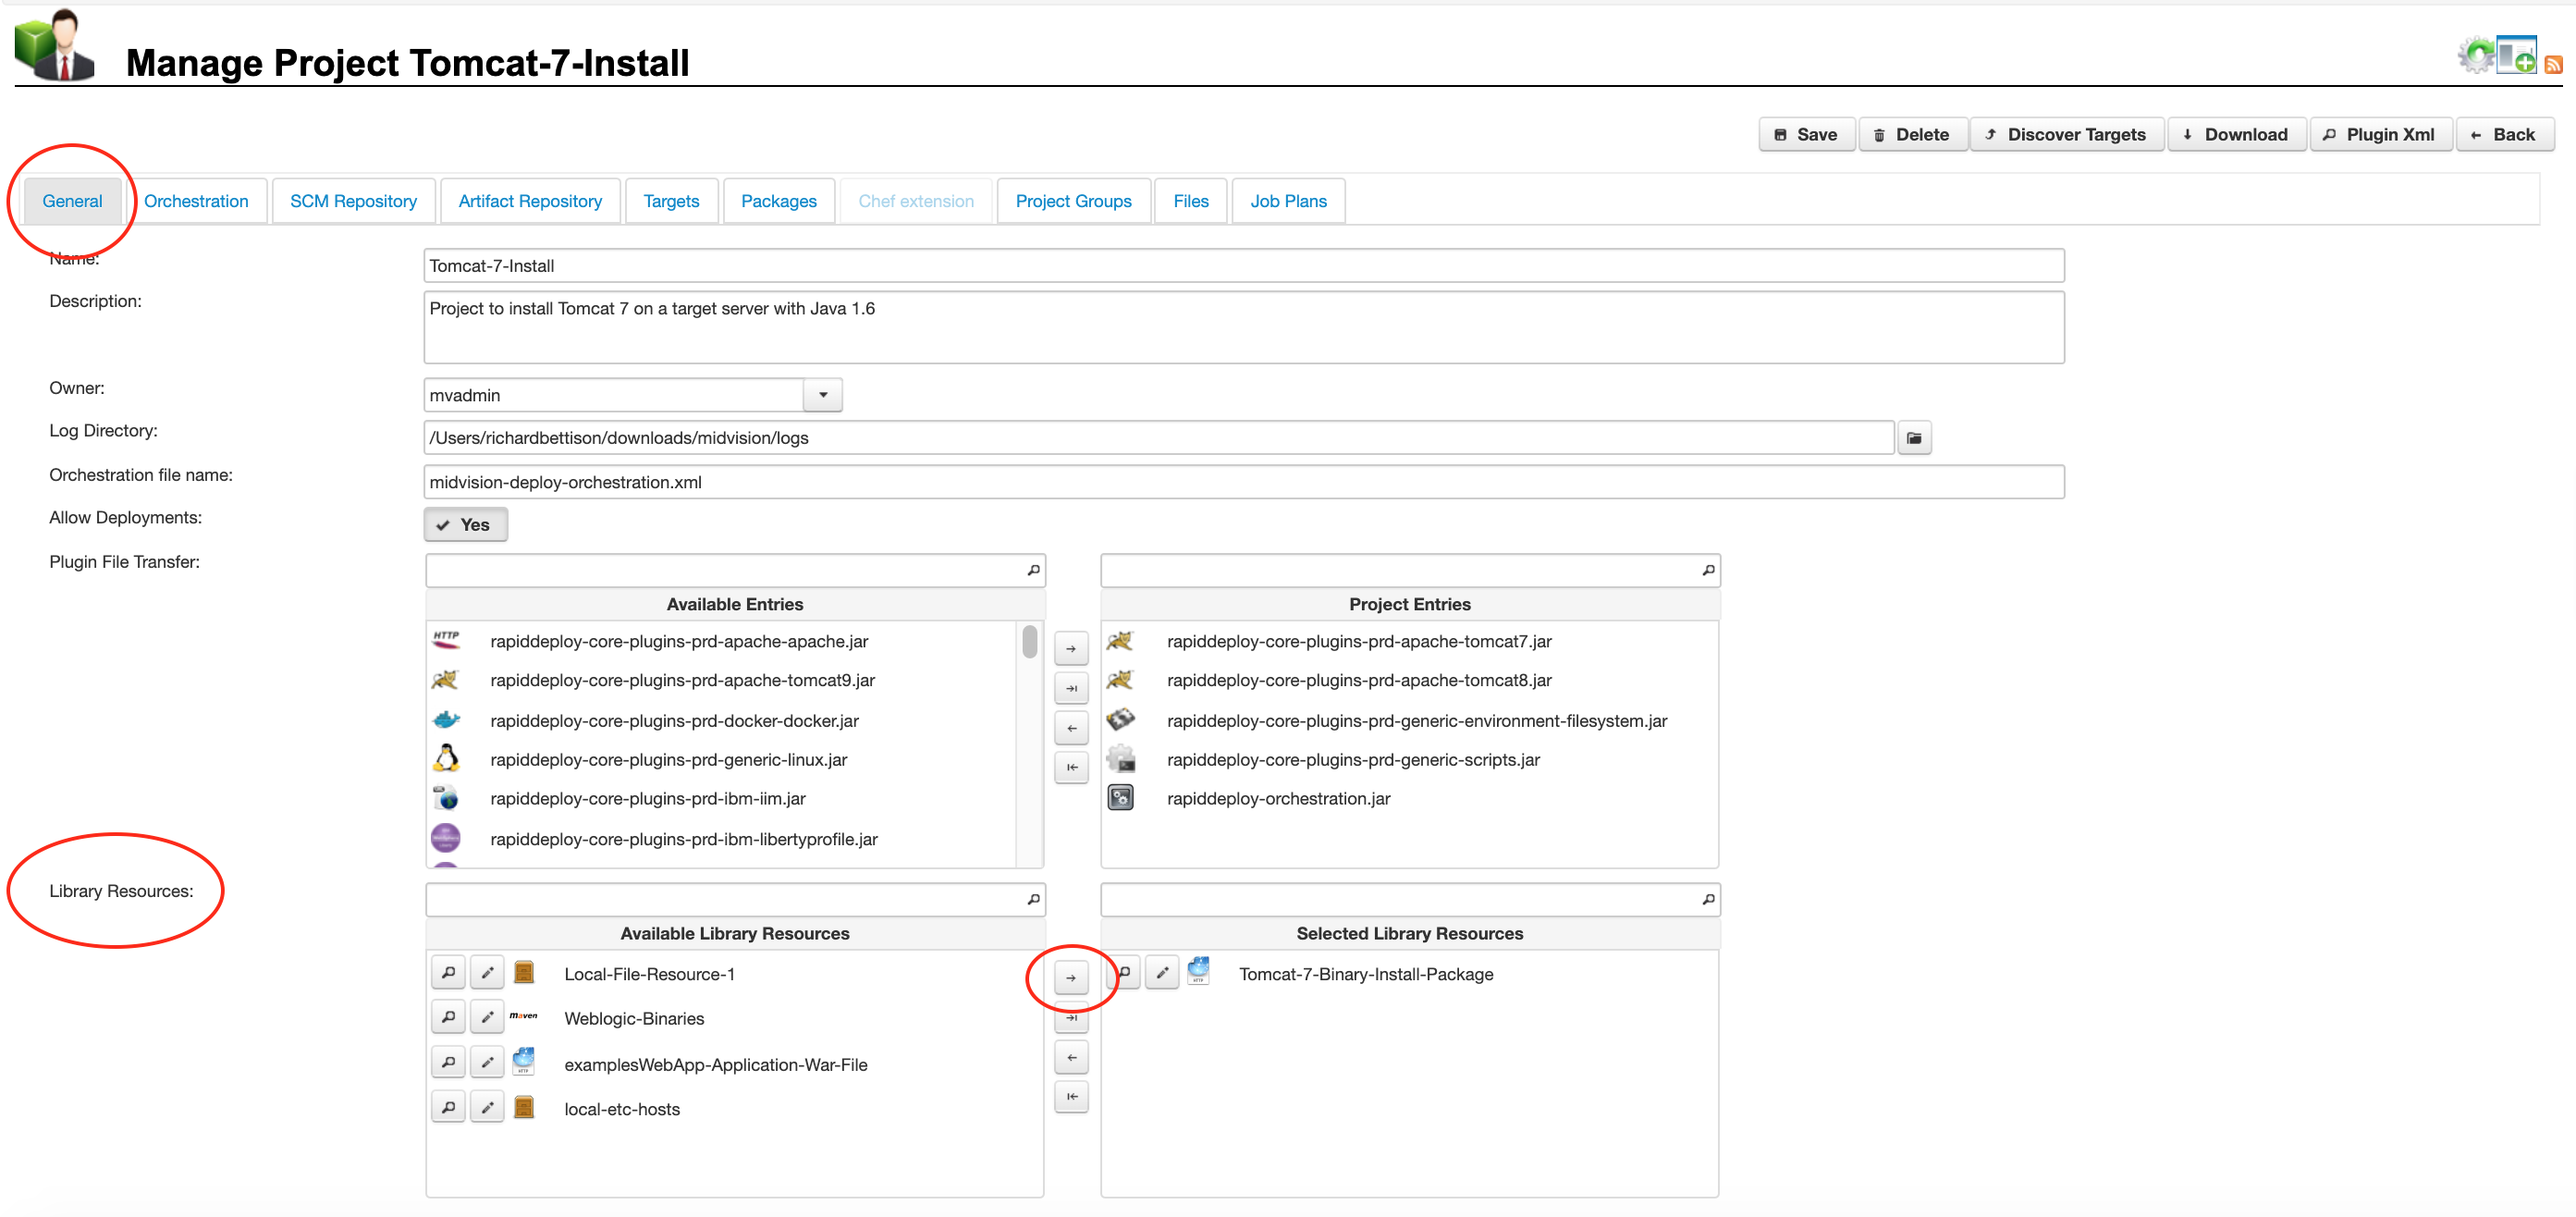
At package (version) creation time, the internal artefact will always be included in the package. The external artefact may either be included in the package directly, or a reference to the resource included, and the resource downloaded onto the target server. You can select external resources to include in the package on the ‘[Project]’ -> ‘General’ tab from the ‘Library Resources’ panel (shown opposite).
You can manually upload internal artefacts into the project folder on the RapidDeploy Server, or have another RapidDeploy or external process copy artefacts into the Project Folder.
External artefacts are defined in ‘Resources’ -> ‘Libraries’
Click to enlarge
Click to enlarge
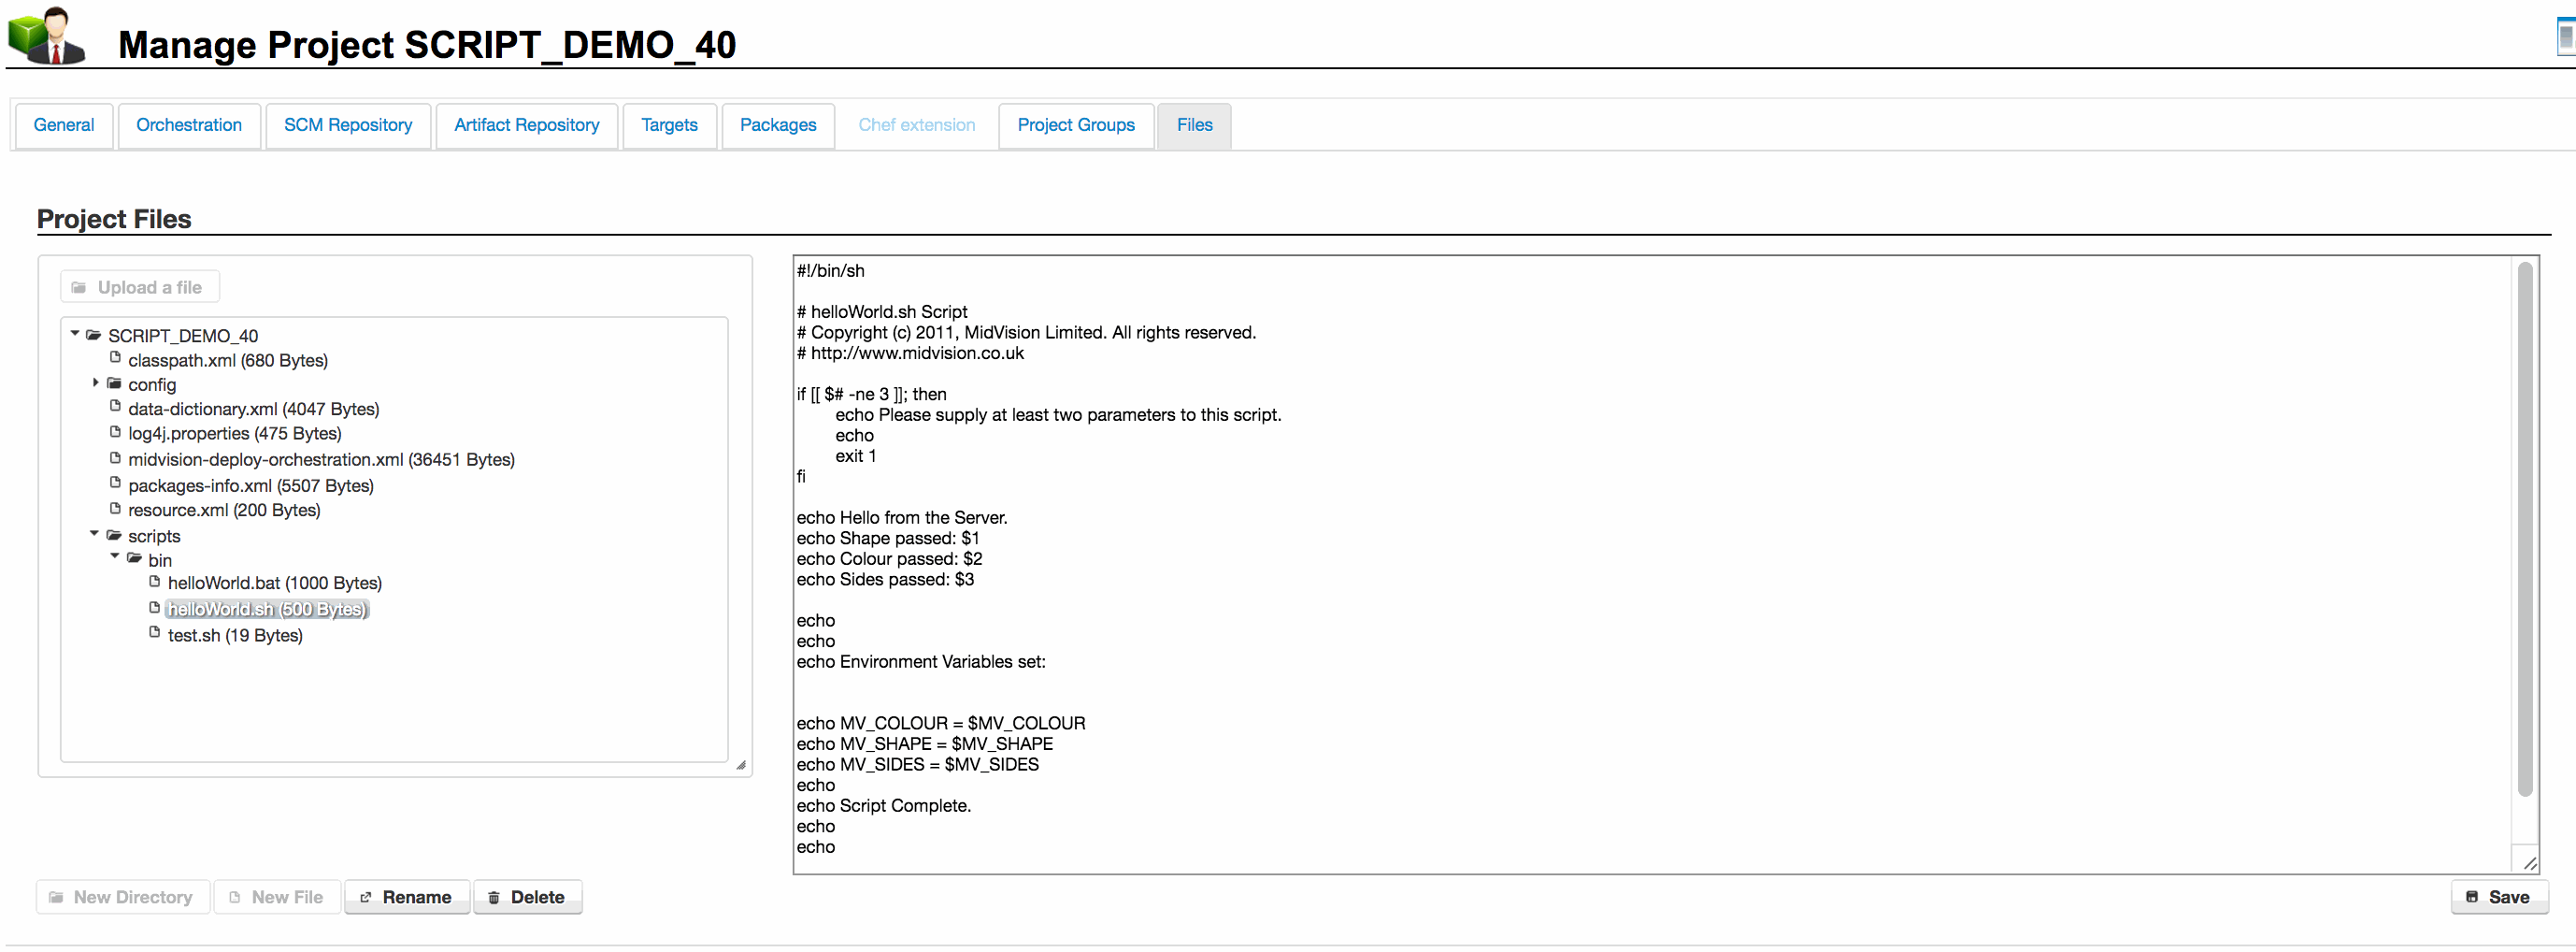
7.1 Internal artefacts
Internal resources can be seen, along with other Project files, on the ‘[Project]’ -> ‘Files’ tab
From this tab, you can manually upload internal artefacts into the project folder on the RapidDeploy Server, or have another RapidDeploy or external process copy resources into the Project Folder.
You can also create/edit and delete files here.
The example to the right is showing a payload of some scripts that will be deployed and run on the target servers.
The Project Orchestration (Model) will have some tasks that copy and run these scripts, using Data Dictionary values to pass different command line arguments and variables to the scripts at runtime.
Click to enlarge
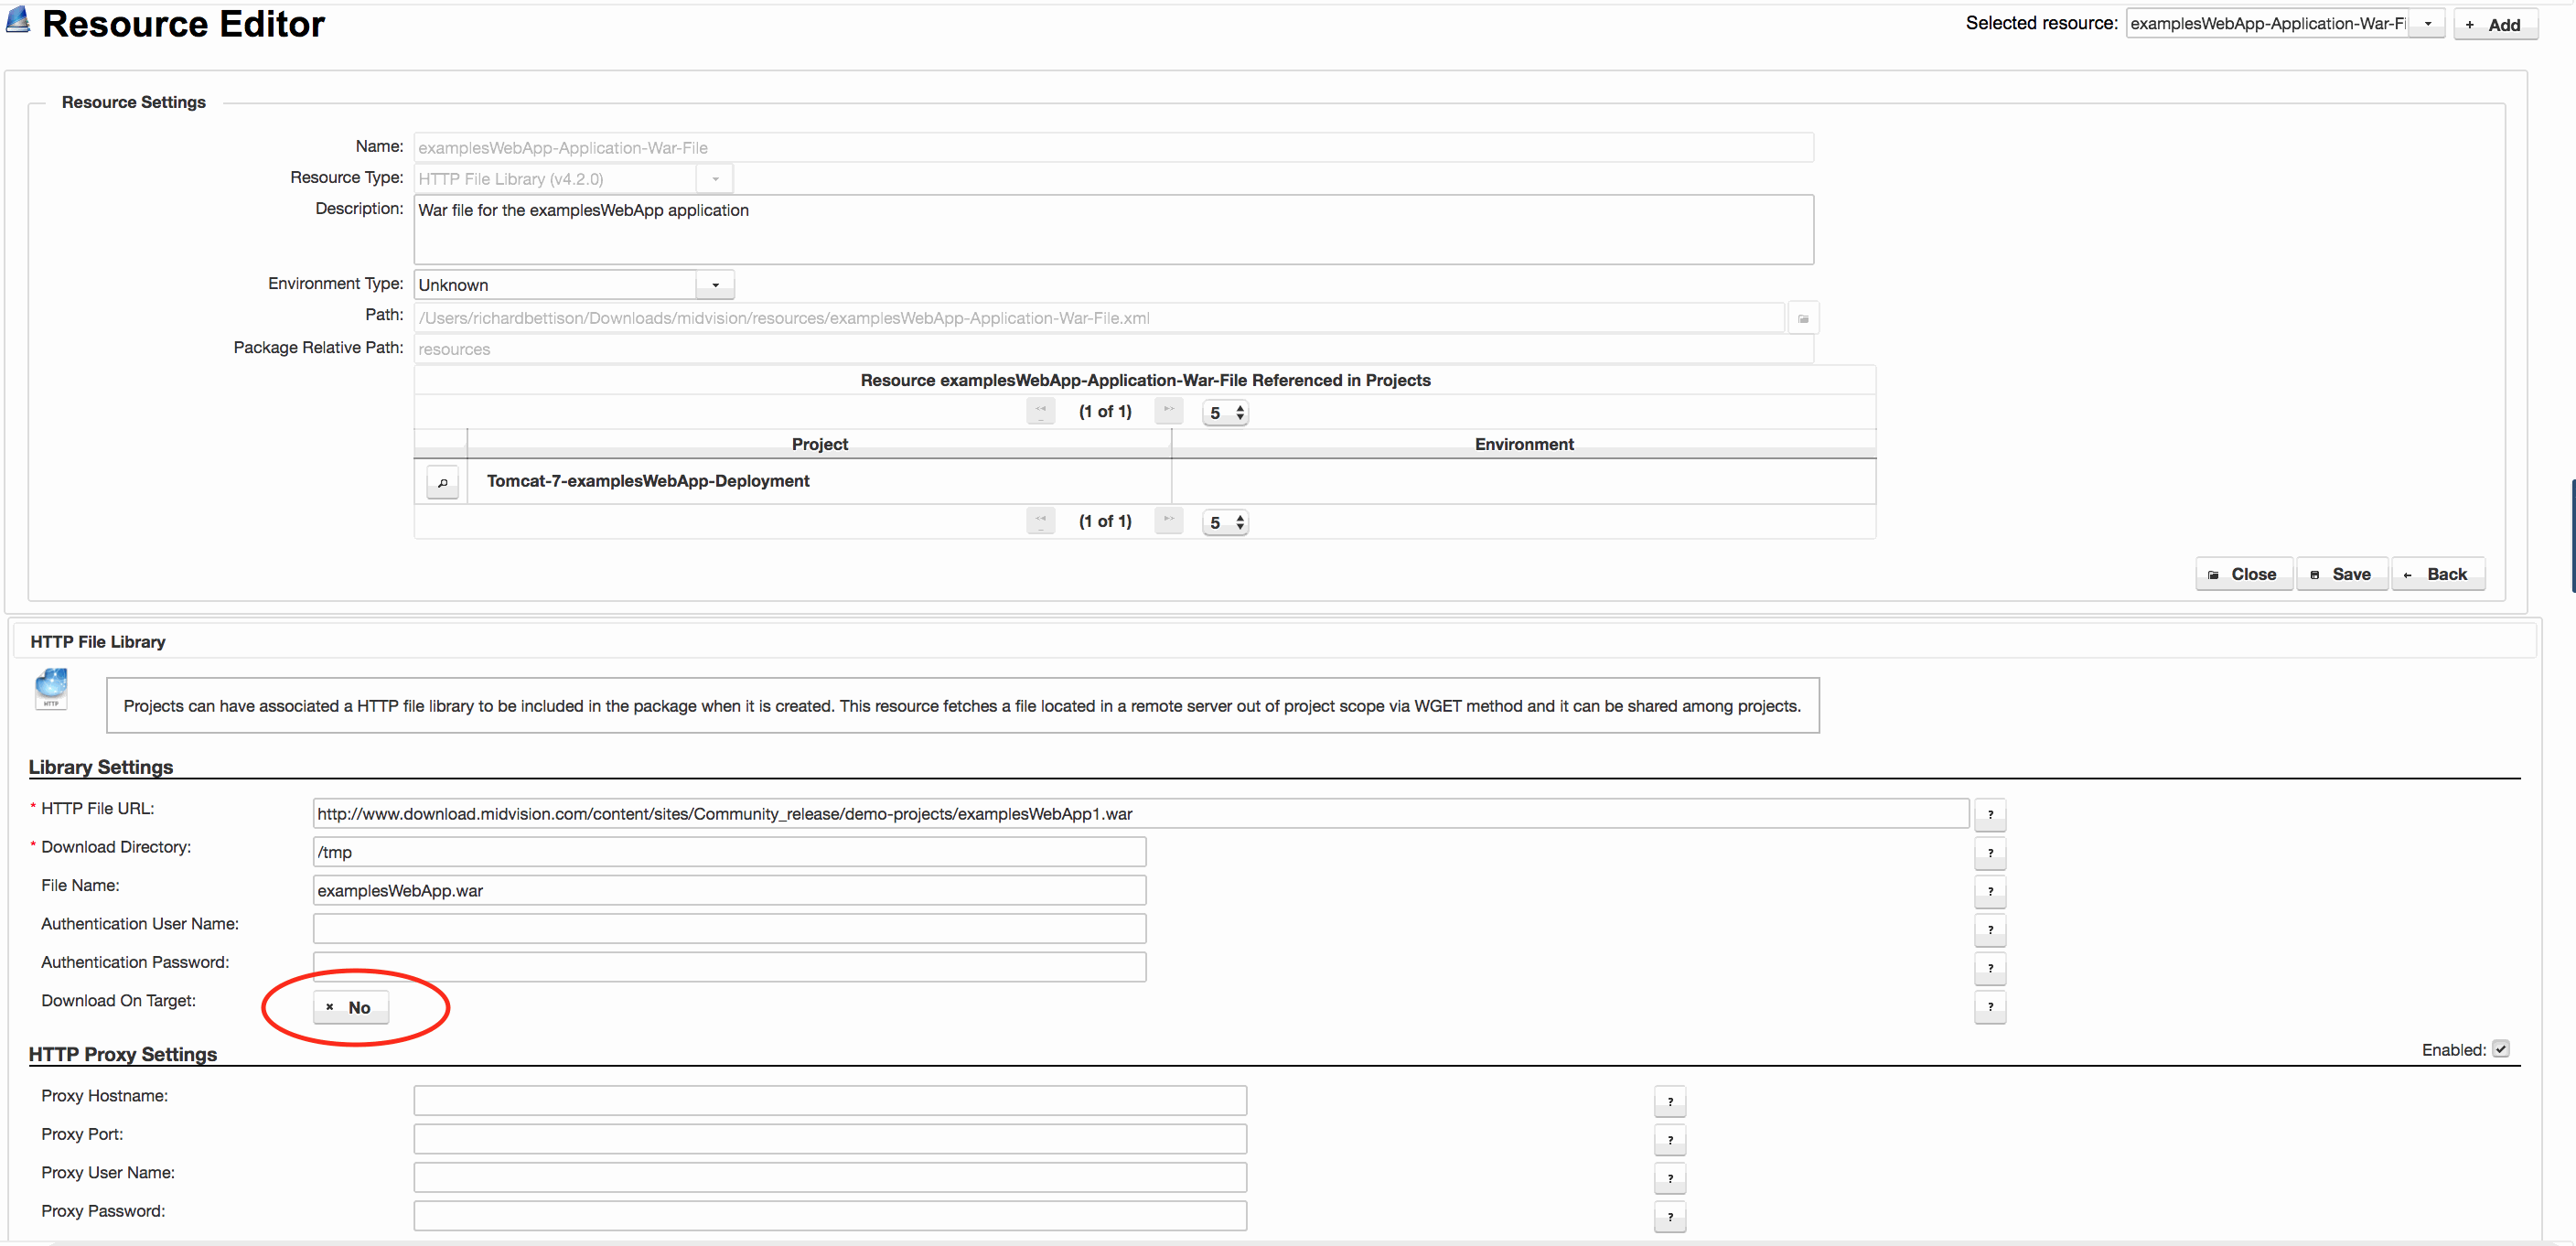
7.2 External artefacts
External artefacts are sourced from external resource libraries which define the location and method of retrieving resources from some external location. Plugins define the retrieval mechanisms, such as Http, Maven, Nexus, Git, Subversion, Remote SCP etc.
External Resources are defined in ‘Resources’ -> ‘Libraries’ or by clicking on the ‘Libraries’ icon from any page as described earlier. They are defined globally and may be consumed by any project.
Typically, these will be resources that multiple projects may wish to use, such as binary installations of common software or versions of a built Jar, War or Ear file that can be deployed.
In the image to the right, we see the Library entry for the examplesWebApp being consumed in the main image at the top of the page. It is retrieved using the ‘HTTP File Library‘ plugin from the specified URL. ‘Download On Target‘ is false, so this war file will be added to the deployment package at package creation time, and not downloaded to the target at runtime.
See the next section “Resources” to learn more about resource libraries.
Click to enlarge