Infrastructure, Servers and Installations
How to create and use Deployment Targets
Deployment targets are where we run our project (server) orchestrations. Typically these targets will be a Server Host or Virtual Machine (VM) or cloud server instance running an operating system such as Linux or Windows.
We define a Target as an Installation on a Server. We call the list of all Servers and their Installations defined in RapidDeploy, the Infrastructure.
At first login, the infrastructure will consist of an initial server configured for localhost. It will be named dependent on the platform you are running on. It will not have any defined installations.
Targets are defined in ‘Resources’ -> ‘Infrastructure’ or by clicking the ‘Infrastructure‘ icon at the top of any page.
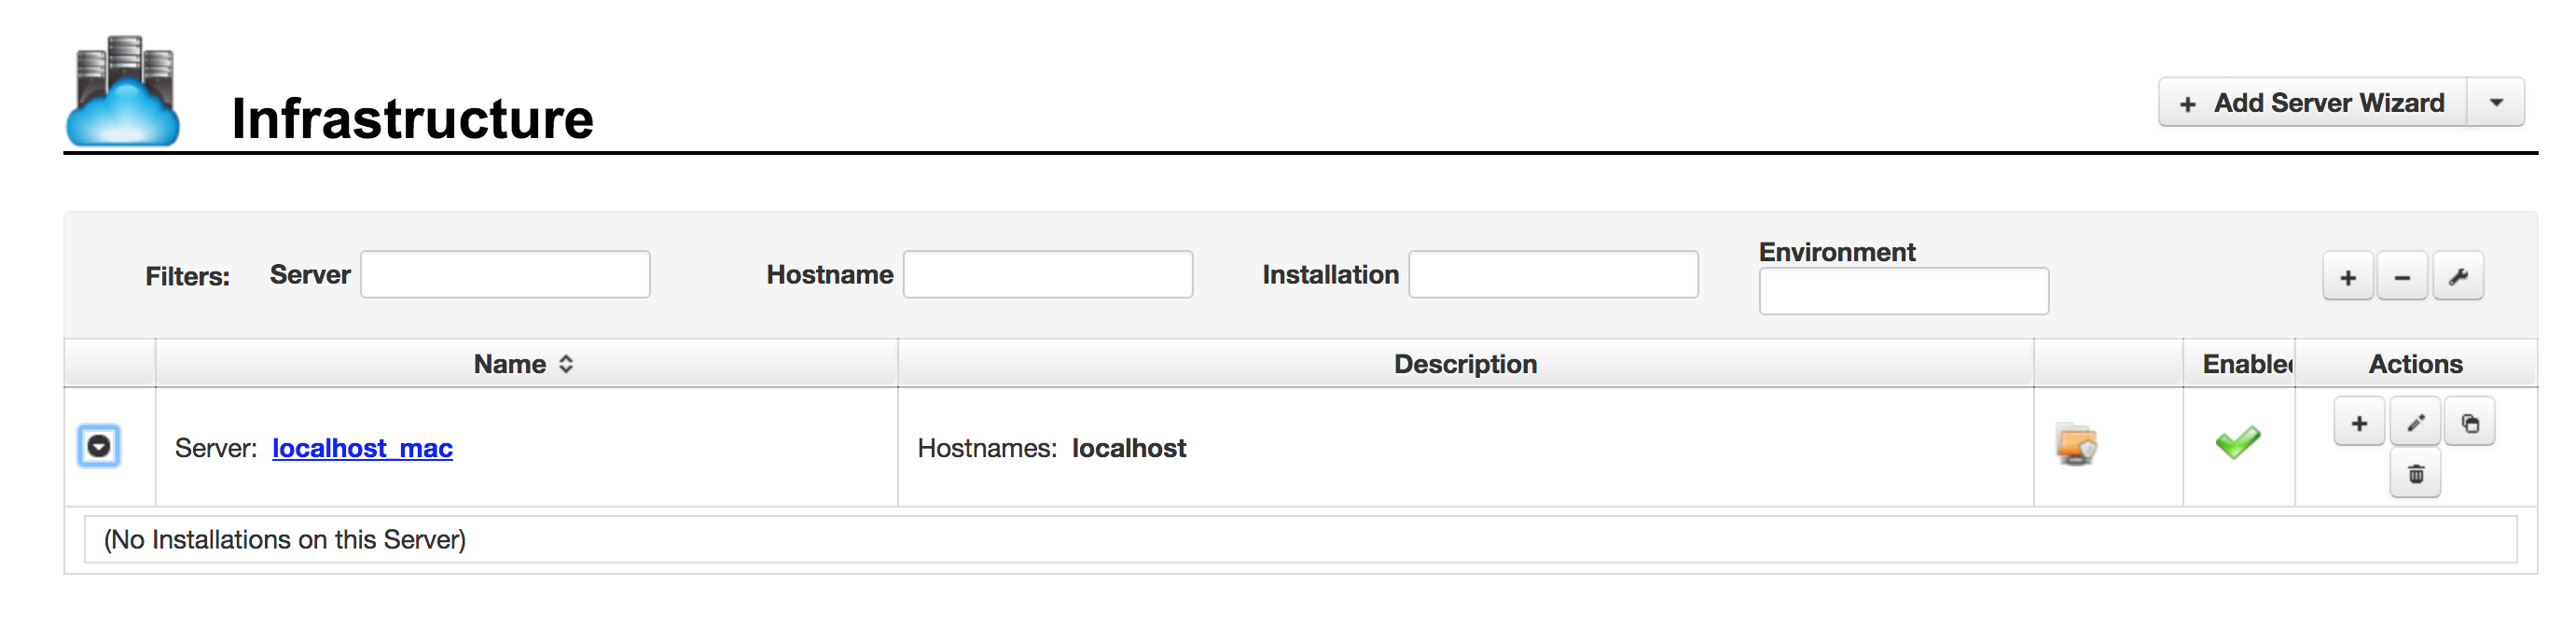
Infrastructure Panel at first login
The Infrastructure panel is shown, with the default initial server.
1. Server Definition
Clicking on any server name in the infrastructure list takes you to the server definition. The basic server definition consists of a Display Name and one or more host names, domain names or IP addresses in the Hostnames field, unless you are using a cloud provider to manage the resources in which case you’ll just see either a logical name here matching the instance name in the cloud provider or the cloud instance IP address.
The Remote Build Store field defines a staging folder on the target host where RapidDeploy will copy deployment packages to when performing deployments. It should be sized according to the number and size of packages deployed.
In RapidDeploy, whenever you want to refer to this logical server definition, you will use its Display Name.
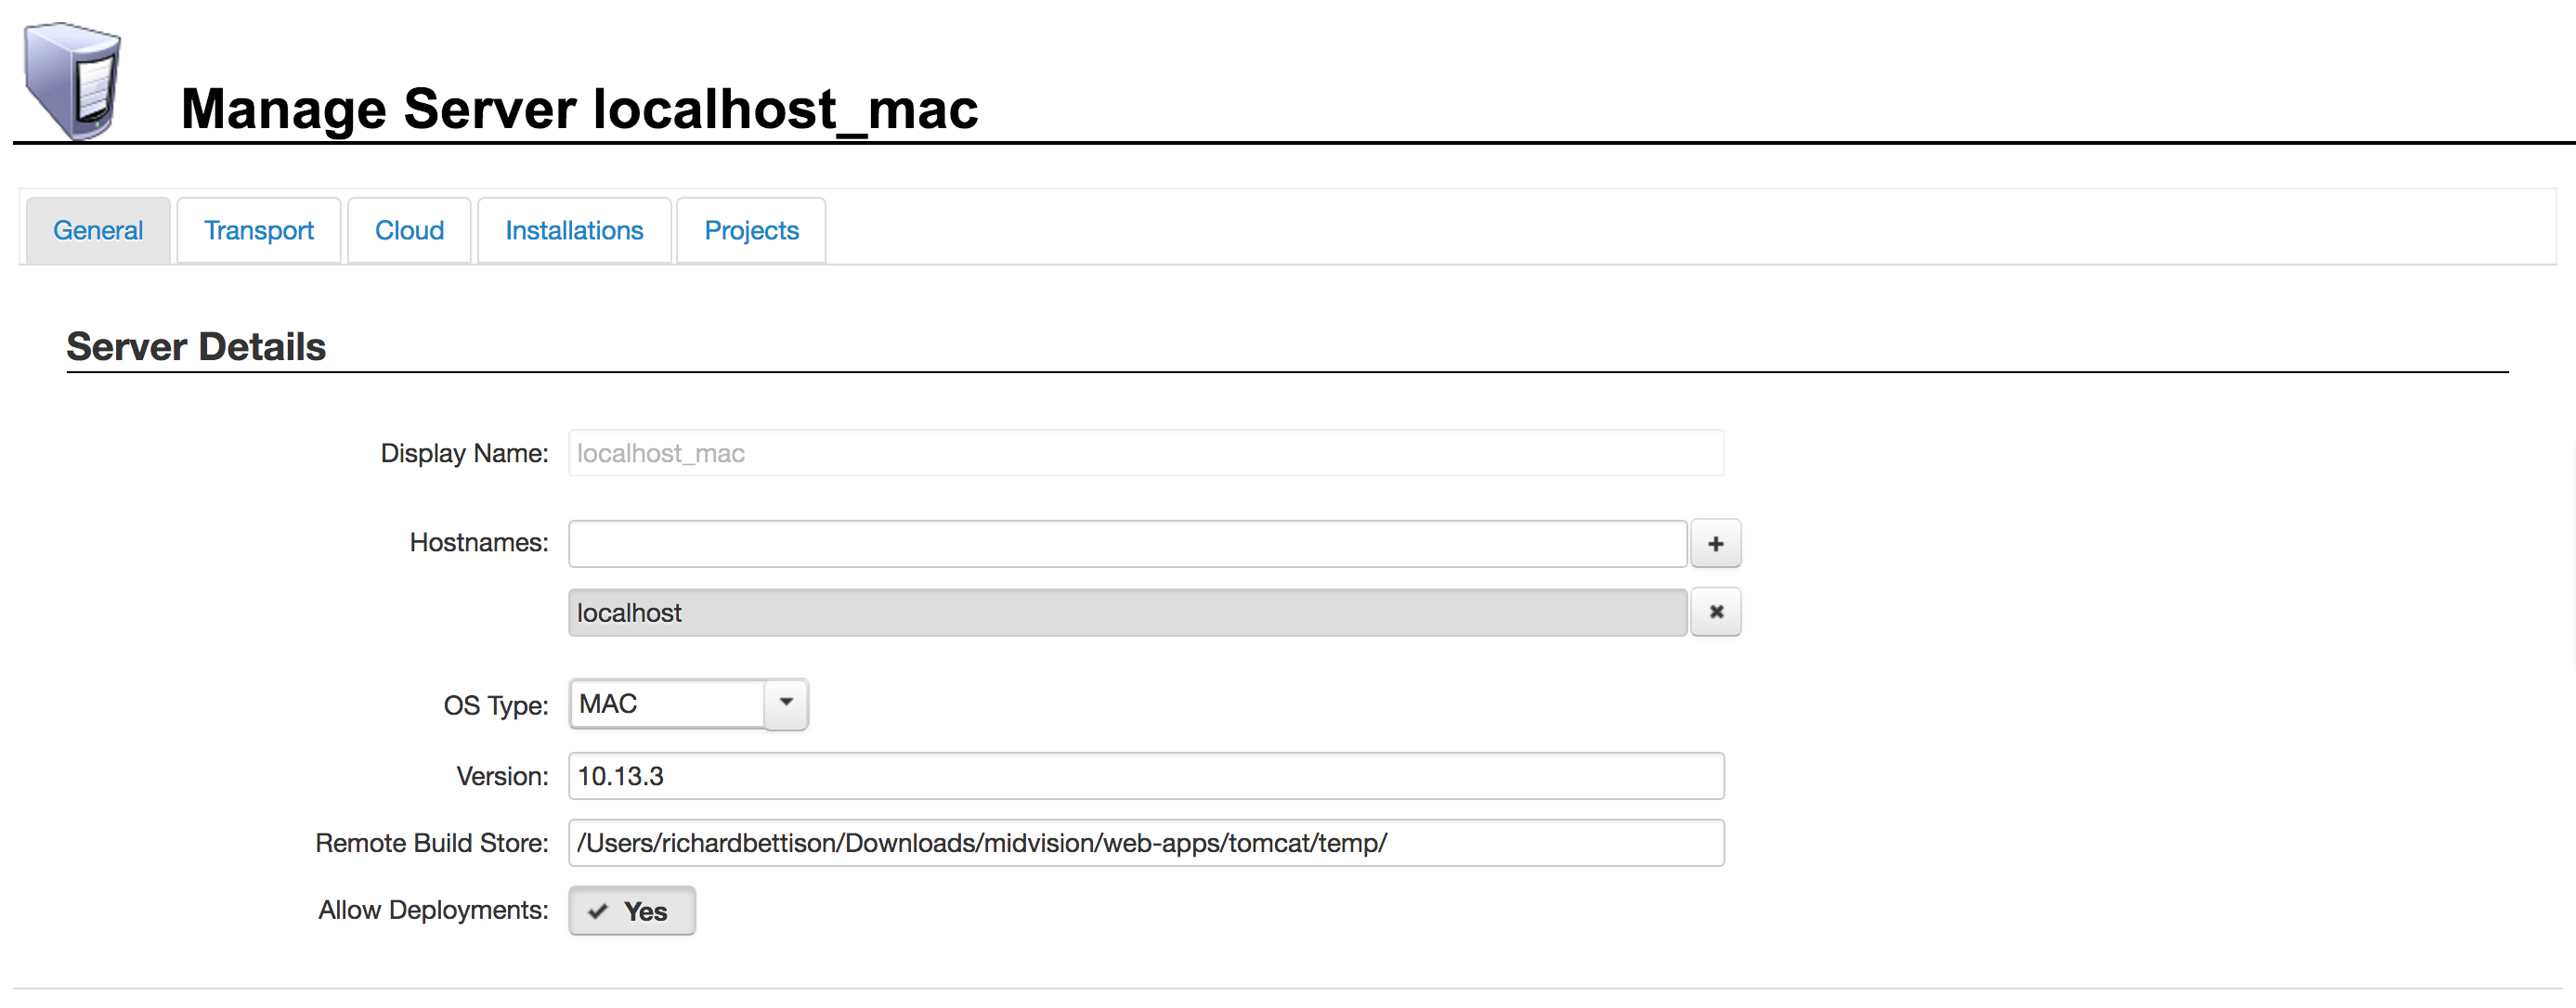
Fig. 1. Click to enlarge
1.1 Creating a Server
You can create a server in three ways.
- The usual way to create a server is from the ‘Add Server Wizard’ button on the Infrastructure panel.
- You can also create a new server whilst defining a Project Target, see 2.1 below for details.
- You can create a new server from an existing server by clicking the icon in the on the infrastructure list panel corresponding to the server you want to copy from.

Fig. 2. Click to enlarge
1.2 Transport Tab
The Transport tab lets you define the transport to use to connect to the target host(s) for this definition. At the moment this can be either SSH or Agent using the inbuilt plugins
Choose either SSH or Agent connection on this tab by selecting from the ‘Transport Mechanism’ drop-down list. .
Most customers prefer to use the SSH transport to connect to remote hosts. Usually this just involves filling in the required details on the panel (shown in Fig. 3) as SSH is normally preconfigured and running on most Unix/Linux target hosts. You will need the SSH port, username and password or SSH key file path (with optional passphrase) that you would use with any SSH connection. Our technical documentation site has more detailed information about configuring SSH, including how to resolve some common SSH connection issues.
Should you prefer to use the RapidDeploy agent instead, our technical documentation site has more information about agent installation and agent configuration including sections on:
using the built-in agent; agent logging; agent memory considerations and running the agent as a windows service.
You can also select a preconfigured ‘Transport Resource’ from the drop-down menu to use a configuration already defined in a resource library.
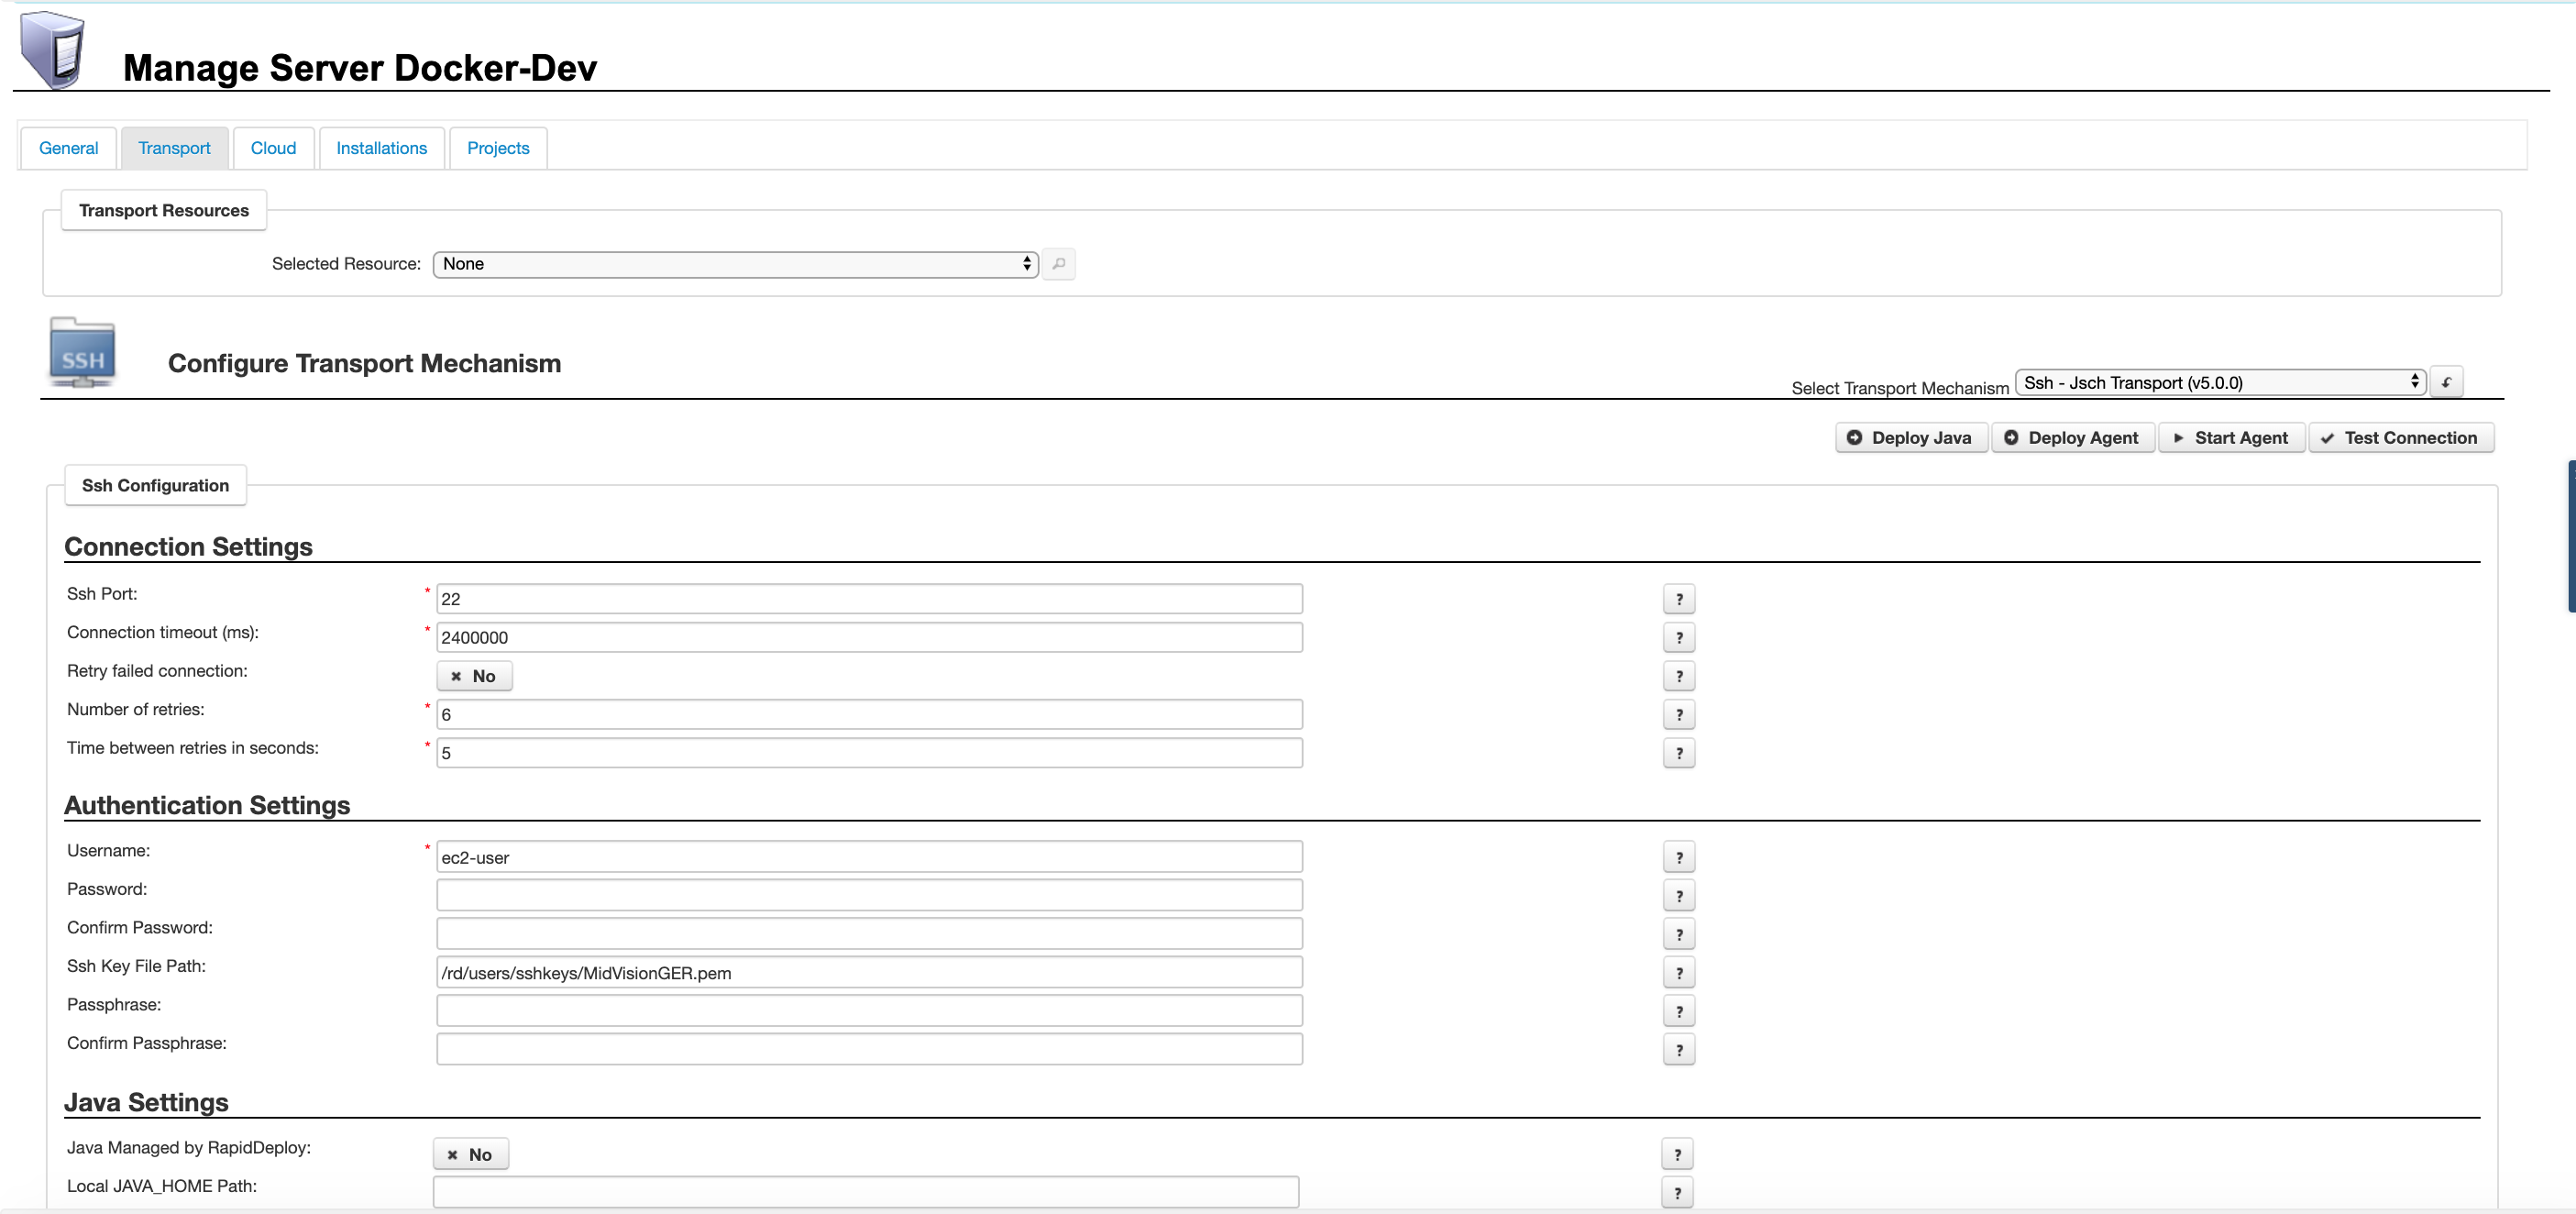
Fig. 3. Click to enlarge
1.3 Cloud Tab
The Cloud tab enables you to optionally define a cloud provider and specify cloud instances. You can specify from the dropdown list which cloud provider to use. The elements in the list will depend on which plugins you have installed but will include Amazon Web Services and Microsoft Azure.
The following is for the AWS plugin, but equally applies to other cloud providers.
After you’ve entered your credentials to connect to your cloud account, you can synchronize and you’ll see all of your existing instances in a specific region by selecting that region from the dropdown.
You can choose to link one or more of these instances to this server definition, or you can use the AWS EC2 Instance Creation panel to define one or more instances.
If using a single instance, the IP address of that instance will be automatically updated in the Hostnames filed on the General tab.
You can also select a preconfigured ‘Cloud Provider Resource’ from the drop-down menu to use a configuration already defined in a resource library.
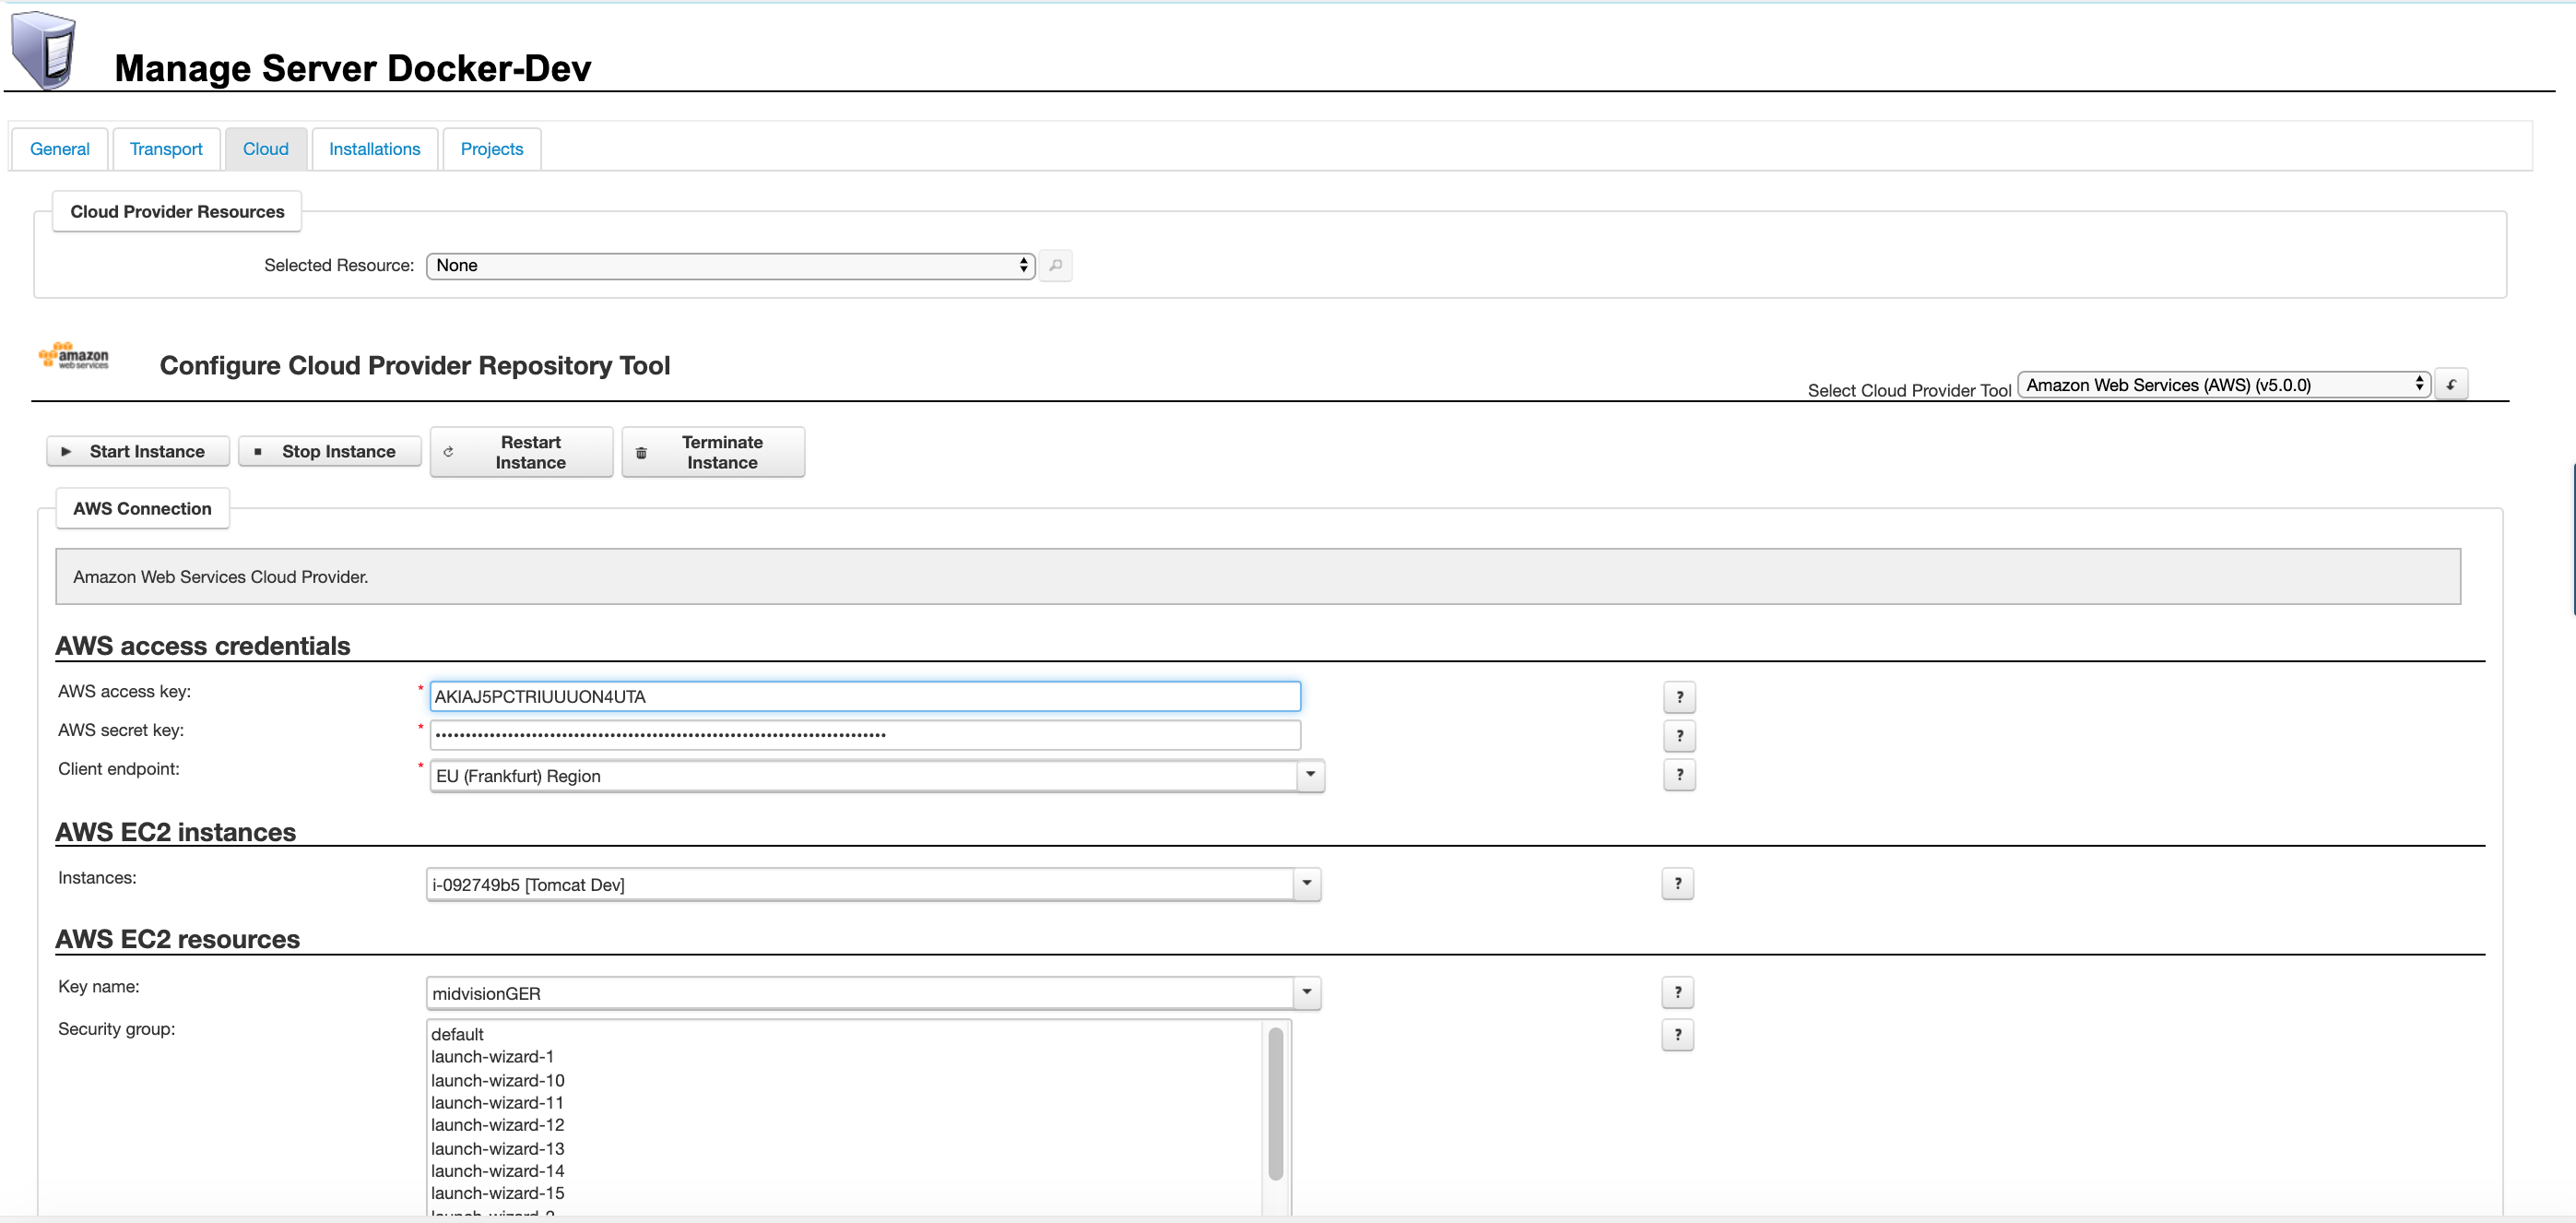
Fig. 4. Click to enlarge
1.4 Cloud Automatic Instance Creation
You use the AWS EC2 Instance Creation panel to define one or more instances that will be created and/or started on first deployment, and then managed by RapidDeploy and the cloud provider from then on.
Specify the name to show in the cloud provider using the Instance Name field. You should check, and set if necessary the Hostnames field on the General tab to match the Instance Name you specified here.
If you define more than one instance to start, by increasing the Number of Servers, they will be named in the EC2 console according to the Instance Name with _1 to _n appended to the end.
You should also change the Deployment Settings panel to enable creation of the instance on deployment to “Yes“.
On first deployment the instance(s) will be created, started and then deployed to. On the Transport panel you can also specify if you want any actions performing before the deployment, such as a yum update or Java install.
On subsequent deployments, depending on the settings, RapidDeploy will:
- Check if the server definition exists in the cloud provider account. If not it will be created.
- Check if the instance(s) is/are running. If not, and the “Start Instance On Deployment” flag is set, it will be started.
- The number of instances actually defined will be checked against the number set in the Number of Servers field. Instances will be created/launched to match this number.
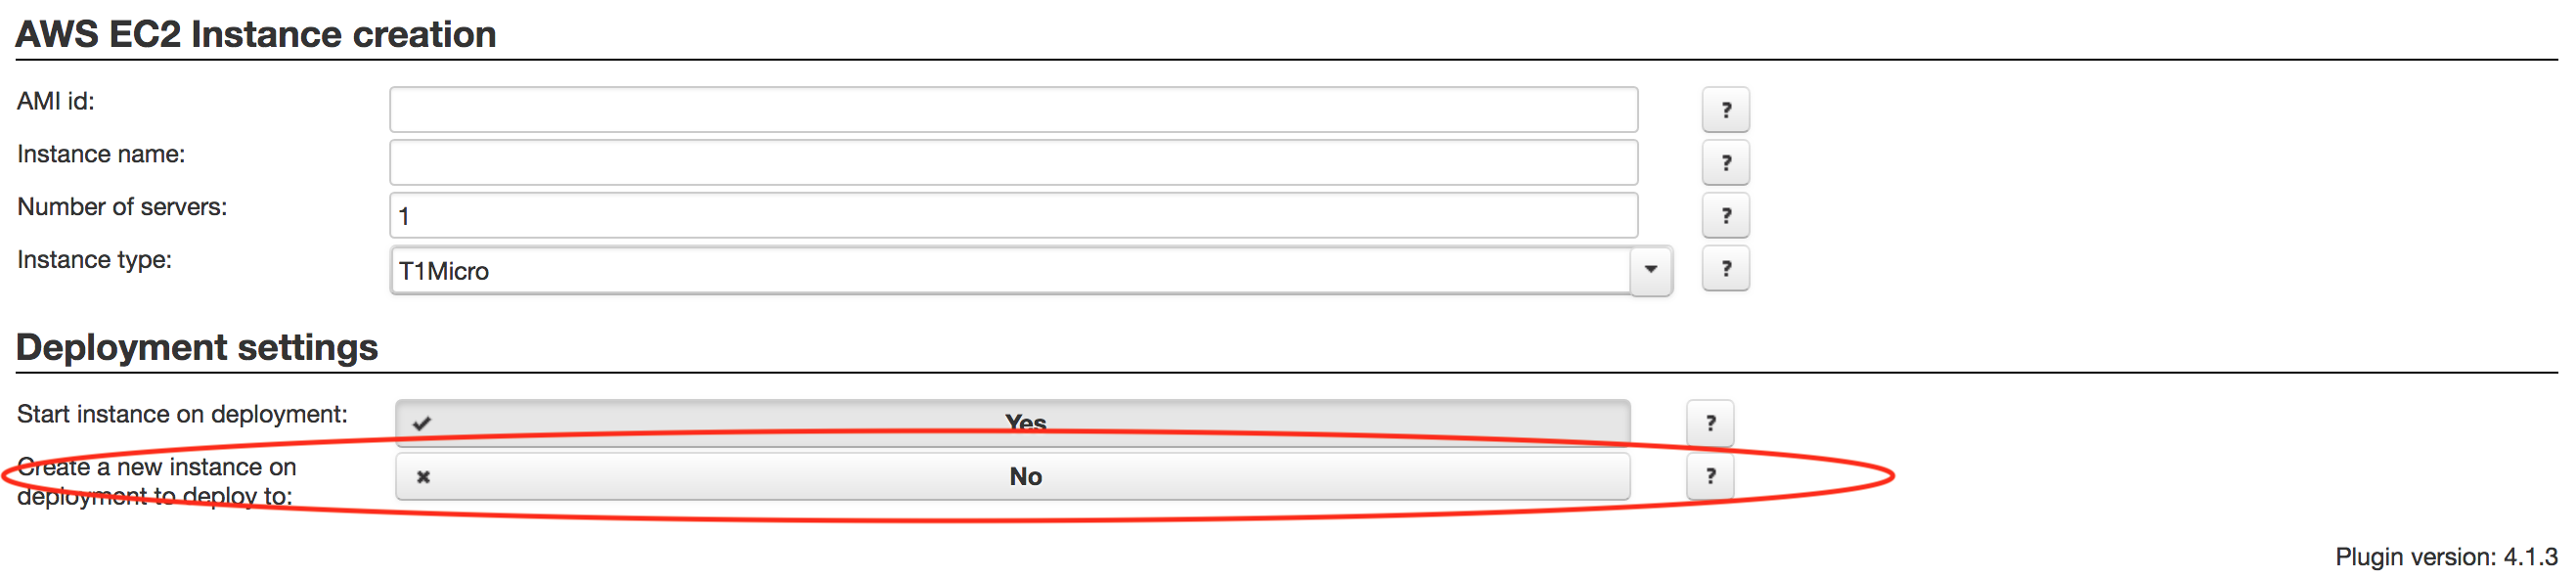
Fig. 5. Click to enlarge
1.5 Installations and Projects tabs
The Installations tab shows all the installations on this server. You can also add new installations from this tab.
The Projects tab shows all the projects that currently deploy to this Server. You can associate projects to targets as described in section 3 below.
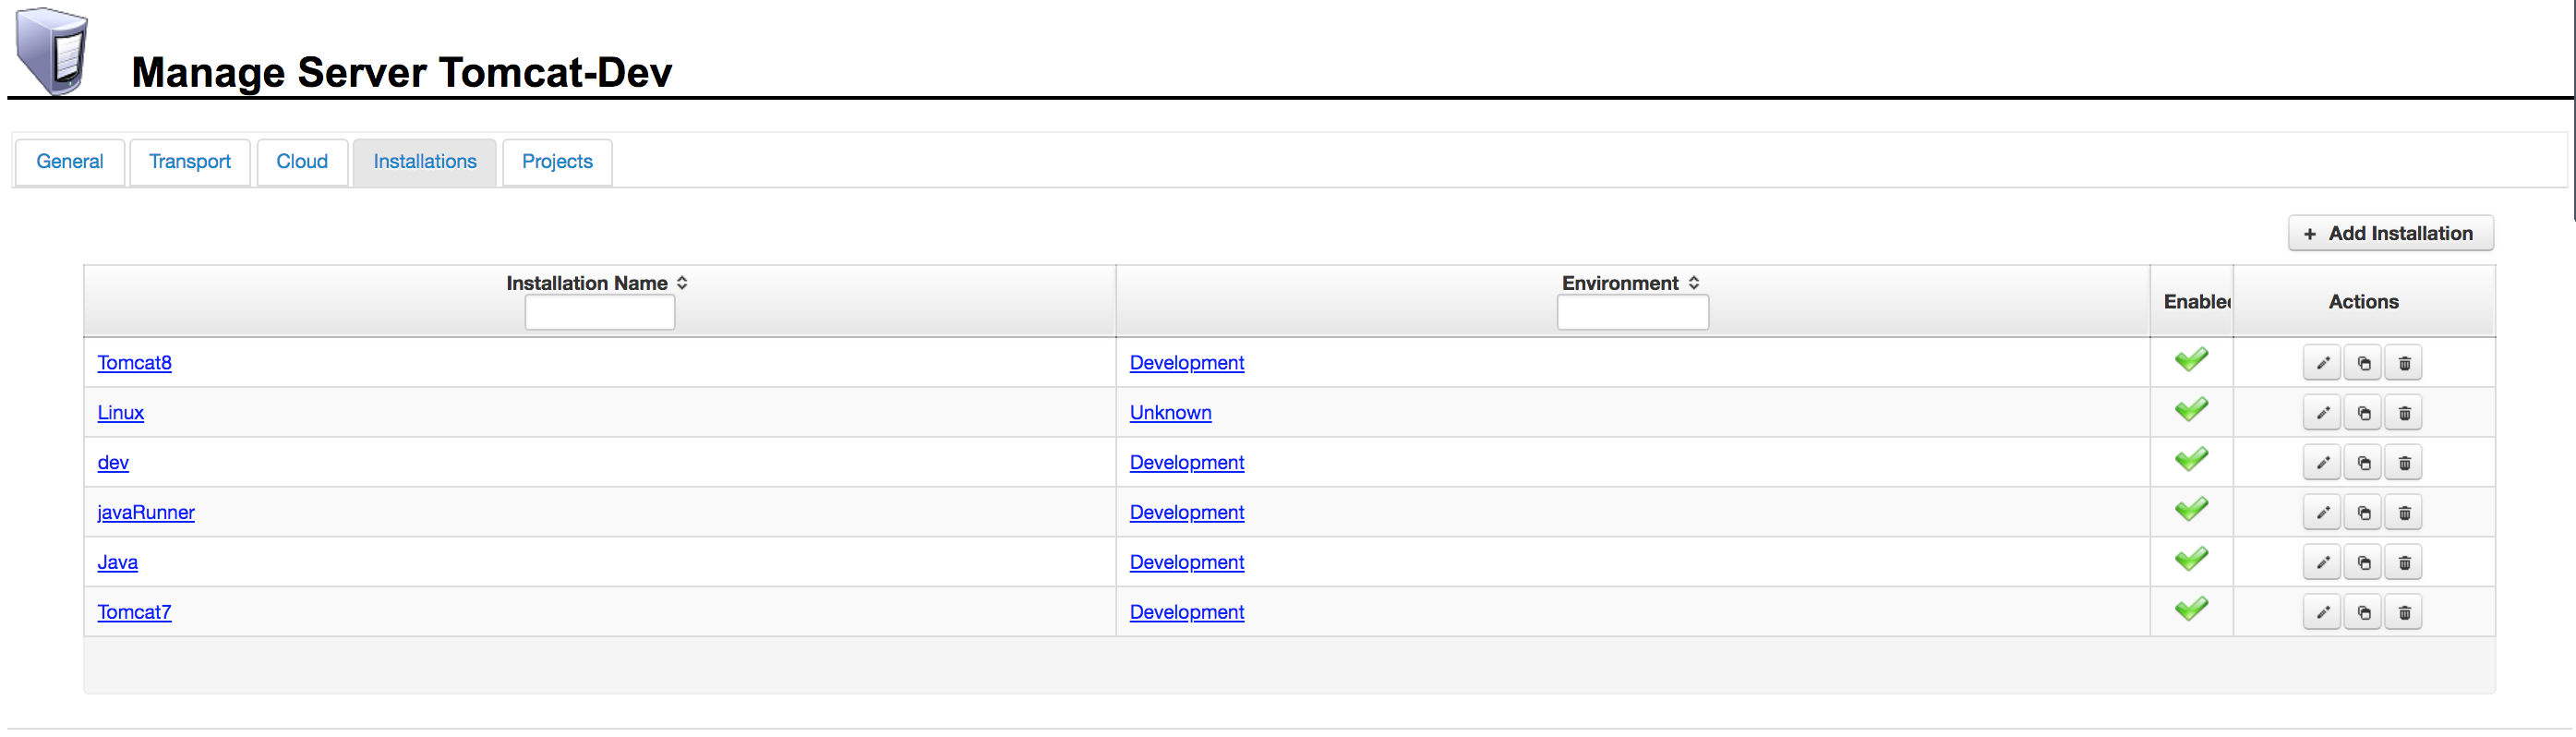
Fig. 6. Click to enlarge
2. Server Installations
Each server can contain one or more installations.
An installation is the definition of something installed on that server. In the image opposite, you can see a server definition with several different installations including Linux, Java, a Java program and two Tomcat installations.
Typically, a project will use its server orchestration to deploy a resource payload to one or more targets (installations on one or more servers).
Therefore a Server Installation, which maps to a Project Target, can be seen as the link between the Project and the Infrastructure that that project deploys to.
For example we might have a project that deploys a Java Application to a number of different servers. In the example in the image, the installation is called javaRunner. We might deploy this to a development, test and production target. In this case it is going to the Tomcat-Dev server, which also has some other components being deployed to it by other projects.
Of course a project could deploy to multiple targets on the same server, so long as each target has a different name. You might want to do this for example if you’re running the same script on a target but you want to pass different parameters or variables to it.

Fig. 7. Click to enlarge
2.1 Creating Server Installations
Server installations can be created from either the infrastructure panel or from the project panel when creating a new target.
- Infrastructure Panel: Identify your server from the list of servers and select the corresponding ‘+’ button on the Action column. Alternatively you can go the Installations tab for the selected Server and click the ‘Add Installation‘ button in the top right hand corner.
- Project Panel: The Server and or Installation can be created automatically when you create a target for one of your projects. You create a new target from the ‘Project’ -> ‘Targets’ tab. In the target creation process, you can select a server or type in the name for a new one, and then select a preexisting installation on that server or create a new one. You then provide a unique configuration name (which applies to this project only) so that you can deploy multiple configurations to the same installation. Please note that if you create a Server this way, you’ll need to go to the Infrastructure pages to configure it later.

Fig. 8. Click to enlarge
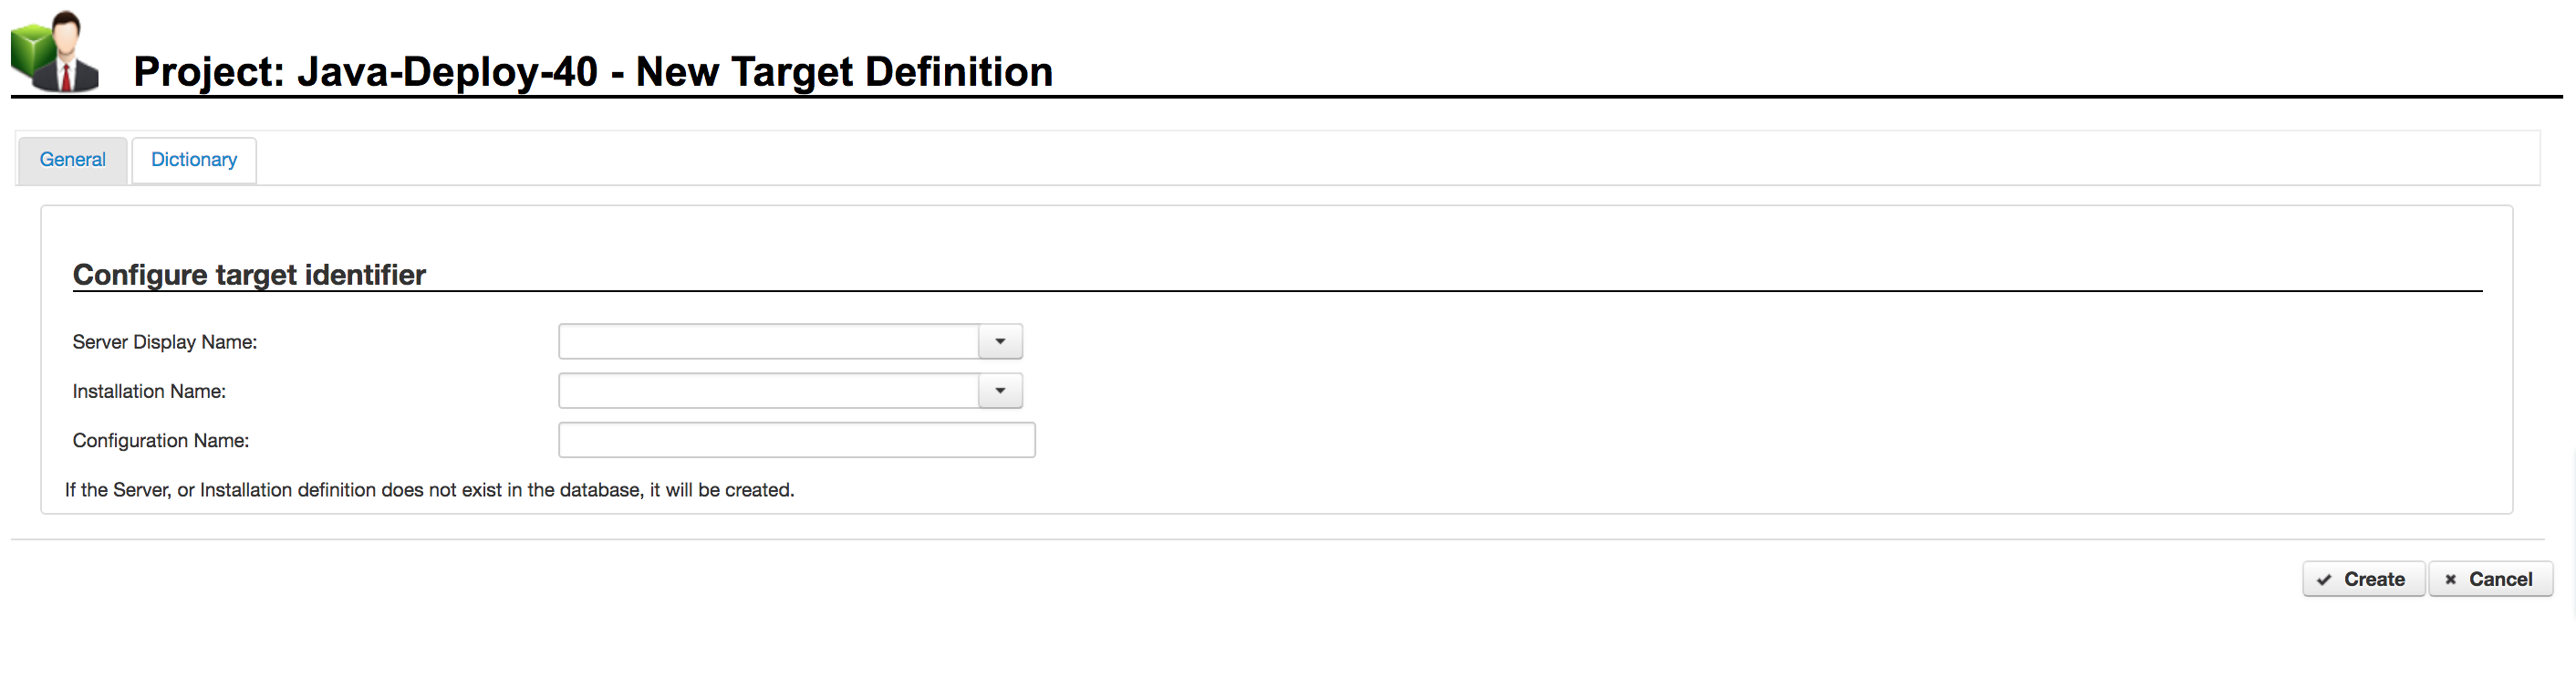
Fig. 9. Click to enlarge
3. Associating targets with your project
3.1 Create a new target association
In order to perform any deployments, you need to associate your project with the target infrastructure for deployments. You do this from the ‘Project’ -> ‘Targets’ tab.
- In your selected project, navigate to the ‘Project’ -> ‘[PROJECT]’ -> ‘Targets’ tab.
- Click the ‘+ New Target’ button. The ‘New Target Definition’ panel is shown as in Fig. 10.
- Select a server from the ‘Server Display Name’ drop down list as shown in Fig. 10.
- Select a preexisting installation on that server from the ‘Installation Name’ drop down list.
- Provide a unique name in the Configuration Name field (which applies to this project only) so that you can deploy multiple configurations to the same installation.
- Click the ‘Create’ button. The target is created, with default Data Dictionary name/value pairs inherited from the Resource and Project scopes.
Fig. 10. Click to enlarge
3.2 Edit a target association
Once you have created a target association, you’ll probably need to edit it, to change some of the Data Dictionary values. You do this from the ‘Project’ -> ‘Targets’ tab.
- In your selected project, navigate to the ‘Project’ -> ‘Targets’ tab.
- Select the desired target from the list.
- Click on the pencil icon in the ‘Actions’ panel corresponding to the target to edit, as highlighted in Fig.11.
- You will see all the Data Dictionary keys for this target, shown as inheriting their values from either the project or resource scopes as shown in Fig. 12.
- Click the ‘Edit’ button to edit a value as highlighted in Fig. 12.
- Edit the value and hit ‘Save’ as shown in Fig. 13. The changed value will now be shown in green as ‘Overridden’.
- Repeat for any other changes required to the key/value pairs.
- The changes are not yet committed. When you have made all required changes, click the ‘Save Changes’ button as highlighted in Fig. 14.
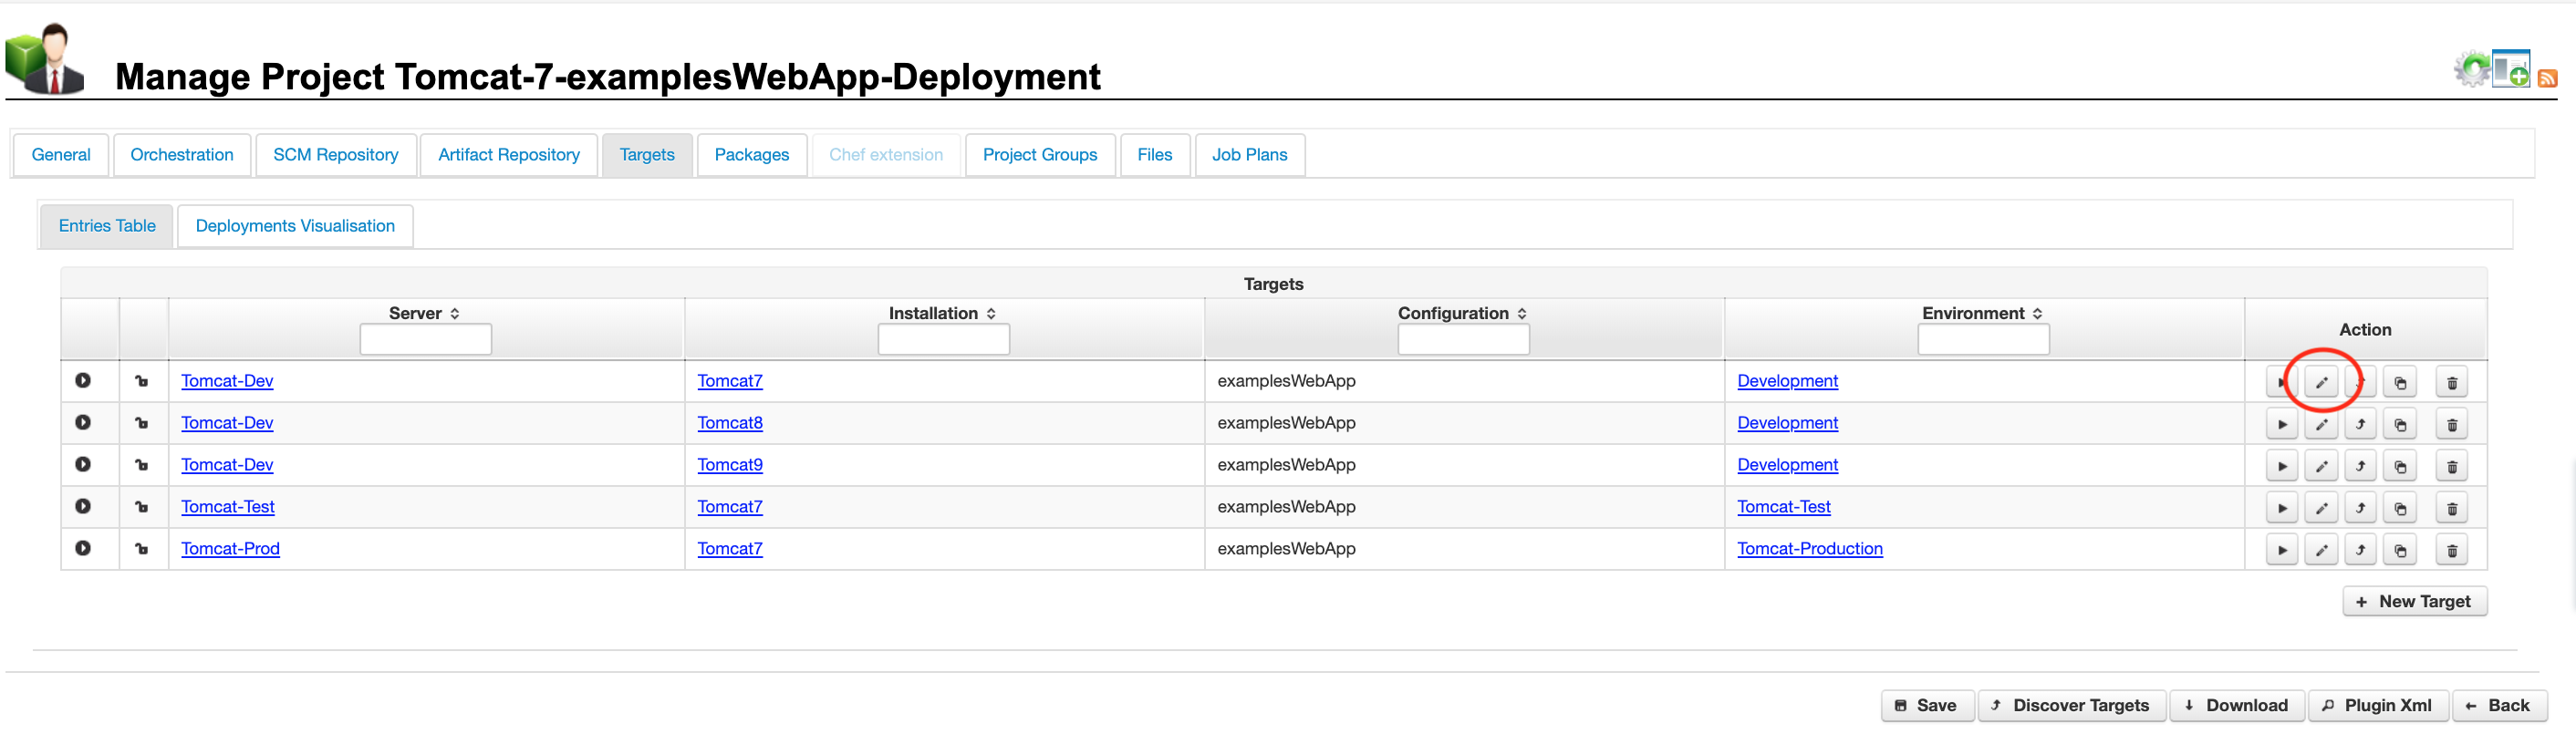
Fig. 11. Click to enlarge
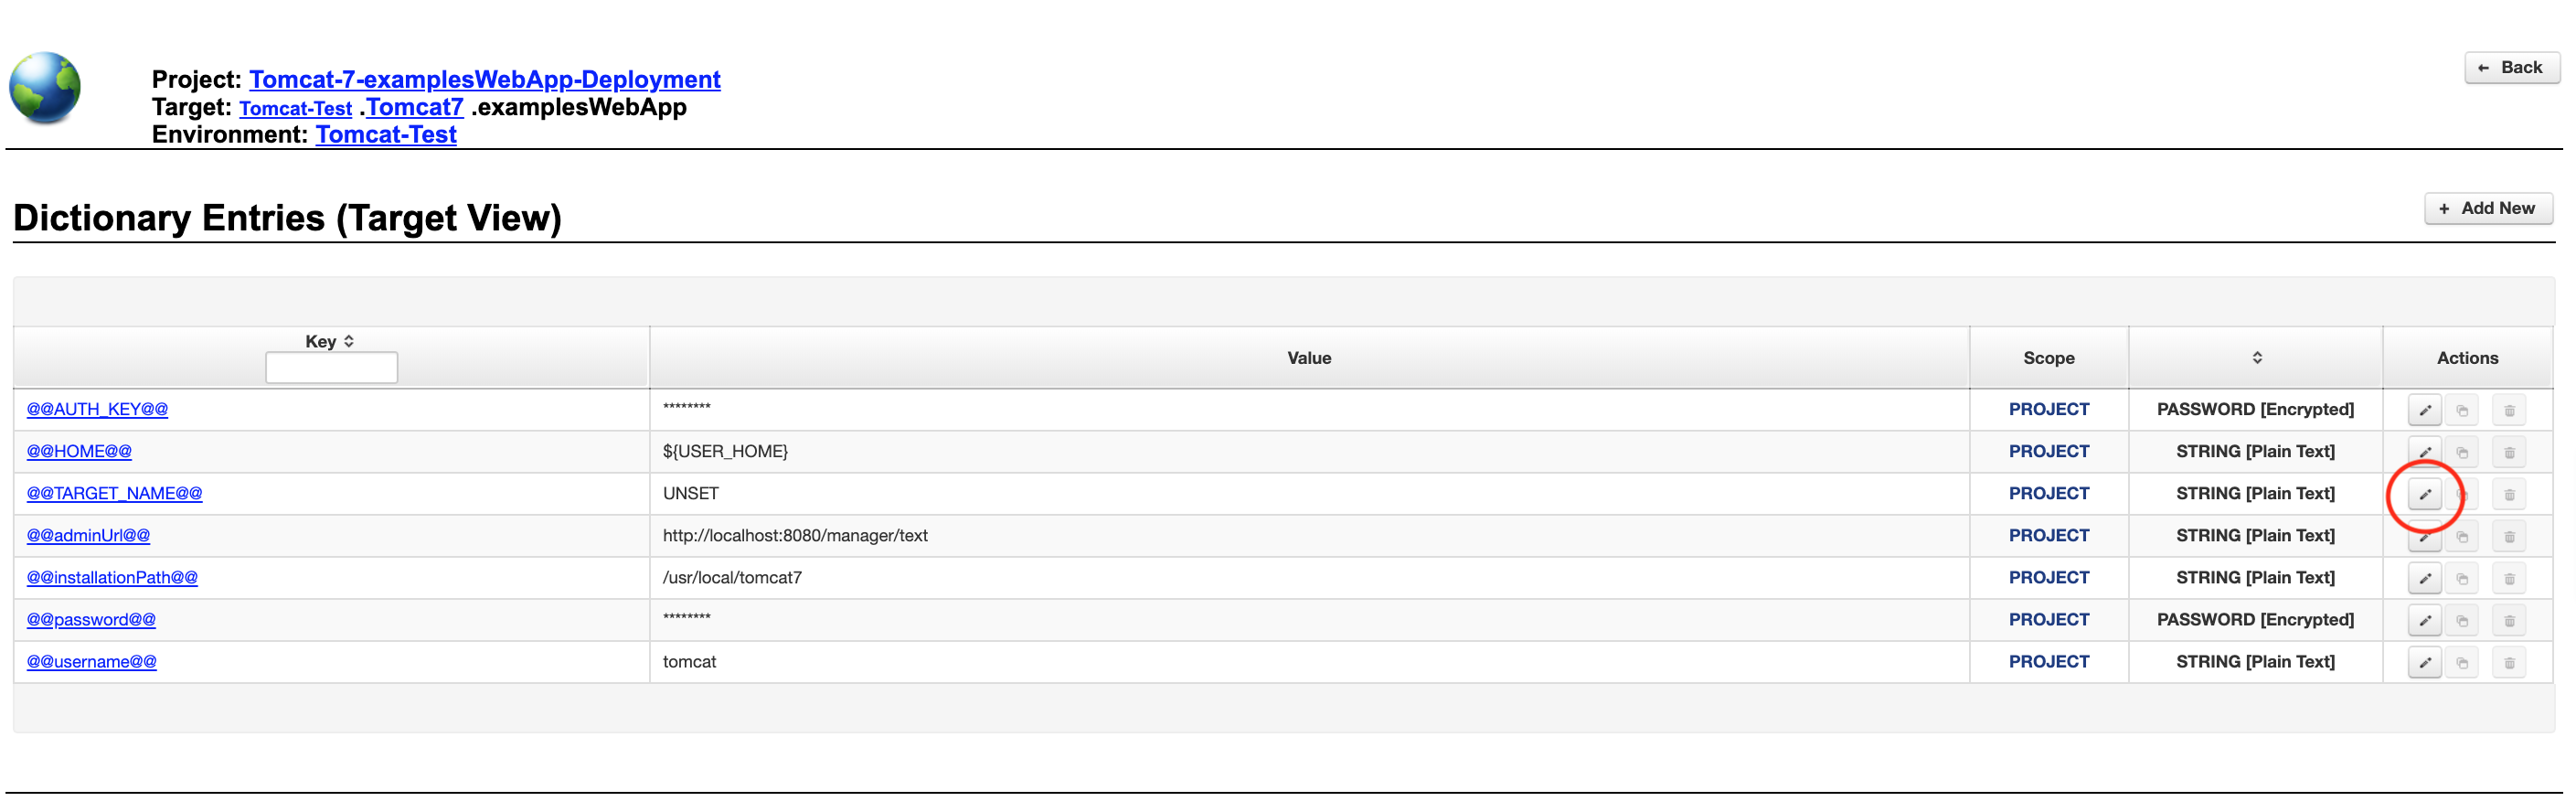
Fig. 12. Click to enlarge
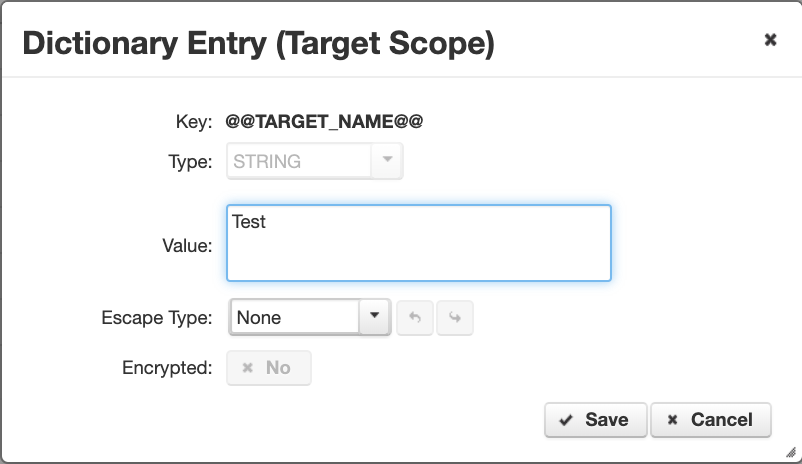
Fig. 13. Click to enlarge
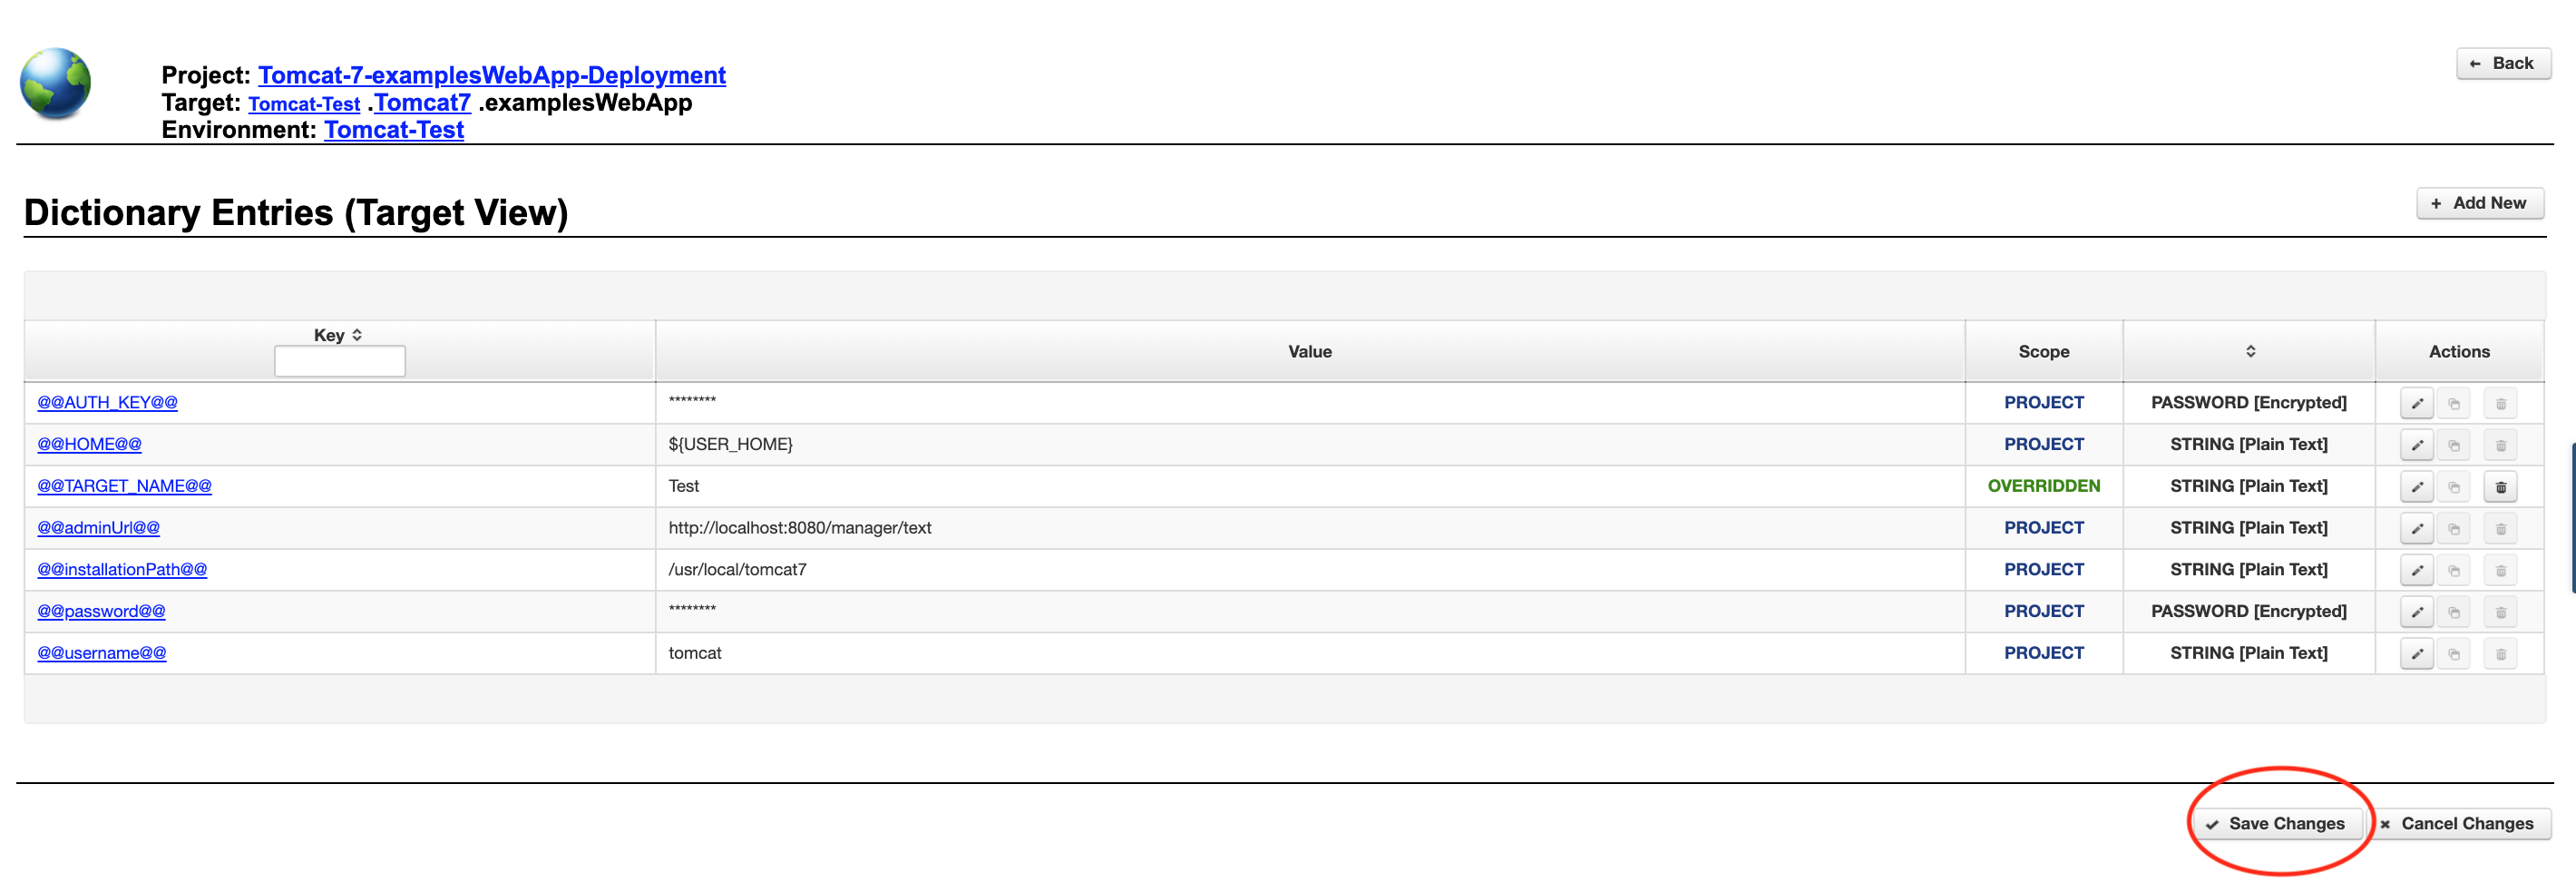
Fig. 14. Click to enlarge