Using Variables in RapidDeploy
How to use variables in RapidDeploy
There are four main types af variables that can be set in RapidDeploy, these being ‘Built-In‘ variables, ‘Data Dictionary‘ parameters, ‘Task Output‘ parameters and Server ‘Environment Variables‘.
Some tasks also allow you to set one or more task entries of type Variable, Property or XPATH.
We will consider each of these variables in the sections below.
Log File Output
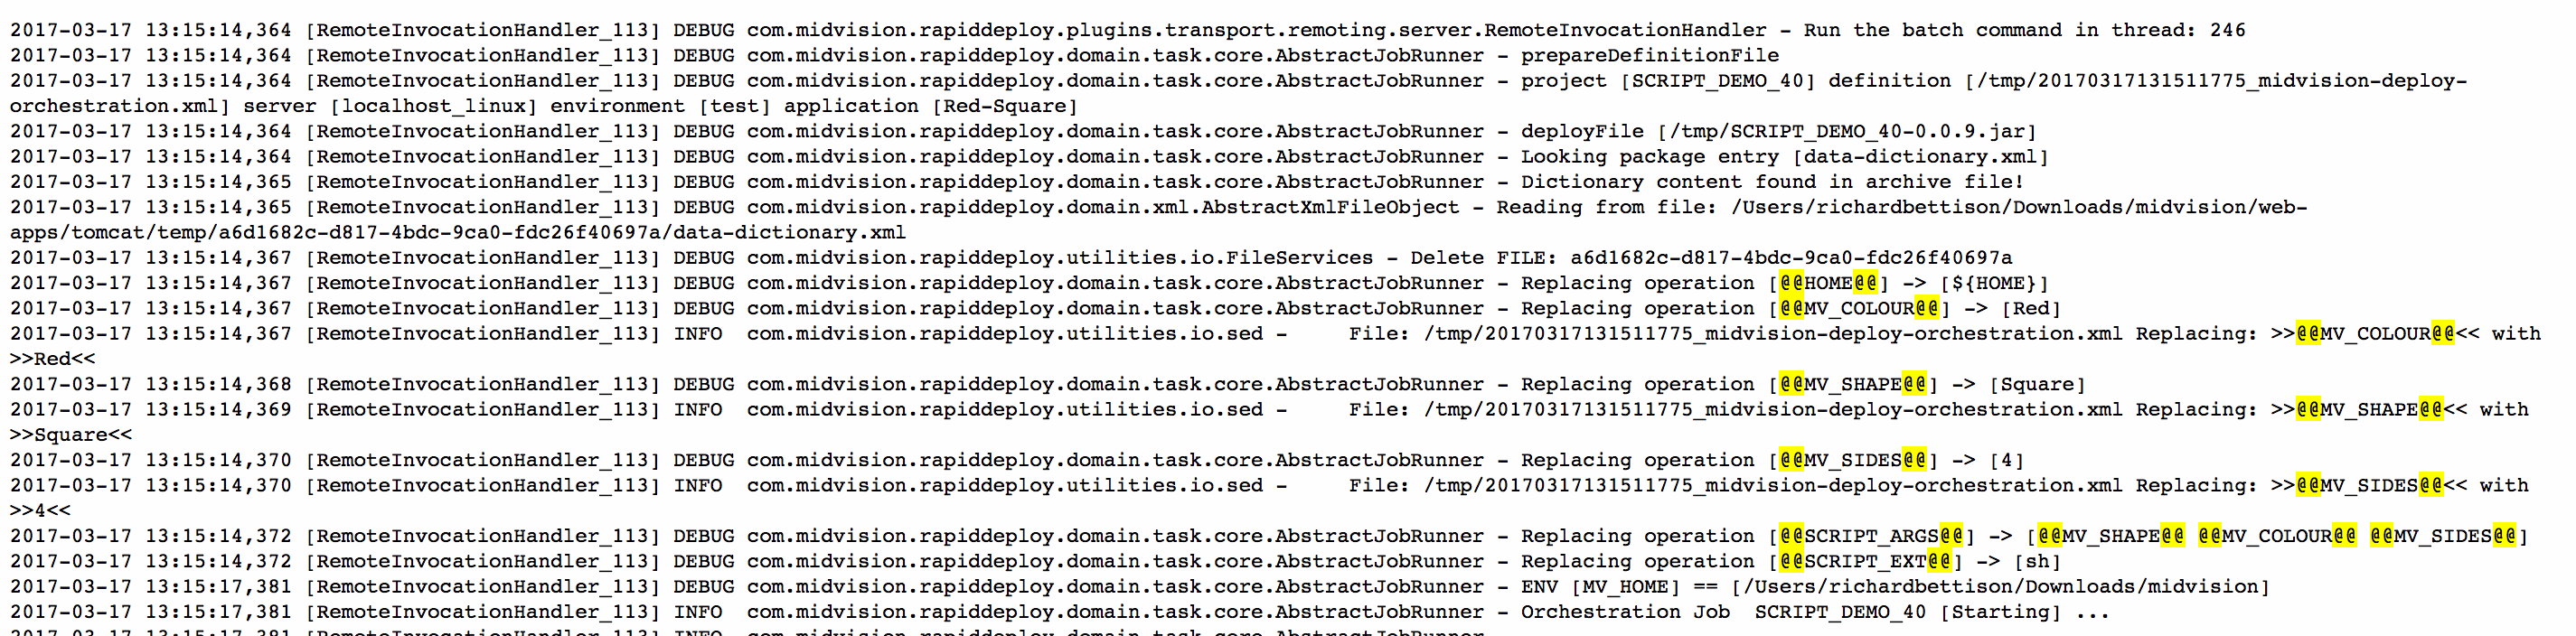
A job log snippet, showing initial Data Dictionary replacement for this run, using this target’s specific values.
1. Data Dictionary Parameters
Environment specfic values are injected into the model at deployment time using ‘Data Dictionary‘ parameters. You can specify Data Dictionary values anywhere in the Orchestration task flow, or in any other files in the project. They are written as syntax @@VARIABLE_NAME@@.
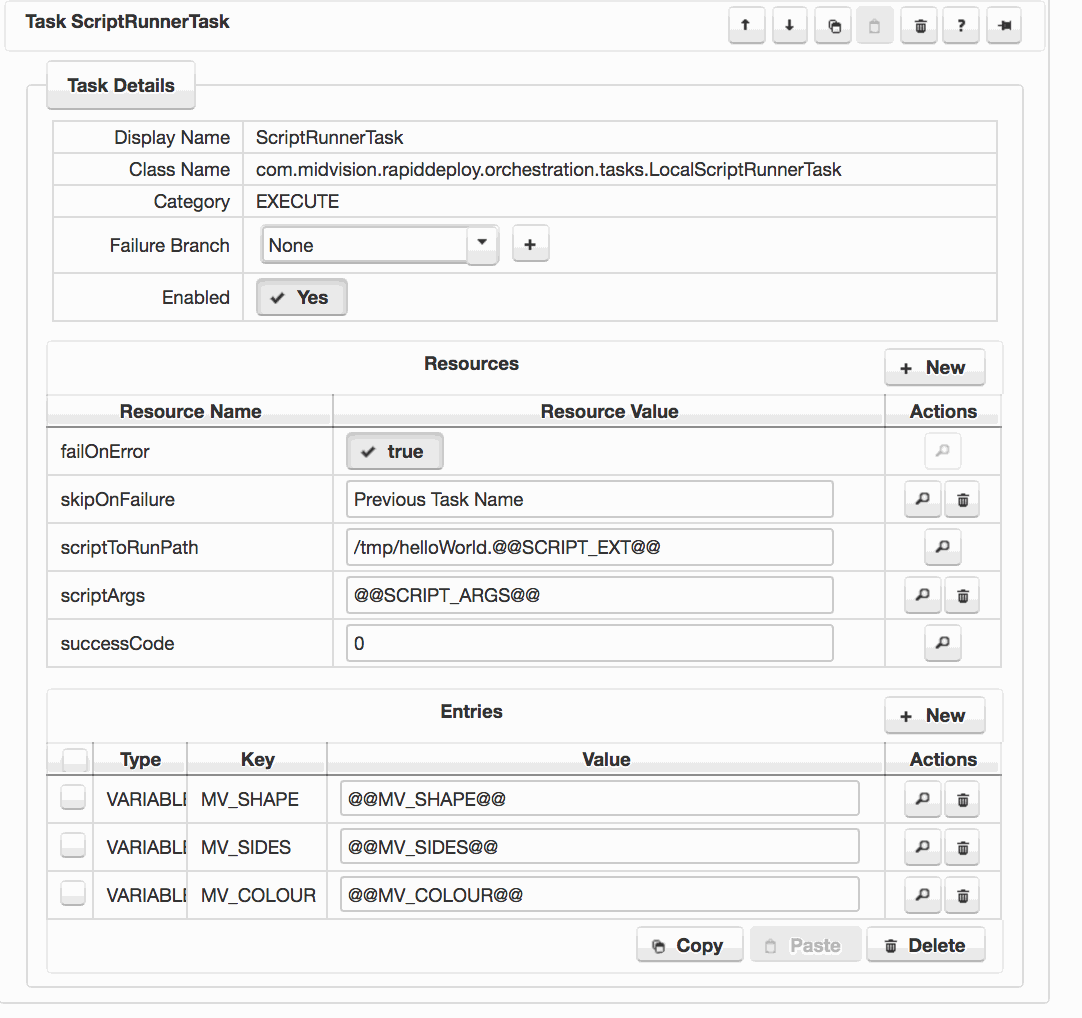
The screen shot to the right shows a task with several configured data dictionary values. These will be set to different values depending on the target that the model is being deployed to.
Data Dictionary values are scoped values that can be set at Resource, Project, Target and Job scopes. A variable at each scope can be overridden by setting the same variable at a scope lower down in the list.
- Resource Scope – Sets of data dictionary name value pairs can be set at the Resource Library scope and used by any project that selects this resource on the project general tab. These resources will be used by all targets unless overridden at the project or target scope.
- Project Scope – Any Data Dictionary values set at project scope are used by all targets, unless overridden by the target scope.
- Target Scope – Overrides Data Dictionary values at the project scope for a particular target.
- Job Scope – Overrides Data Dictionary values at the project and target scopes. Can be set when a job is called via the web services interface. User is prompted to enter Job Scoped Data Dictionary values in the UI if the value is empty at the Project and Target scope. This is called ‘Late Property Injection’.
If you specify a Data Dictionary parameter and save the project, the new parameter will be discovered and added to the project scope.
As shown in the above image, for each job you can easily see all of the actual settings for this run at the top of the log file (unless they are encrypted or password values).
You can set help text for any Data Dictionary entry so other users can see what it is being used for.
Click to enlarge
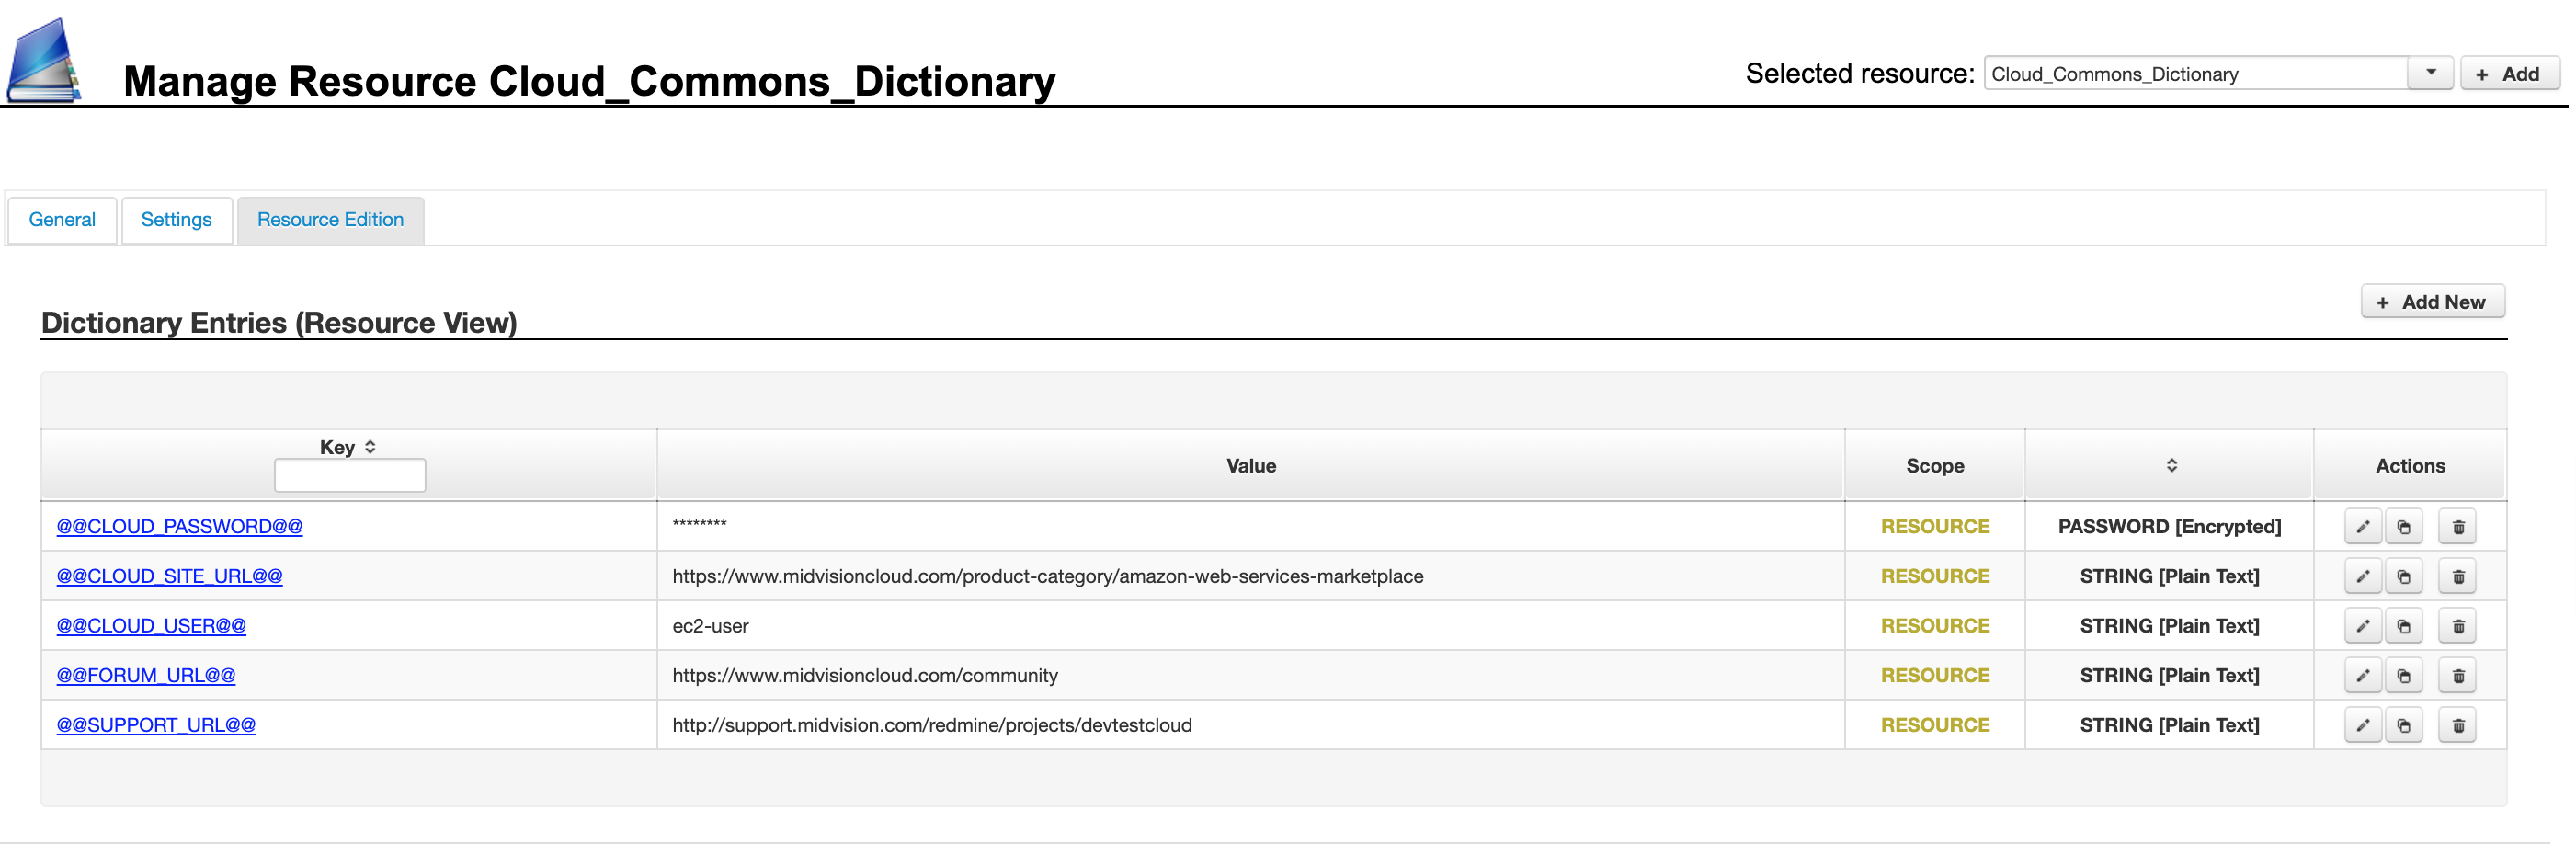
1.1 Resource Scope Data Dictionary
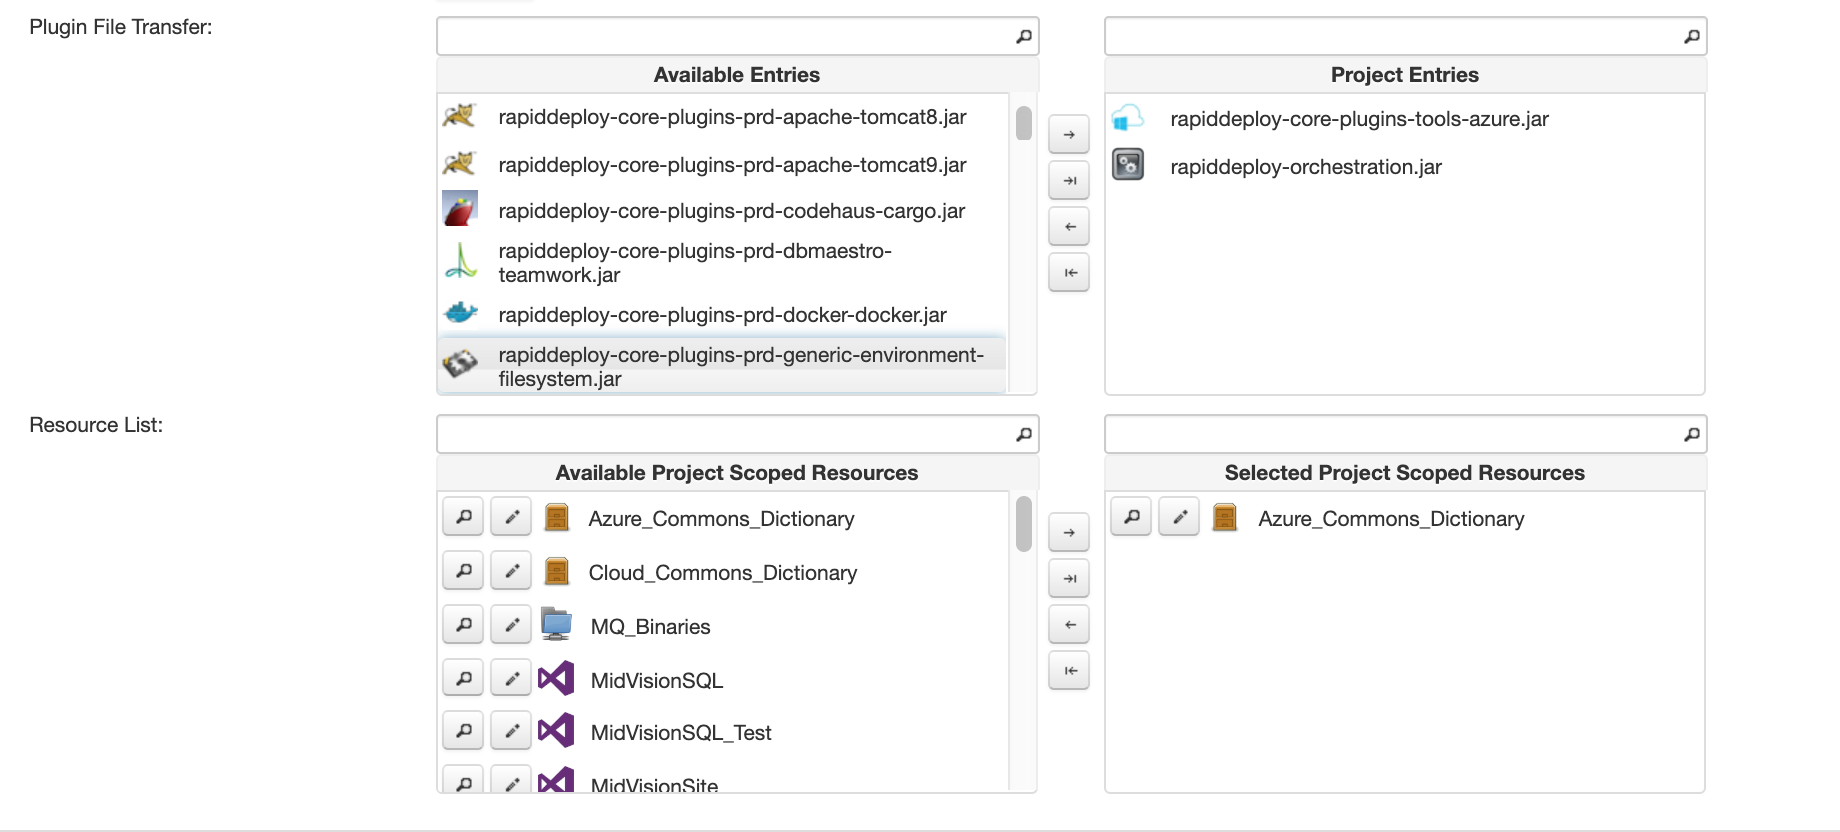
The first image shows the resource scoped data dictionary values on the resource library panels. You can use the resource scoped data dictionary variables by selecting them on the project general tab, as shown in the second image. If selected, the data dictionary values set in the library resource will be used unless overridden at the project, target or job scopes.
Click to enlarge
Click to enlarge
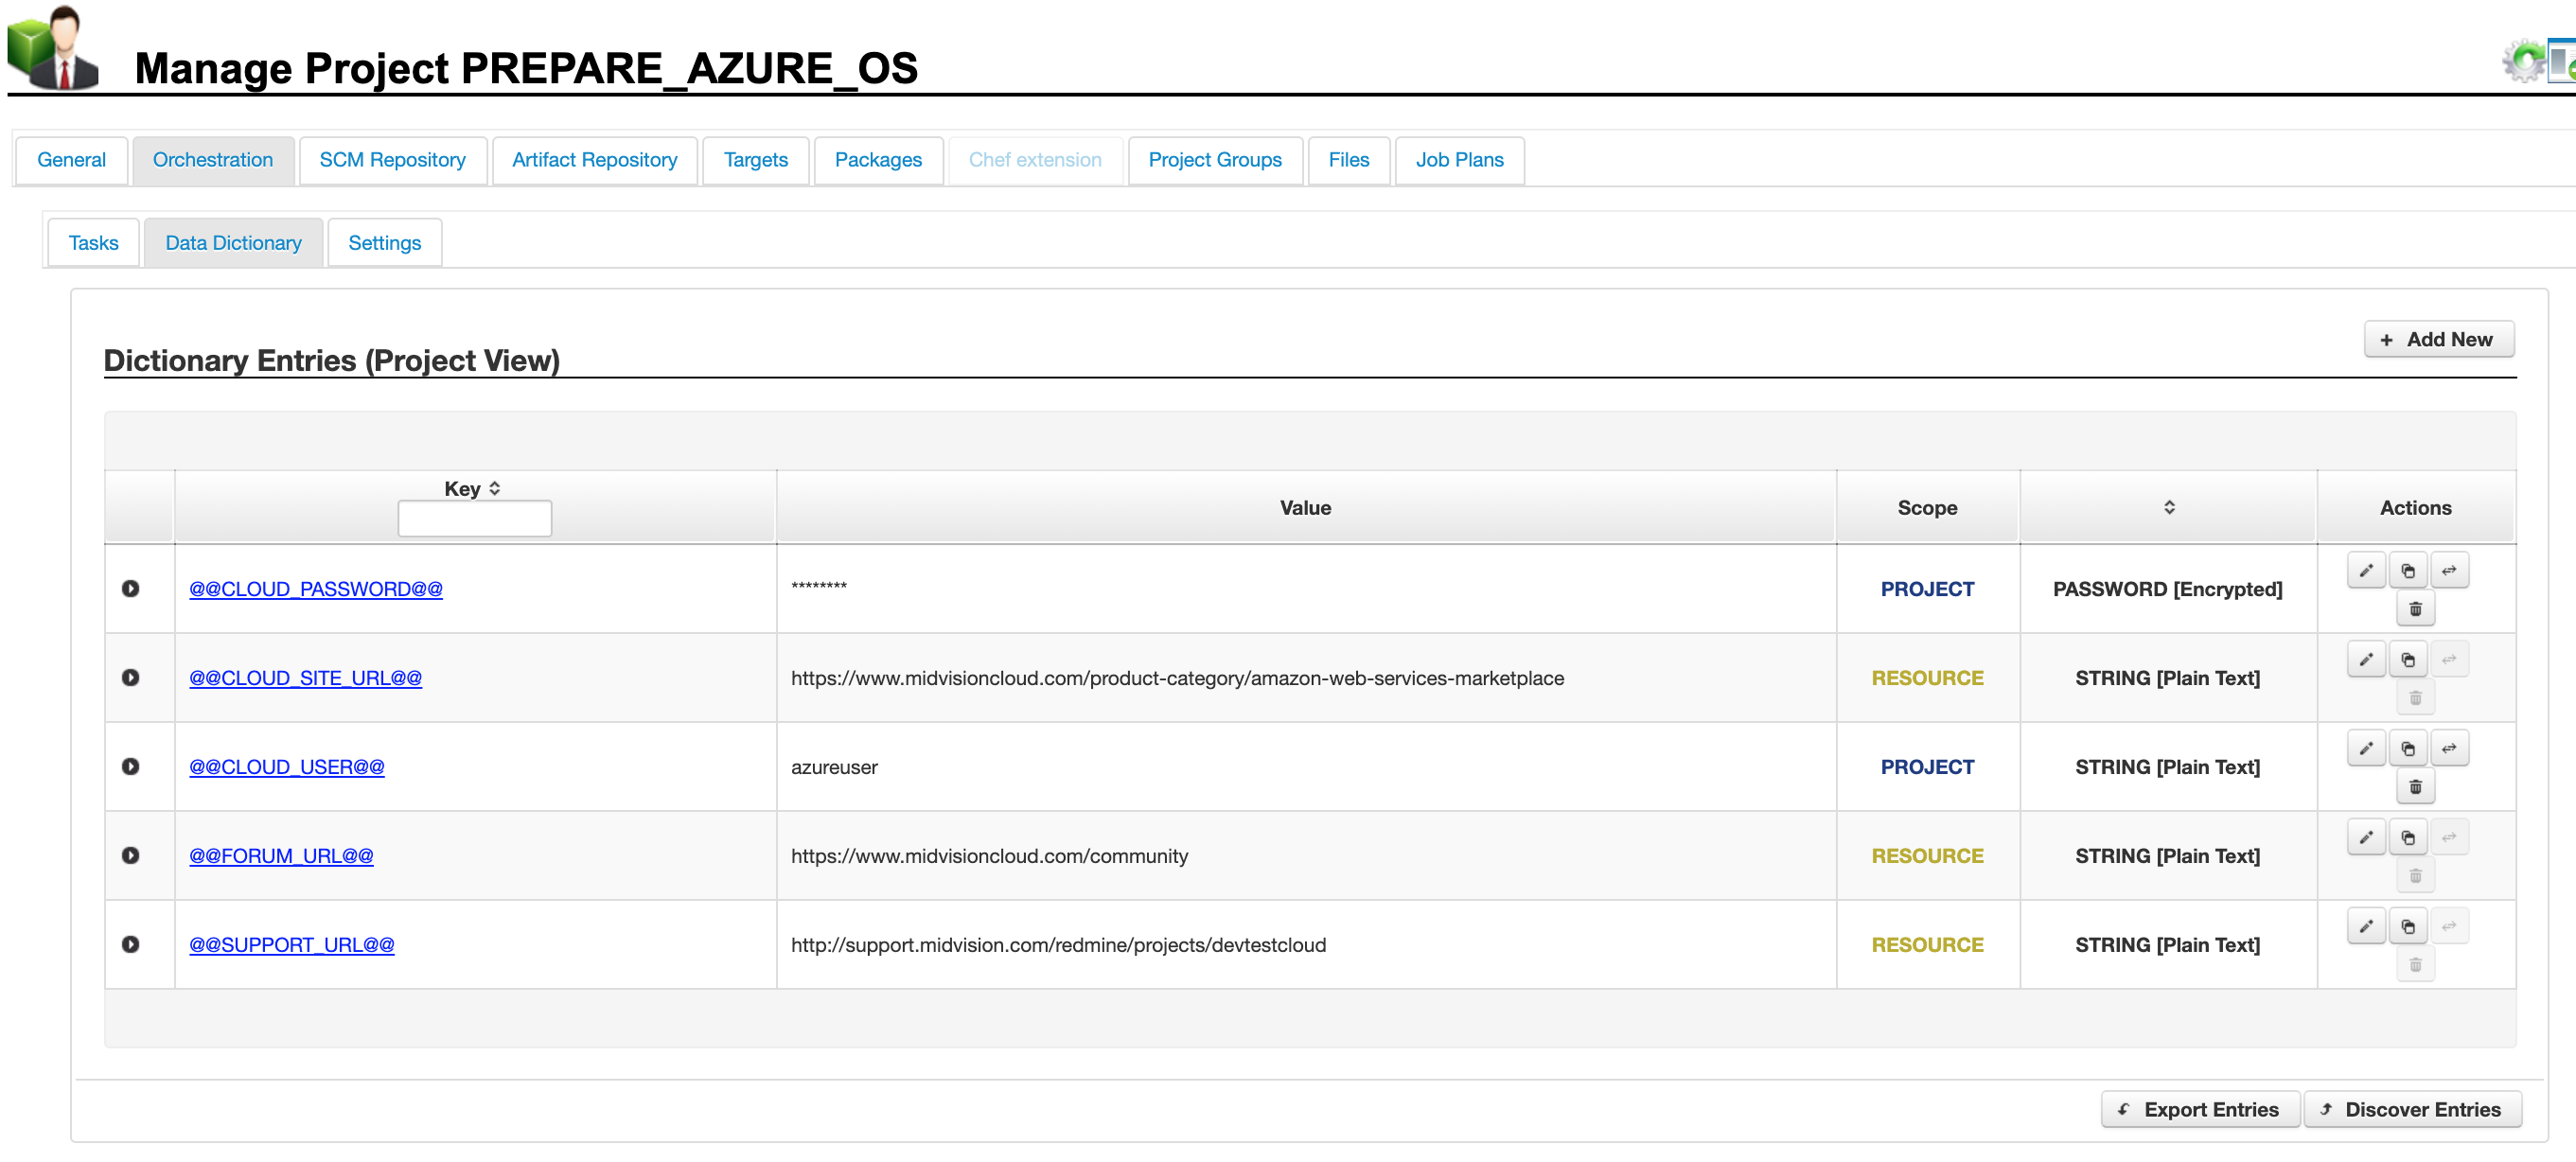
1.2 Project Scope Data Dictionary
This panel shows the project scoped data dictionary values. Some have been set at this scope (Project in blue) and some are inherited from the Resources scope (Resource in yellow). These values will be used unless overridden at the target or job scopes.
Click to enlarge
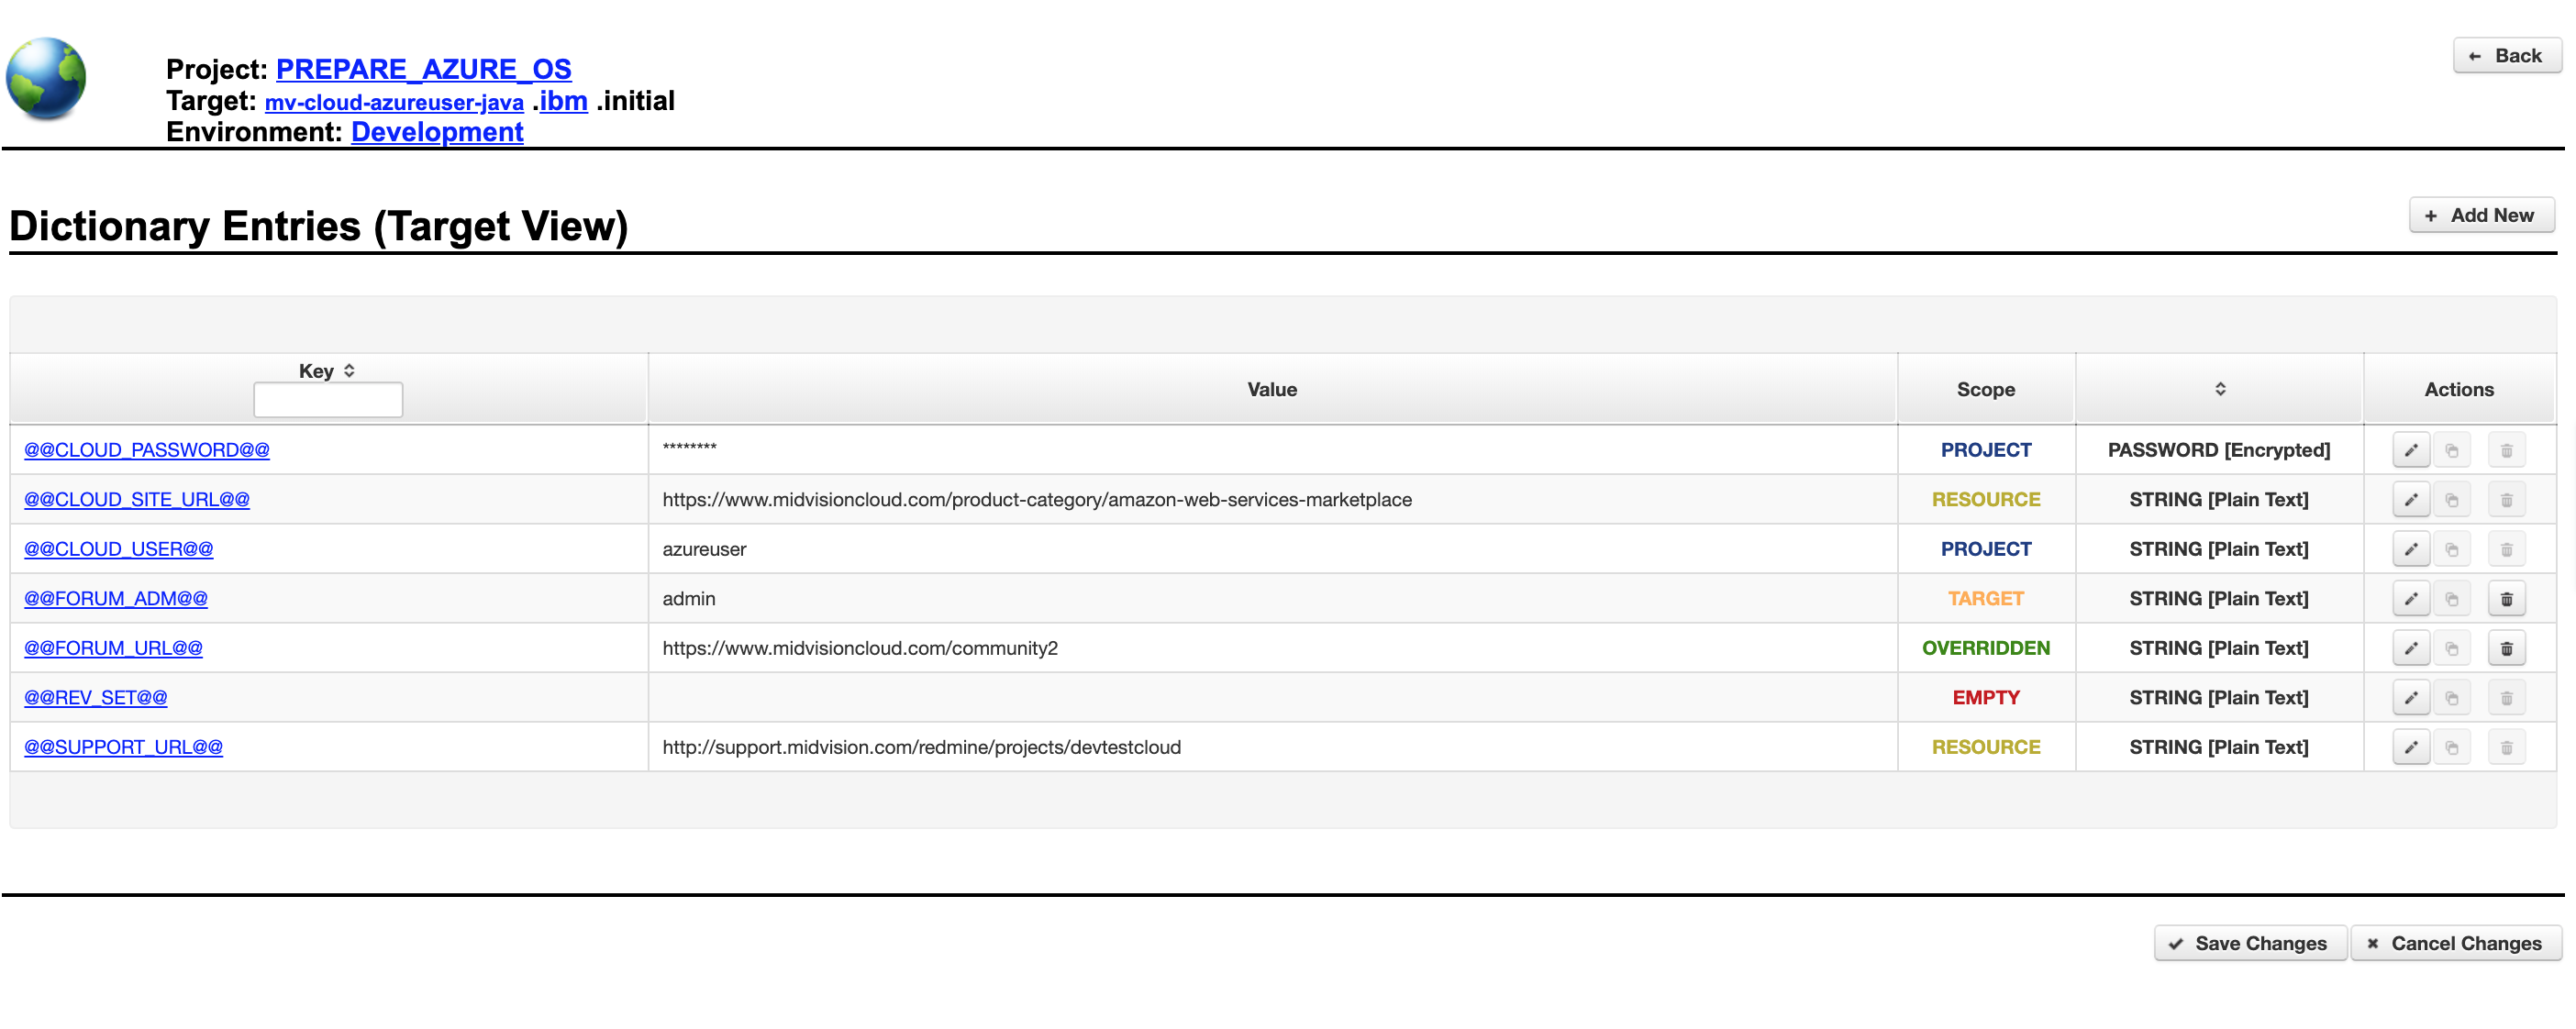
1.3 Target Scope Data Dictionary
This panel shows the Target scoped data dictionary values. The colour coding makes it is easy to see which values are overridden, and which are inherited.
The red ‘Empty’ indicates the value is empty at all scopes. We call this ‘Late Property Injection‘. The user is prompted to enter these values at deployment time, although they can elect to leave them blank
The green ‘Overridden’ means a variable at a higher scope (Resource or Project) has been overridden at this scope.
The blue ‘Project’ means the value is inherited from the project scope.
The yellow ‘Resource’ means the value is inherited from the resource scope.
The orange ‘Target’ means the value has been set at this scope only and therefore may not exist on any other targets.
Click to enlarge
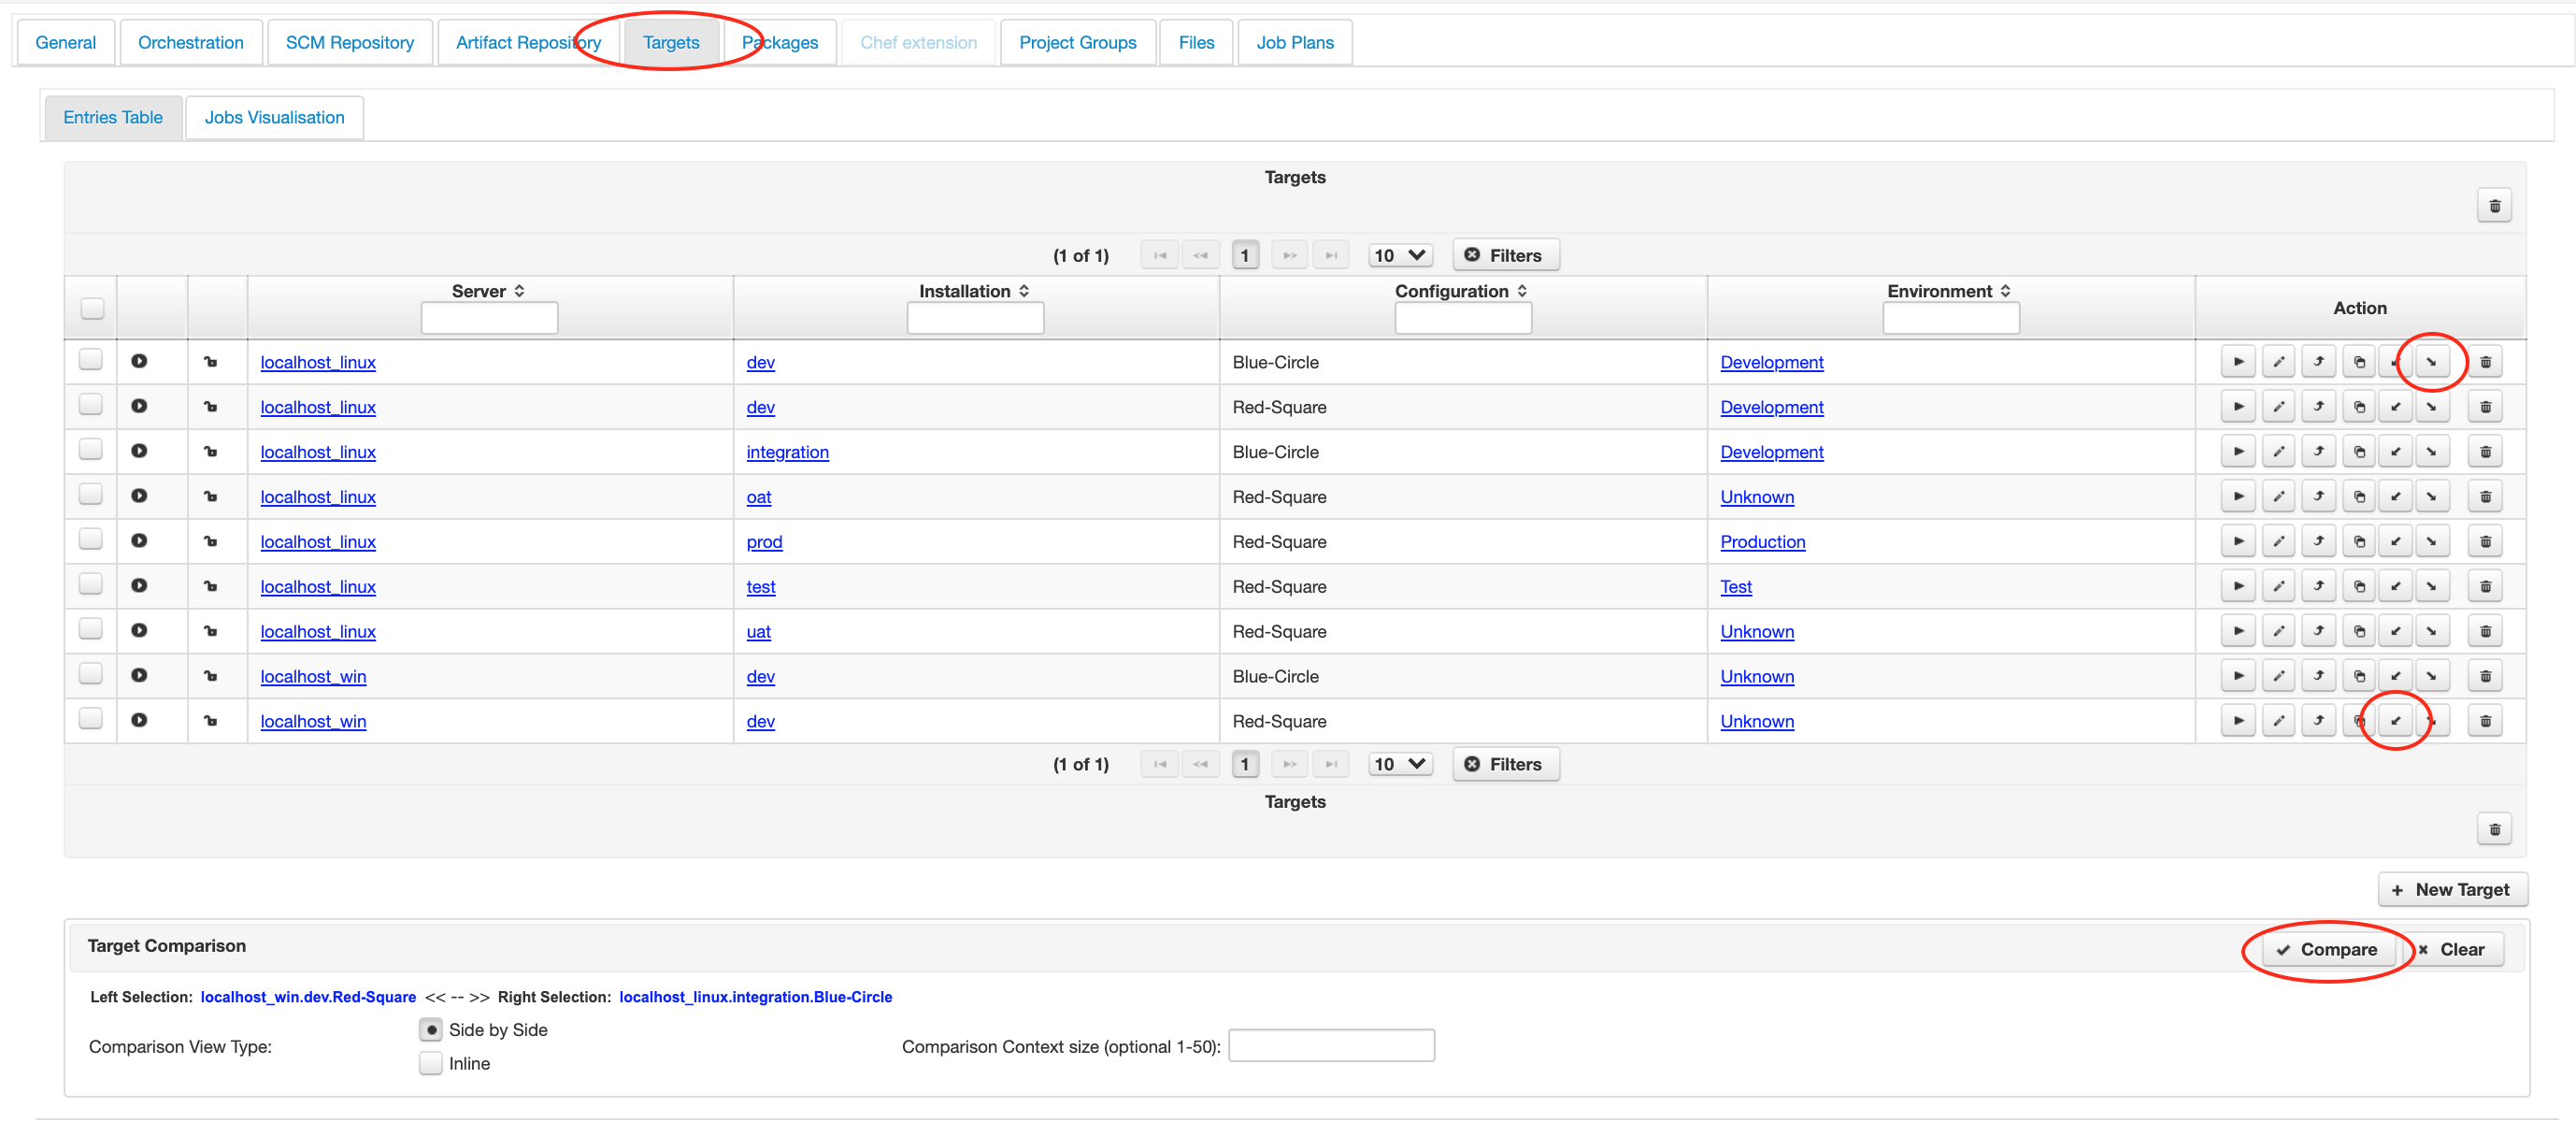
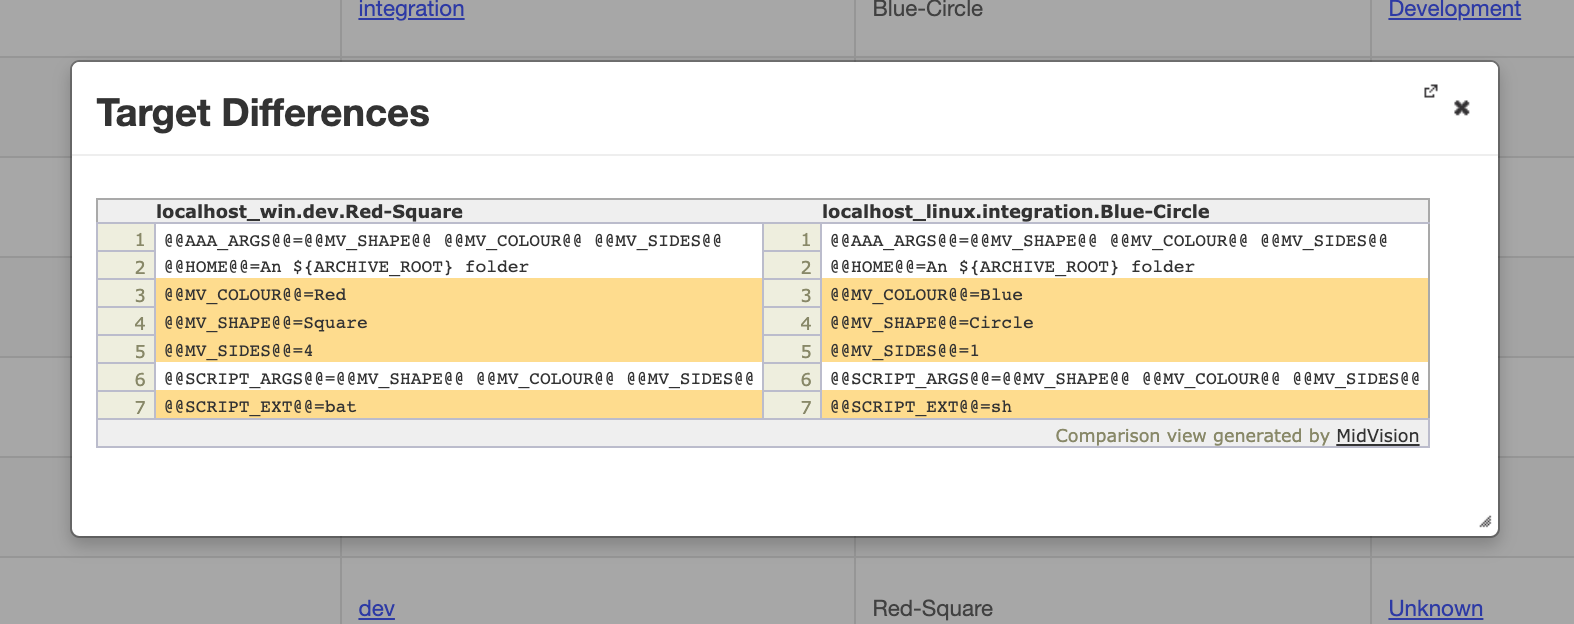
1.4 Comparing Data Dictionary settings for different targets
This panel opposite shows the ‘Targets’ tab with the configured targets for a project. You can select two targets to compare using the ‘Select Left’ and ‘Select Right’ buttons (as shown) from the ‘Actions’ column. Then select the ‘Compare’ button in the bottom right of the screen. A modal dialog is displayed with the differences between the two targets shown in Orange (changed), Red (deleted) or Green (new). An example is shown in the panel opposite.
Click to enlarge
Click to enlarge
2. Built-In Variables
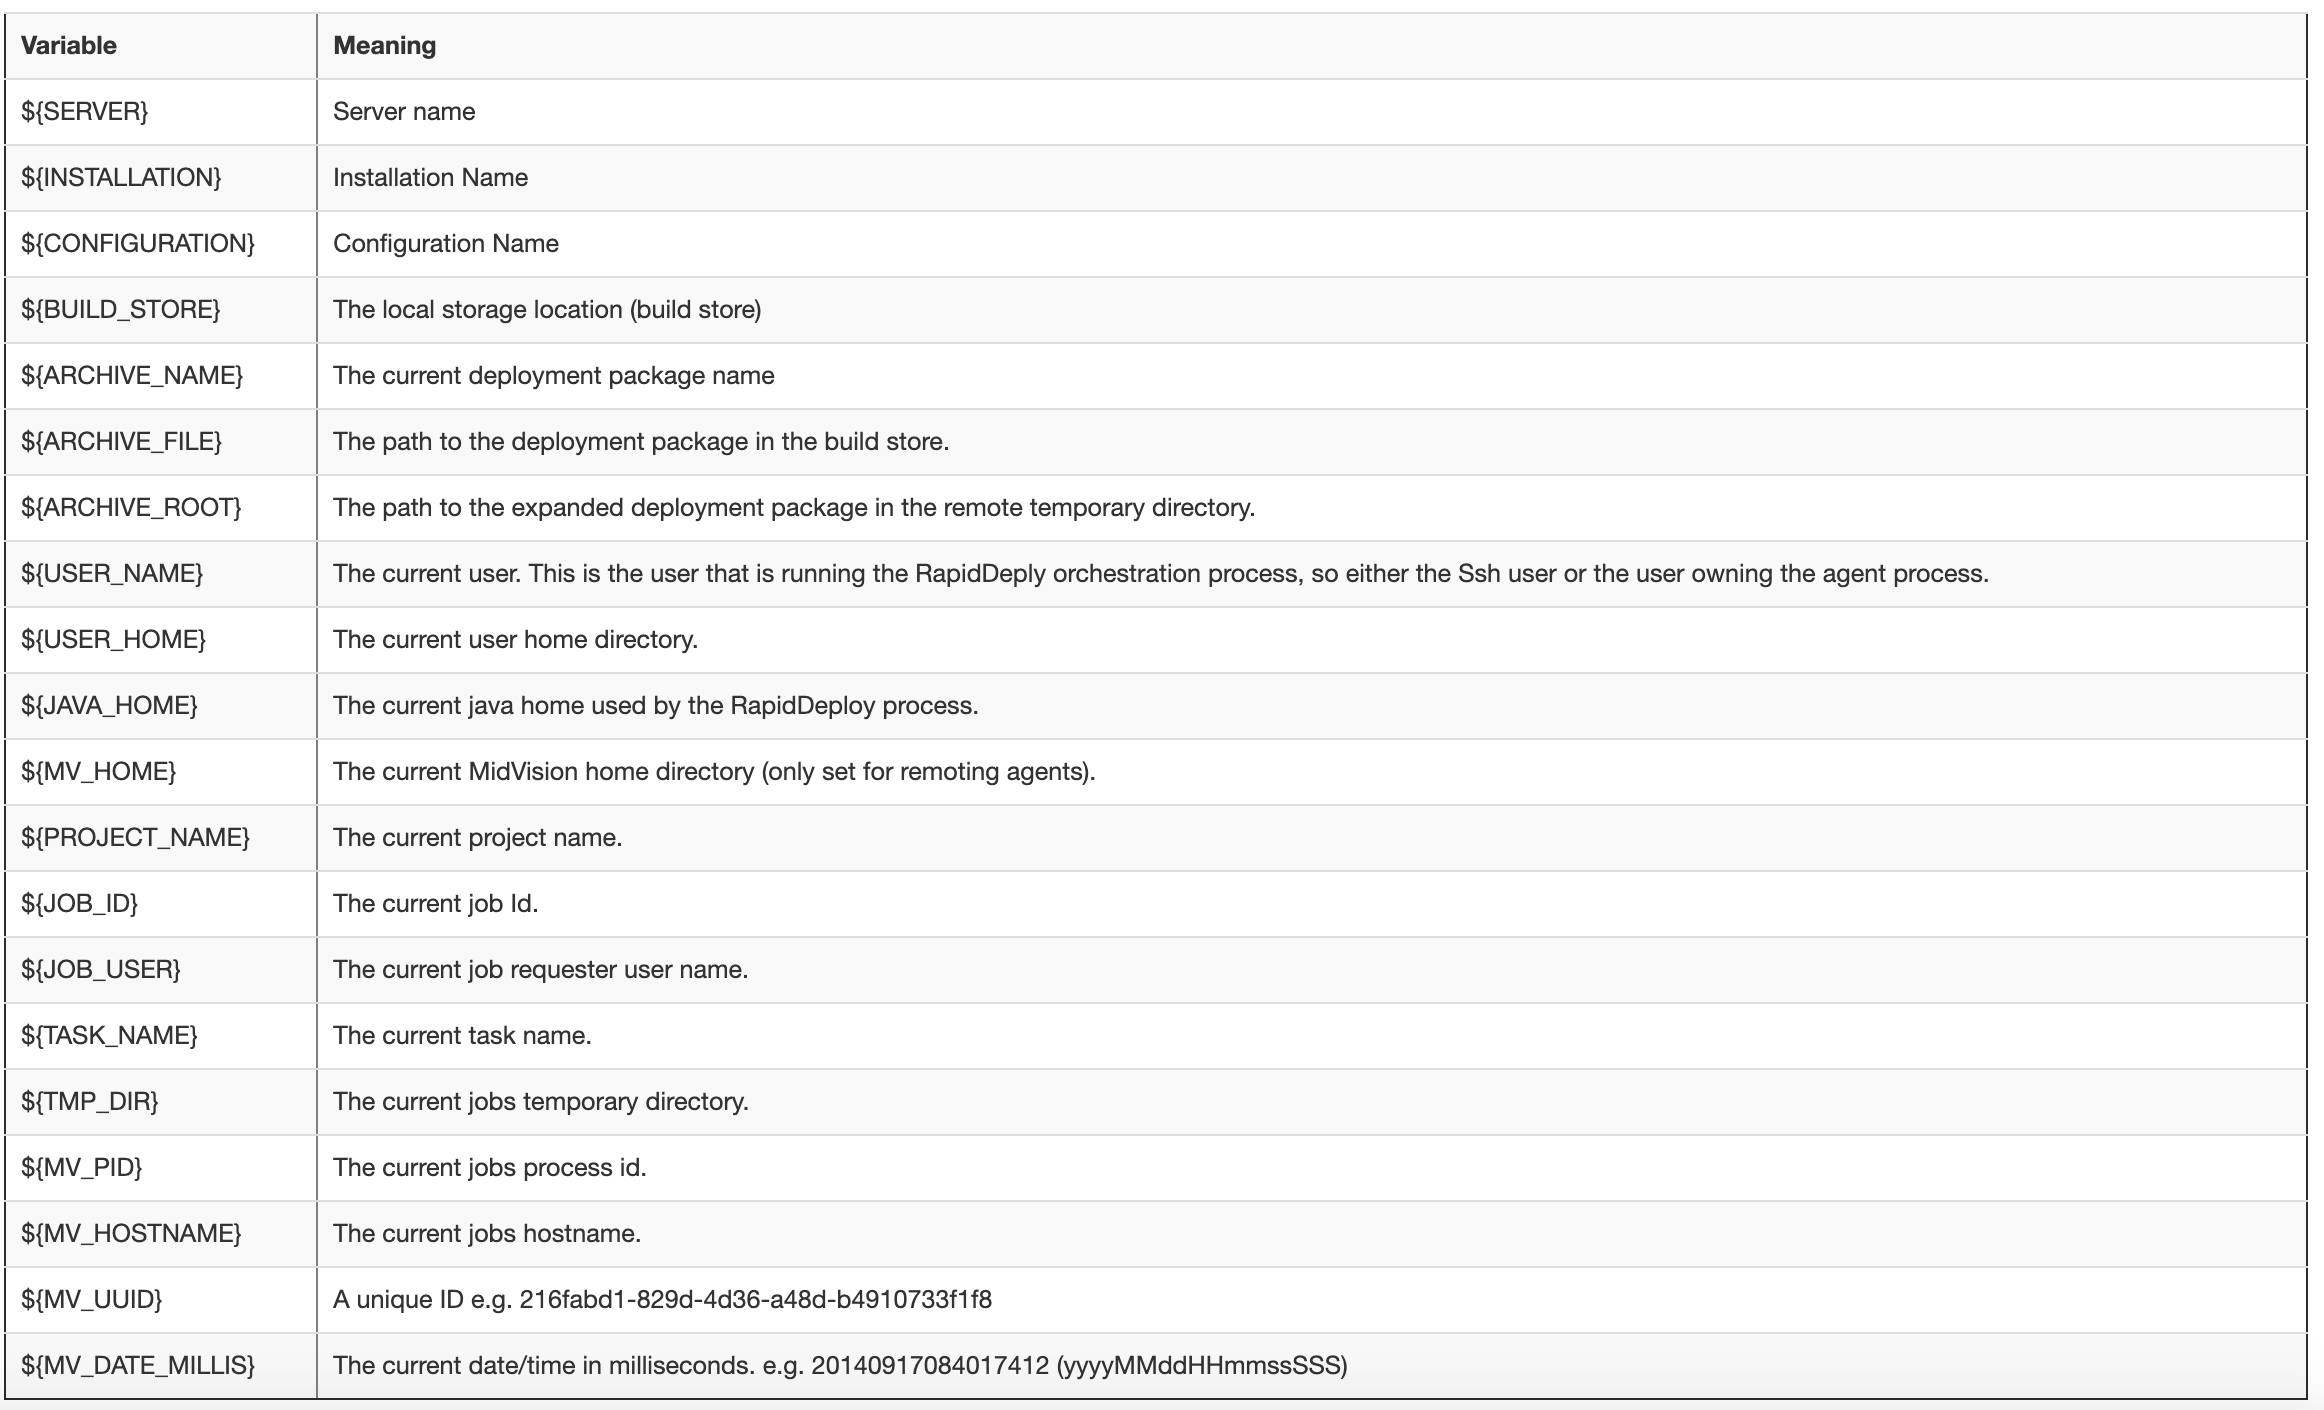
RapidDeploy supports a number of ‘Built-In’ variables that can be used in any task resource field. Built in variables are always referenced as ${VARIABLE_NAME}, irrespective of platform.
These variables are designed to give the user easy access to job specific values that would otherwise be hard to obtain. For example the ${ARCHIVE_ROOT} variable always points to the root folder of the expanded deployment package on the target server. This is useful since this folder is always expanded into a temporary location which includes a uniquely generated UUID. We can reference any resources in our deployment package with ${ARCHIVE_ROOT}/path/to/resource.
A list of current built-in variables is shown in the screenshot.
Click on the image to enlarge.
Click to enlarge
3. Task Output Parameters
Most tasks support one or more outputParameter(s) which are used to capture the output of a task, for use as inputs in any fields in later tasks.
The outputParameter is always specified as ${OUTPUT_PARAMETER_NAME} and can be used as an input to any later task fields, with exactly the same name.
The user can use the default name that comes with the outputParameter field, or change it to their own one.
The name of the output parameter may vary. THe help text associated with the field will alert you to the fact that this field is for an output. Some common examples are:
- outputParameter
- resultParameter (typically a string representation of a boolean i.e. ‘true’ or ‘false’)
- outputResult (typically a string representation of a boolean i.e. ‘true’ or ‘false’)
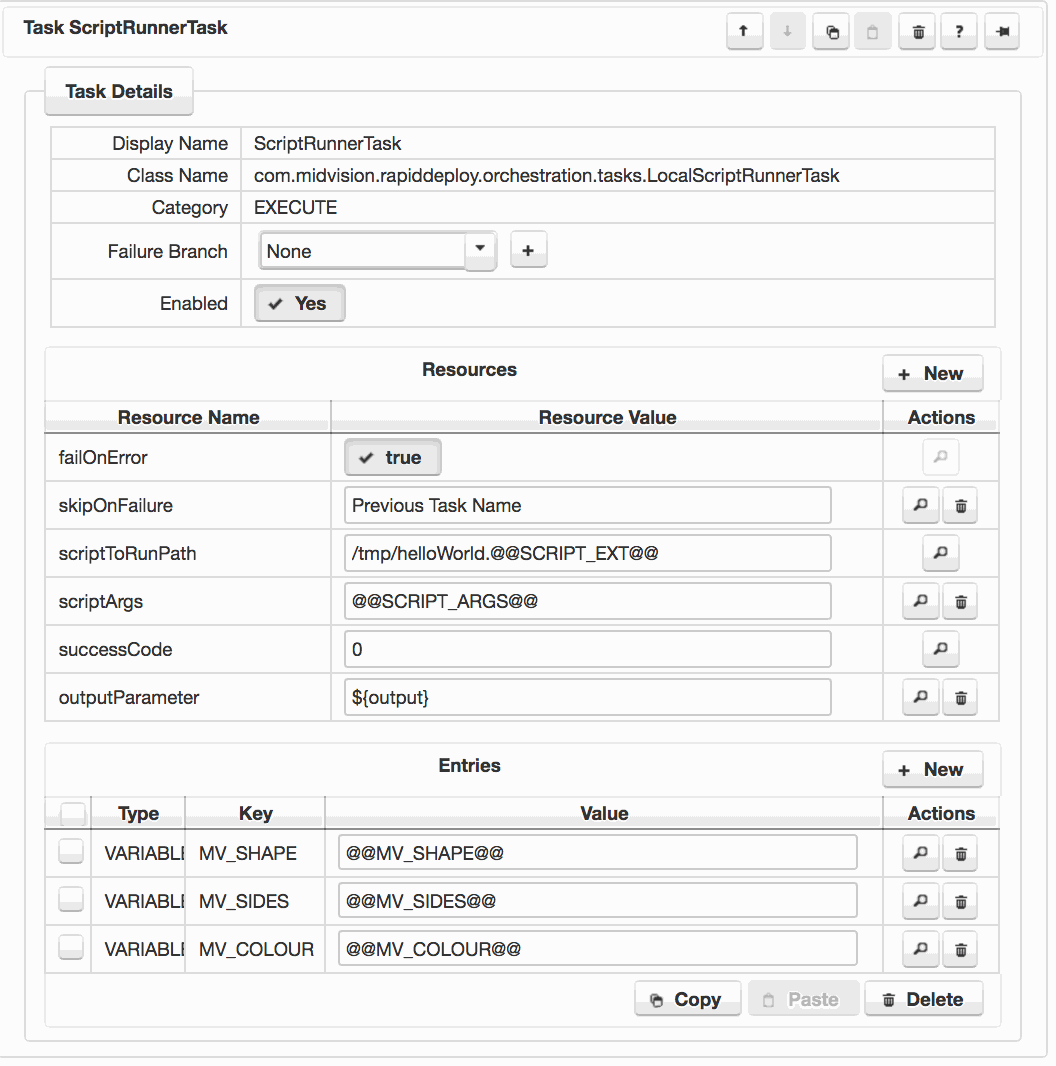
In the image opposite, the outputParameter is the default for this task of ${output}, which can be used in any field of any downstream task. It contains the output from the script being run.
Click to enlarge
4. Server Environment Variables
For connections to target servers via SSH, you set server environment variables on the server panel for your target server(s). These variables override any variables set in the SSH user shell on the target server, but are themselves overridden by any task Variable entries.
More information can be found on the server configuration page.

Click to enlarge
5. Task Entries
Some tasks allow the setting of one or more ‘Task Entries’ which are used in different ways depending on the type of the entry.
You may add as many entries as you like. Entries can be of three different types. The task help will tell you which type is valid for the current task
- VARIABLE – sets environment variables in the shell for this script or process being run. Used for script/command runner type tasks.
- PROPERTY – set a property key and associated value. Often used for search/replace type tasks.
- XPATH – Set an XPATH expression as key, and a replacement as the value. Used for the XPATH search/replace task.
In the image opposite, you can see an ‘Entries’ section at the bottom of the ‘ Task Details’ panel. These entries are of type ‘VARIABLE‘, and so will set environment variables in the shell that is used to run the script defined in this script runner task. These variables will override any other server environment variables if set on the target server or in the RapidDeploy Server environment variables definition.
Click to enlarge
6. Job Plan Variables
Two RapidDeploy orchestration tasks allow you to set and get job plan variables. This means that the output parameters from one job in a job plan can be passed into later jobs in the same plan.
- Set Job Plan Variable – Takes a variable from your orchestration and elevates it to the Job plan scope, so it can be used later on in your pipeline by a different job (project target). You can use this task multiple times to set as many different variables as you want.
- Get Job Plan Variable – Get a previously set variable from an earlier job (project target) in the job plan and use it in the current job by assigning it to an orchestration parameter (equivalent to a task output parameter).

Click to enlarge
7. Order of evaluation of variables
Variables of the form ${VARIABLE_NAME} are evaluated as according to the following precedence:
- The system will first try to reference the variable from the list of built-in variables. If the variable name matches a built-in variable, then this will be used at runtime.
- Where you reference a variable that does not match a built-in variable, then the system will next try to reference the variable from the list of task output parameters. If the variable name matches a task output parameter, then this will be used at runtime.
- Where you reference a variable that does not match a built-in variable or task output parameter, then the system will next try to reference the variable from the list of java properties set for this execution. If the variable name matches a java property, then this will be used at runtime.
- Where you reference a variable that does not match a built-in variable, task output parameter or java property, then the system will next try to reference this variable as an operating system environment variable. If the variable name matches an environment variable set or inherited in the shell running the deployment process, then this environment variables value will be used at runtime.